🎯 Spray Like a Pro, Finish Like a Boss
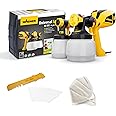
The Wagner Universal Sprayer W 590 FLEXiO is a powerful 630W paint spray system designed for both indoor and outdoor use. Featuring a large 1300 ml container and a 15-meter hose, it enables fast, uniform coverage of up to 15 m² in 6 minutes. Its FLEXiO technology and patented I-SPRAY nozzle ensure flawless application of a wide range of materials, from latex paints to high-viscosity varnishes, while adjustable settings and a separable gun make it versatile and easy to clean.


| Manufacturer | Wagner |
| Part Number | 2361538 |
| Product Dimensions | 28.5 x 15.5 x 39 cm; 3.1 kg |
| Item model number | 2361538 |
| Colour | Yellow/ Black |
| Style | W 590 |
| Material | Metal |
| Pattern | Single |
| Power Source | AC |
| Voltage | 230 Volts |
| Wattage | 630 watts |
| Item Package Quantity | 1 |
| Number of Pieces | 1 |
| Hose Length | 15 Metres |
| Cord length | 1.5 Metres |
| Usage | Amateur, Inside, Outside |
| Included Components | Paint spray gun, hose, and paint container |
| Batteries included? | No |
| Batteries Required? | No |
| Item Weight | 3.1 kg |
Trustpilot
1 month ago
1 month ago