Desert Online General Trading LLC
Dubai, United Arab Emirates
Desert Online General Trading LLC
Dubai, United Arab Emirates


🔧 Ignite Your Drive with Confidence!
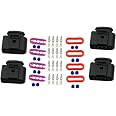
The Alpha Rider Ignition Coil Wiring Harness Connector Repair Kit is designed for various vehicle models, including A4, A6, GOLF, and more. This comprehensive kit includes four sets of ignition coil connectors, crafted from durable copper, ensuring a reliable and efficient connection. With all necessary components included, this repair kit is essential for restoring your vehicle's performance and eliminating driveability issues caused by broken or corroded connectors.
| Manufacturer | Motofans |
| Brand | Alpha Rider |
| Item Weight | 1.76 ounces |
| Package Dimensions | 4.33 x 3.62 x 1.34 inches |
| Is Discontinued By Manufacturer | No |
| Manufacturer Part Number | LY006-Audi-0816-ARLGX |
J**G
MK4 VW and Audi TT 8N Coil Plug Direct Replacement!!!
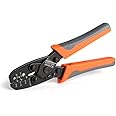
Get a decent depinning tool to go with this and you're set. This kit includes the metal crimps and rubber seal if you wish to replace those, but usually that part is fine. If you use the depin tool and pop the old ones out, the new plug will slide right on and click into place. These appear to be almost identical to oem save for a few manufacturing marks. Might I suggest purchasing some heat shielding to try to help from extend the life of these new ones.
D**N
Don't plan on a simple repin: get a crimper.
This kit won't help you to repin the old pins in new shells: the new shells expect the included smaller pins (see photo: new pin on right), and won't fit the old bigger pins.That may not be a problem for you though: when I tried my de-pinning tools on the old connectors, I found them brittle, and each shattered instantly. This is probably due to their age, and the high heat environment they work in. When an old shell crumbled, I was able to pull the old pins back out easily.Suggestions:1. You need a quality wire stripper, flush cut nipper, and the right crimp tool(s). Flush-cut an old pin off, strip it of about 3mm insulation, put the new rubber plug on the wire, insert a pin in the crimper (I used a1.9mm crimp aperture; 2.0mm might be better), put wire in the pin and crimp. You next need to crimp the pin's strain relief onto the insulation. I didn't have a crimper that would do this part, so improvised with needle nose pliers.2. Do one shell and one pin at a time: The package includes only 16 new pins. If you instead cut everything off first (SUCH a bad idea!) and drop a pin down the back of the motor or booger one up, you now have a disabled vehicle 'til your next Amazon shipment. Would be nice to have some spares.3. Throw a light-colored towel over the work area to catch tiny parts and tools you drop. Fix it to the firewall, maybe with a clamp. Tuck it under the wiring harness.4. Bring plenty of light, and if your eyes aren't god-like, bring a magnifier; head-mounted is good.5. Carefully un-snap and remove the plastic wire loom from the coil pack connector wire bundle before you start. Having all 4 connector shells freed from the loom is a real sanity booster: you'll have enough room to work.6. Take a phone picture of the connections to each coil pack before starting, so you have a reference for reassembly of the connector shell.Hope this helps someone!
D**N
Strong and Firm, but hard to install.
Please know that this is not a plug and play installation. You will need to remove all the connectors completely. Just know its gonna take a couple hours. My advise is to do it 1 wire at a time if you dont have a detailed electrical diagram. I installed these on a Audi Q5. Much better than the factory connectors that had completely fallen apart.
G**N
They did fit
They did work but the rubber seal was a little fat and wouldn’t let it lock into place I had to use the original one and it worked fine
E**N
Do not buy, completely wrong wire gauge
For starters, the terminals are not factory style, they are a generic terminal (forgive me, but I forget the style name, not a molex or amp terminal, but still widely used). If you are expecting to just use the plug bodies, you cannot. So if you use the included terminals, you must have the proper crimp tool (mine is a Blue Point PWC47 from the tool truck at work, so it's not a cheap crap set of crimpers). But the largest issue is that the wire gauge is completely wrong. Factory looks to be at least 16ga and these terminals look to be for about 22-20 gauge so they do not crimp on properly. I'm going to have to bring my soldering station out to the garage to properly secure the terminals to the factory wire. Stupid. Even the little shield wire didn't crimp that well to be honest. The terminals are just junk. I don't have time to wait on proper parts from the dealer, but do yourself a favor and don't be cheap like I was on this and just get the plug body from VW or Audi.I'm working on my son's 148k mile 2004 A4 1.8t quattro for a data point.
M**K
Good quality great price
Good fit and quality. Everything needed to replace your broken connectors except the wire covers that go over the back. Wish they came with them but I was able to reuse mine.
D**R
Smaller terminal connectors than VW/Audi. Garbage.
I have done several 2.0TSI/TFSI with oem and aftermarket connectors and these don't even come close to serviceable... If you installed these, I would replace them in your own time... Before you HAVE to replace them to fix a DOA car.
C**L
Easy install and great value
A VW/VAG terminal tool and 10 minutes was all it took to replace my old brittle and busted connectors. Kept the pins and seals for later. Great deal!
Trustpilot
1 month ago
2 months ago