
DOWNLOAD THE APP


Customer Services
Copyright © 2025 Desertcart Holdings Limited
DOWNLOAD THE APP


✨ Connect Brilliance Effortlessly 🔗
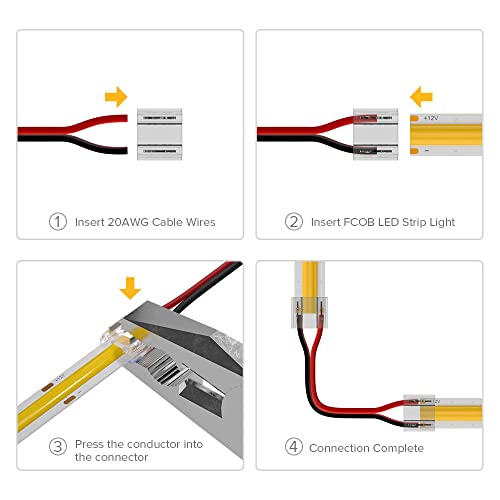
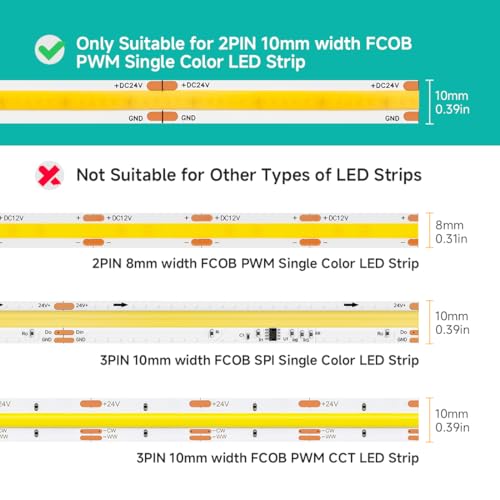
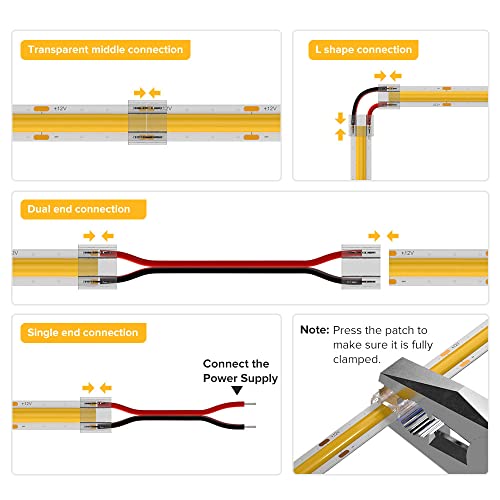
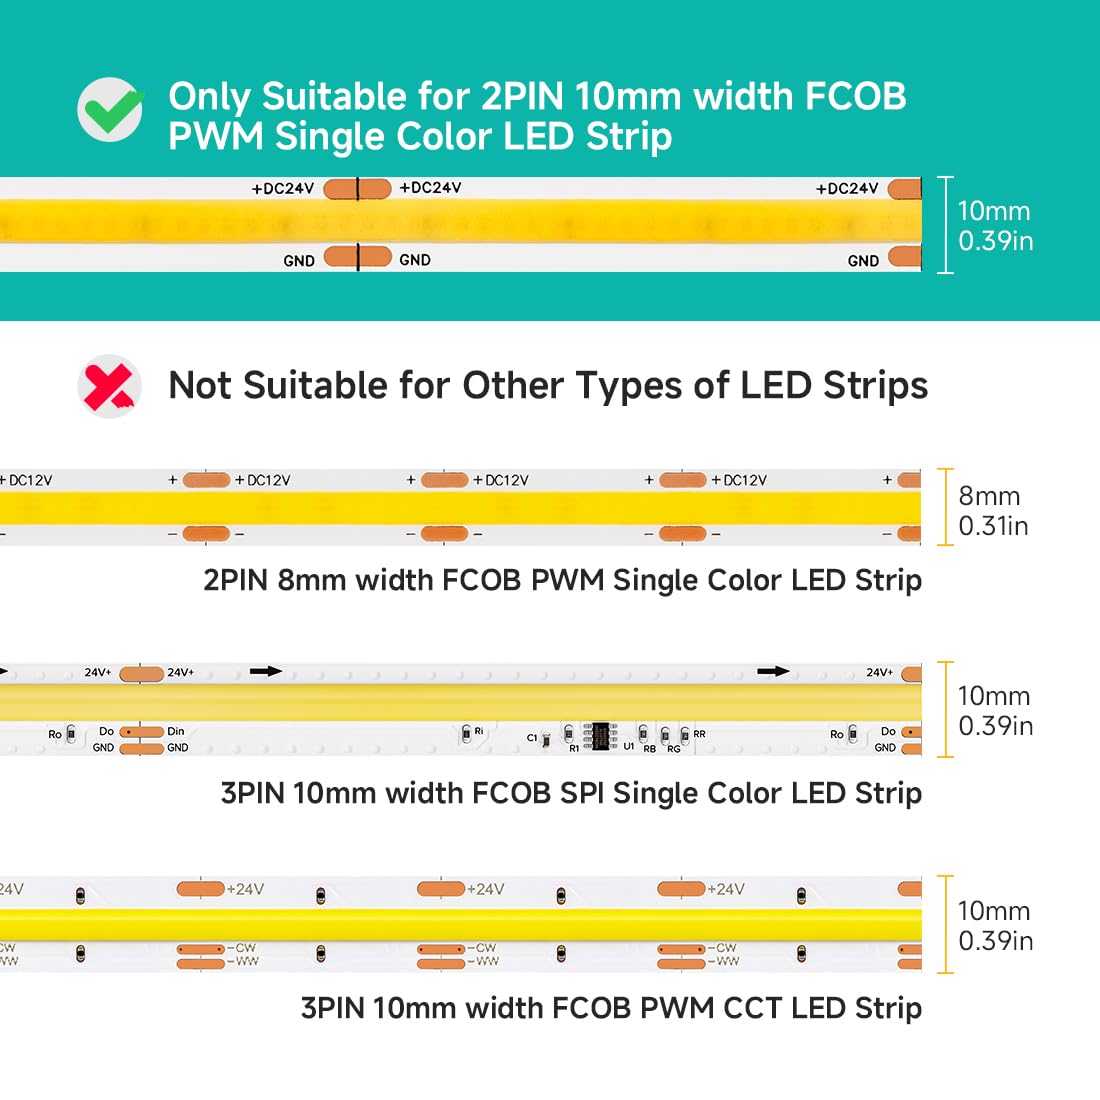
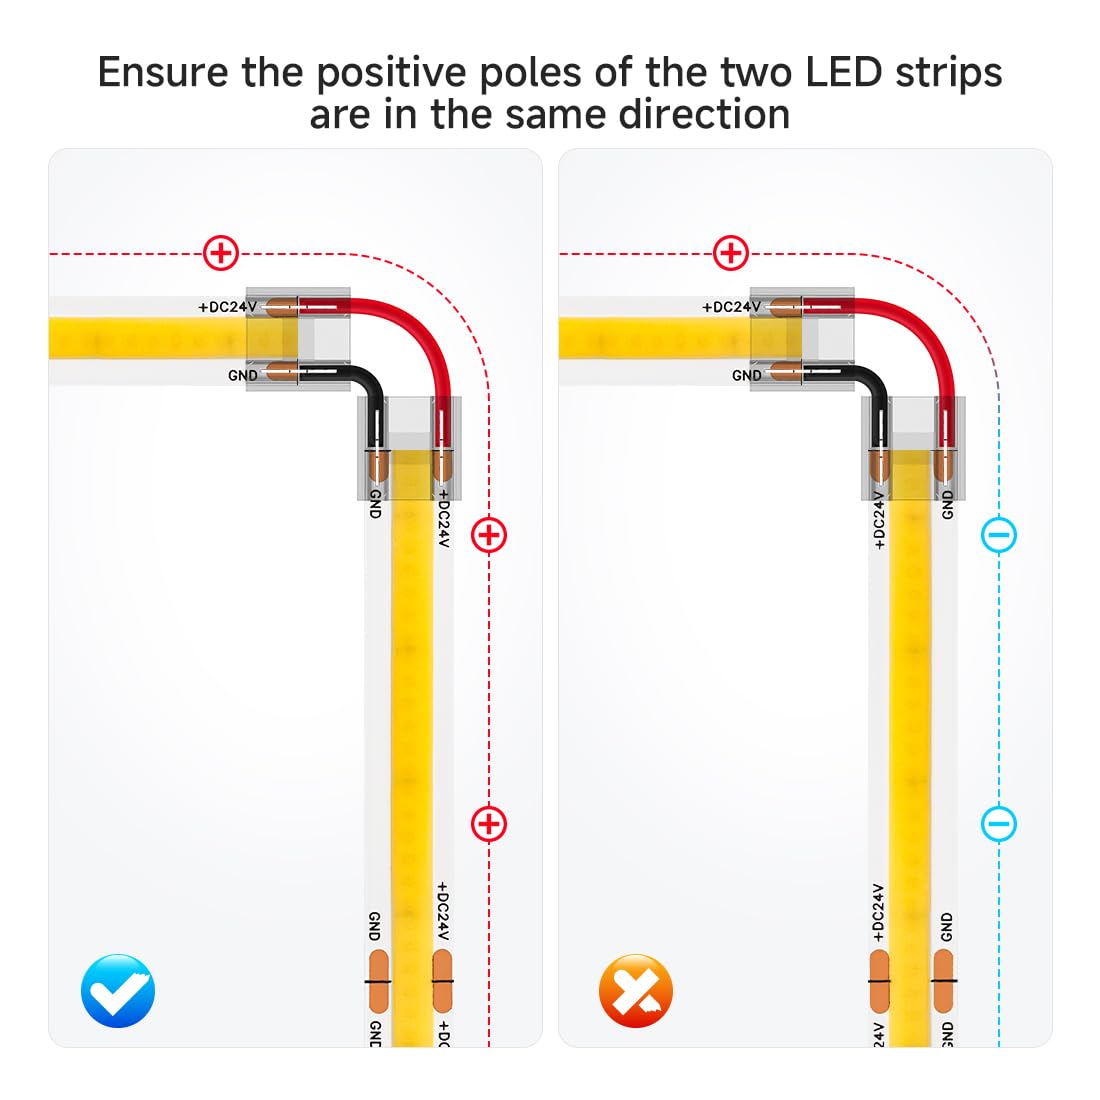
The BTF-LIGHTING FCOB 10mm Connector Kit offers 14 transparent, solderless connectors plus 5 durable 15cm 20AWG extension wires, engineered exclusively for 10mm FCOB COB LED strips. Its low-profile, no-tin design guarantees seamless, gapless connections that preserve uniform light output without damaging copper pads. Perfect for indoor LED strip customization, this kit delivers professional-grade installation ease and aesthetic continuity.


| ASIN | B09W8GB8R3 |
| Batteries Included? | No |
| Batteries Required? | No |
| Best Sellers Rank | #7,074 in Tools & Home Improvement ( See Top 100 in Tools & Home Improvement ) #23 in Lighting Accessories |
| Brand | BTF-LIGHTING |
| Color | Multicolor |
| Customer Reviews | 4.3 4.3 out of 5 stars (661) |
| Date First Available | March 23, 2022 |
| Form Factor | low profile |
| Indoor/Outdoor Usage | Indoor |
| Item Length | 15 Centimeters |
| Item Weight | 0.317 ounces |
| Item model number | FCOB-10MM-2PIN-15CM-20AWG |
| Light Color | Multicolor |
| Light Source Type | LED |
| Manufacturer | BTF-LIGHTING Teachnology Co., Limited |
| Material | Copper |
| Number of Items | 14 |
| Number of Light Sources | 20 |
| Occasion | Christmas |
| Part Number | FCOB-10MM-2PIN-15CM-20AWG |
| Power Source | DC |
| Special Feature | No Light spot, Uniform light |
| Special Features | No Light spot, Uniform light |
| Specific Uses | Indoor use only |
| Style | Modern |
| Theme | Indoor |
| Voltage | 12 Volts |
| Wattage | 1 watts |
M**H
Great product
These worked out great for my under cabinet lighting! Very easy to use, no issues.
A**R
Worked great installing LED…..
Great item…
T**A
Nice lighting feature
Used these in a kitchen remodel and provided the perfect lighting feature. Set up can be a bit tricky. But turned out great
A**R
Unpredictable results but still worth buying
They're great when they work but you have no idea if the connection will actually work until you compress them. If the connection fails, then the copper tab on the light strip is ruined and so is that connector. Then you have to shorten your light section and try another copper connection point. Very frustrating!! However, if the connection IS successful, its a huge time saver over soldering and a more reliable connection than soldering. I wish there was a way to verify the connection was good before you compress them but I don't see how that can be possible.
A**M
Pricing
Good pricing
A**S
Connectors Stopped working after few days
Middle Connectors failed after few days. Before installing the strip on the wall, I have checked the entire strip and worked fine for just few days.
J**T
Very simple and reliable connection
I used the 8mm, 2-connector version to connect COB LED strips from Home Depot. The original Home Depot kit came with a power supply, a lot of wire, including a Y-connector, but by itself was not adequate for a fairly small under-cabinet lighting project, because it didn't provide a way to make connections over short spaces. One issue I had was that I needed to put some of the lights on the bottom of an under-cabinet radio (remember those?), and with the original kit alone it was impossible to do that neatly. With these connectors I was able to cut the original strips *and* the wiring, and make new connections anywhere I needed them. I was even able to cut the pins off the end of the COB strips and insert the short stub with the pins into one of these connectors to make a new male or female pin connector on the end of a wire. The original 20 AWG wire also fitted into the connector, so I didn't need to use the wire that came with the kit - I have that for a future project. I had no problems making the connections - I used needle-nose pliers, so had to come in at an angle, but it probably would have been fine if I'd used a smallish pair of regular flat-end pliers. Every connection worked first time, and I had no damage. It took me a while to figure out which of the many kits available on Amazon was the right one for my project, but I'm very happy with this choice.
A**N
Perfect
Perfect 8mm 2 leads 5VDC.
B**T
Made connecting led strip for media wall effortless. Much easier than soldering!!
P**D
Se travaille très bien les clips fonctionne bien
R**R
El producto es bueno y de calidad pero dicen es de 12 mm cuando es de 10, es la unica queja
A**Z
No me gustaron ya que si por algun motivo elbseguro no agarra bien el cable y se suelta es muy dificil volverlo a utilizar
R**.
Easy to install and very nice lighting.
Trustpilot
1 week ago
2 days ago