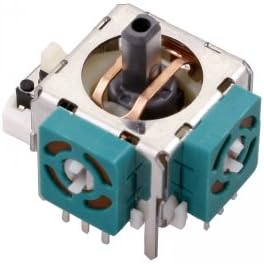

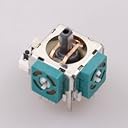

2 pcs Analog Stick Thumbstick Replacement for Xbox 360 Controller
Product ID: 3981742
Details
- Compatible DevicesGaming Console
- BrandYTTL
- UPC700175508720
- ManufacturerNIKINGSTORE
Buy anything from 5,000+ international stores. One checkout price. No surprise fees. Join 2M+ shoppers on Desertcart.
Desertcart purchases this item on your behalf and handles shipping, customs, and support to Cyprus.
M**E
Great replacements
Why spend $30 buying a new controller when you can easily fix your broken one? I've owned my 360 controller for about 5 years and the left analog stick started acting strange. When I pushed it all the way up, it was like I wasn't pushing it at all and made playing games really frustrating. After replacing the analog sticks, everything works great again! Just like brand new!To install, you'll need:- a screwdriver- a desoldering iron (or copper braid)- a soldering iron- rosin core solderInstructions:First, disassemble the case by removing the screws from the back. There's a hidden one in the center covered by a sticker. With the screws removed, the back of the case should come off very easily. Remove the circuit board from the case. Pull the plastic thumbstick off the defective units. Identify the legs of the defective thumbstick on the reverse side of the circuit board. Using your desoldering iron, remove the solder from the unit's legs. (Note: if replacing the left thumbstick, you will first need to remove the left trigger assembly using similar desoldering techniques.) The unit should detach from the board fairly easily. Insert the replacement in the exact same location as the one just removed. Apply your soldering iron to each of the legs and touch the hot leg with your rosin core solder. I recommend soldering the 4 largest legs first, then the smaller ones. Only apply enough solder to bond the part to the board. (Reattach the left trigger, if removed previously.) Reassemble the case and button it up with the screws. You should how have a fully restored controller!
A**A
Works well and seems durable.
Changing these out is more of a pain than I thought, but they feel more solid and durable than a different replacement brand my brother bought. Those wore out extremely quickly and I mean started feeling like they wore out the same day. These feel like the oem sticks. In fact only one stick needed replacing, but after swapping it out I realized the other original one was a bit sticky. I wouldn't know it was a replacement at all, as the feel seems to be the same as an oem stick.The only problem is I seem to have shorted something or messed up something on the board from the replacement process. The controller will work just fine for and hour or so, then just lose connection with the Xbox. Takes pulling the battery and then it'll connect again. So I can't rate the stick durability as I couldn't figure out what the problem was so brought another controller out of retirement. The boards have very thin circuits so it was hard to see if any were damaged. I'll keep these sticks for when another controller goes out and give it another shot. There was a tiny capacitor (I think) near one of the connectors and it might have been desoldered a bit since it was pretty close and I was heating the area for a while. It's so small I couldn't tell.The thing that makes the changeout difficult is the solder has to be removed from all the pins before it can be taken off. It is a solid unit, so you can't just heat the solder and pull that one pin out like you can do with a wire or capacitor. I had de-soldering ribbon instead of one of the irons with a vacuum bulb and it was hard to get enough solder off of each pin. Trying so many times on each pin is maybe why I damaged something. Lots of heat for quite a bit of time. I actually ended up using an exacto type blade to cut through some of the the pins on the broken stick. Then I was able to get the really tough pins off individually after I tore the old stick apart.I also used a paperclip to clear the solder out of each hole afterwards so that the unit would seat all the way down on the board. It was possible to force it down when there was a little solder left in there, but it looked like it was slightly raised, so I cleared the holes so it would be all the way down on the board.
J**S
Works, better than broken, but has centering issue
They work, good feel, a way to bring a broken controller back to service.However, mine doesn't seem to center properly and thus has an issue of drifting to the left (I only used one, and maybe the other doesn't have that issue, but can't really say for sure.) Might be OK for someone replacing a completely broken stick, but if you're already having drift issues and want to replace it, I might try something else.
J**C
These things looked great, and physically moved well
These things looked great, and physically moved well. Felt the same as far as stiffness and motion as the OEM piece, but when it was all put together and tested, the joysticks do not return a smooth nice input to the computer. Very glitchy, and lots of dead spots in range of movement. Very disappointed :(
T**R
Worked well and wan't too hard to install. Mine ...
Worked well and wan't too hard to install. Mine came in a little crooked but I think it was probably my fault and I'm just too lazy to take it apart and try [email protected]
J**N
Save your money and get a new controler
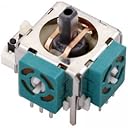
Ok if you need a quick fix but there's a serious dead spot going left . I replaced my right stick b/c of slight left drift . Got these today replaced right stick and it's simpleto replace if you can soldier . Unfortunately the center of the internals of the replacement are aluminum or some other cheap metal instead of copper like the one pictured which would have probably been better and now I no longer have slight left drift but a sever dead spot going left and down up and right are OK I'll post pics. The first is in center position there's no problem . Second pic is how far I had to push stick left before I got response in game and third is a pic of the one I haven't used yet because I only needed to replace the right one you can see the difference in the one pictured and the one I got . My advice is to save and buy a new controller . The right stick no longer has enough accuracy because of dead spot for fps games that require it. Unfortunately my older controler is now all but useless for anything requiring quick looking or aiming
Trustpilot
1 month ago
1 month ago