
DOWNLOAD THE APP


Customer Services
Copyright © 2025 Desertcart Holdings Limited
DOWNLOAD THE APP
🔧 Elevate your deck game with twist-free, marine-grade precision!
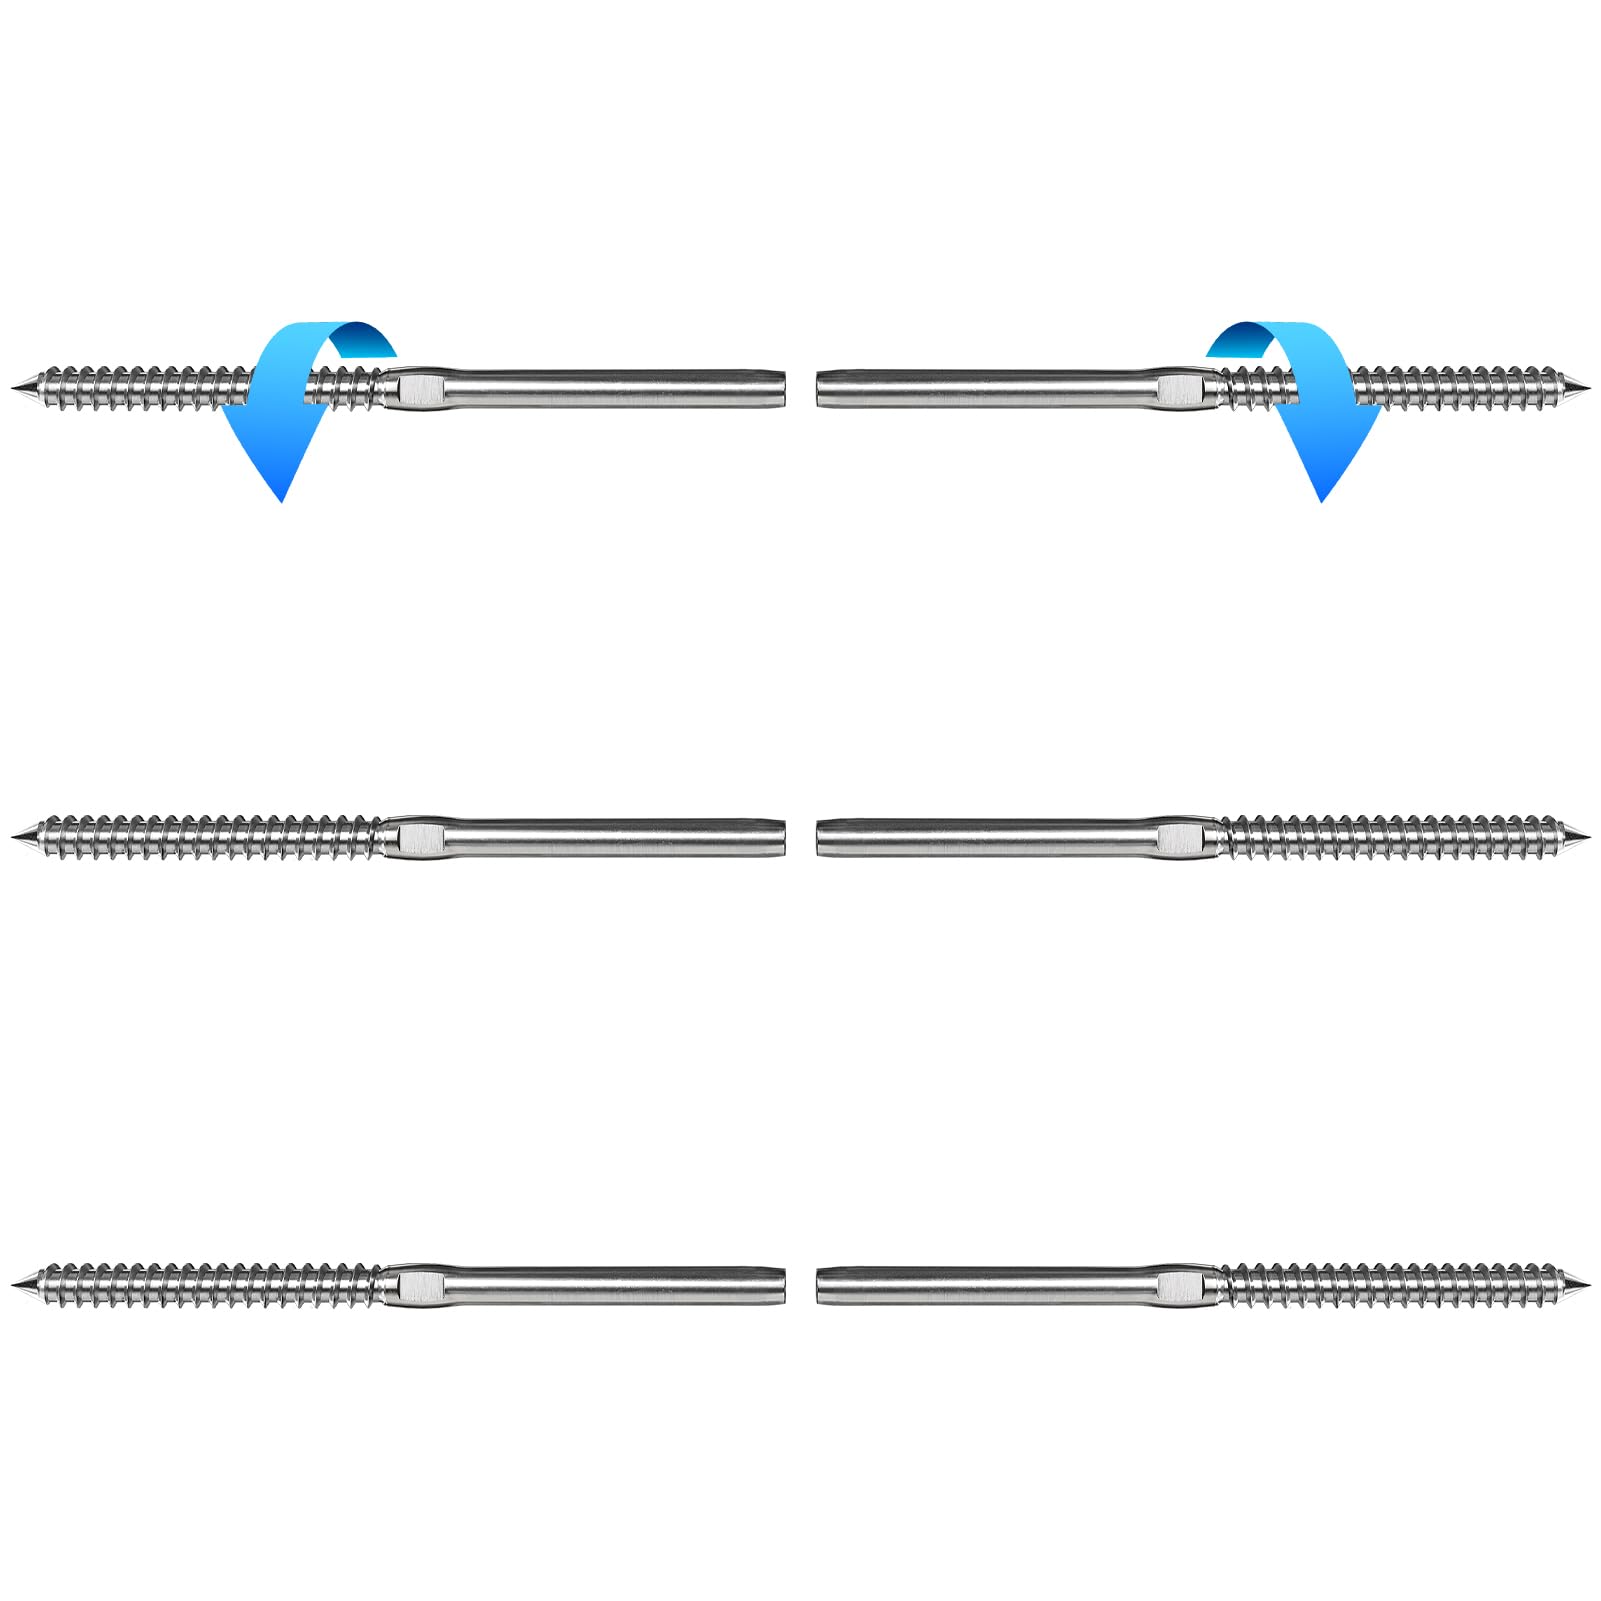
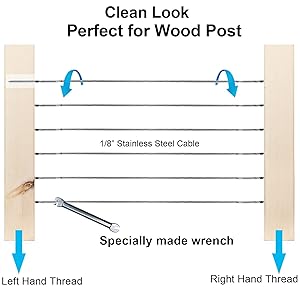
The Steel DN Mate T316 Stainless Steel Swage Lag Screws set includes 6 pieces (3 right, 3 left hand threads) designed for 1/8" cable railing systems on wood posts. Made from corrosion-resistant marine-grade T316L stainless steel, these lag screws enable easy cable tension adjustment without turnbuckles, preventing wire twisting and ensuring a sleek, durable railing solution ideal for both indoor and outdoor use.


| ASIN | B08CKHCQJJ |
| Best Sellers Rank | #26,361 in Tools & Home Improvement ( See Top 100 in Tools & Home Improvement ) #12 in Decking & Fencing Hardware |
| Brand | Steel DN Mate |
| Color | Silver |
| Compatible Groove Diameter | 0.13 Inches |
| Customer Reviews | 4.7 out of 5 stars 1,100 Reviews |
| Drive System | External Hex |
| Exterior Finish | T316L Stainless Steel |
| Fastener Size | 0.125 in x 1.5 in |
| Fastener Type | Deck Screws |
| Finish Types | stainless steel |
| Grade Rating | Industrial |
| Head Style | Flat |
| Head Type | Socket |
| Item Diameter | 0.14 Inches |
| Manufacturer | DNMATE |
| Material | T316L Stainless Steel |
| Material Type | T316L Stainless Steel |
| Metal Type | T316L Stainless Steel |
| Point Style | Type A Point |
| Screw Head Style | Flat |
| Screw Point Style | Type A Point |
| Set Screw Thread Type | UNC |
| Size Name | 1/8" |
| Thread Class | Product-specific |
| Thread Coverage | Partially Threaded |
| Thread Style | Right Hand |
| Thread Type | Right&left Handed Thread |
| UPC | 889971350563 |
| Unit Count | 1.0 Count |
C**H
Great Buy!
Fantastic product, easy to use, railing looks great!
N**H
Cost friendly and looks great
Somewhat easy to install if you’re an intermediate handy man. Helped me to make a jig for perfect drill holes on every post. Hardest part is crimping the wire. Wife was happy, that’s all that matters.
C**.
Great Product
I've just begun my project and have installed roughly 25 or these. Pretty straight forward, install is easy only thing that takes getting used to are the left handed threads, my mind want to turn to right but that is opposite other than that (which is not product related anyways) these things are great! Initial reaction for the crimping made me nervous thwy wouldn't hold buth these cables are tight as can be and no signs they are fauling at all. The only thing I would complain about is that both tools aren't round. The rounded one is too long to fully rotate between cables and the short one that is flat hurts hands after 2 or 3 studs.
P**F
Substantial and lifelong
Used these end hardware fittings to complete a stainless steel cable railing system around our deck. They are left handed and right handed and worked wonderfully. A little bit of work to measure, cut and crimp all the fittings but I tell you what…they look great and will last well beyond my lifetime.
L**S
Great product with over the top customer service!
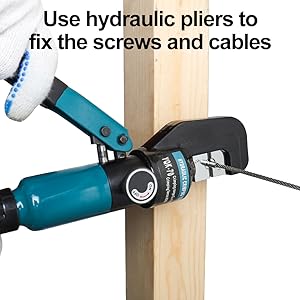
I used this product to replace wood slats on my handrail for my deck. I found the wood slats really hurt the visibility. Problem solved with Steel DN Mate. I replaced my 1 by 1 wood slats with the stainless steel cable system and I could not be happier. Extremely cost effective and easy for a "do it yourself project". Ordered through Amazon. When I first screwed up by not predrilling 2" for the screws I texted the company saying the wrenches provided broke. I had new wrenches ordered on a Saturday night and delivered by 8am the next day. After predrilling the required 2" I had no more problems and that was on me. I used a template made from a 1 by 4 board that had holes drilled vertically every 3" that I clamped to the 4by4 post that allowed me to score where to predrill the holes. Then removed the template, predrilled the 2 inches into the post, installed the the swage screws so 1" of thread still showing on each side, cut the wires 1.5" shorter than the distance between posts, crimped the wire using a hydraulic crimping tool and then started on one side using the wrench and turned equal amounts on one side and then the same to the other side. I started out 10 quarter turns on one side then same on the other side. When the cable slack was taken up I switched to 5 turns then 3 and 2 turns on each side so as not to twist the cable. Photo shows the end result. We are thrilled with the results.
N**K
Excellent deck railing solution - DO NOT use the included drill bits
Color me impressed. I couldn't believe how cost effective these were compared to buying eyes, turnbuckles and ferrules. These offer a much cleaner look and are very easy to install. I had one of the included bits snap off deep inside one of my deck posts, and it is pretty much impossible to remove. DO NOT USE THE INCLUDED DRILL BITS. Make sure you use a template when drilling holes in your posts and do your best to keep them straight, otherwise these screws will stick out at weird angles and won't look uniform. Pros: - Not expensive - Low profile - Allows you to easily tackle corner posts - Very easy to install with a few quick tips (see below) Cons: - Cheap hardware. The drill bits are trash and the mouth of the wrench slowly starts to open up and lose its grip - A bit finnicky to get each screw perfectly straight - Need to spend an additional $40-$50 on crimpers Tips: - Use a quality 3/16" drill bit, which is a tad smaller than the included 5mm bit and provides a tighter grip when the screws are driven into the post. Take your time and get them as straight as possible. - Remember that a 100-pack of these screws means you're only getting enough to run 50 cables. - You should always tighten both screws the same amount (quarter turn, half turn, etc) to prevent the cable from being twisted, because that might cause one of the screws to slowly back out of the post which will make the cable lose its tension. - Make sure you have at least part of the railing framed out before you start, otherwise the cables are going to pull your posts in different directions as you go. Overall this is an excellent solution and I am glad I made the purchase.
A**R
Slick look for the cost
The product looks great after install. But if you want to save time you’ll have to experiment. 1. You can measure post to post and subtract the 1.5” for the wire. This will work on a level surface. Except if you did not shoot the drill completely level or straight - the 1.5” will likely be taking “too much”. Always do 1.6” just in case. 2. If you cut the wire a bit too long and can’t manually turn the hand tool, grip your hydraulic crimping on the wire screw and manually turn it this way. You could just start over but who would wanna do that? 3. When doing the wire cutting, have someone hold the other end of the wire you just cut - to line it up with the second wire you needed for the same posts and cut until you have the needed amount. 4. Use a drill to drill the wire screw into the post to get it started. Attempt to get the screw into the post the same depth - do a thread count and get a rough guess/count on proceeding screws. 5. Use a cobalt, not supplied, 3/16th drill bit for tapping the wire screw holes. 6. On stairs, throw away the directions they gave you on 2” between posts. It would depend on the depth of your stairs for that to make sense anyway. You’ll be in for a rough few hours on one section if you don’t listen to this advice. You need to set the wire screws to a COUNTABLE thread count on each side. You then place the wire into the hole of one wire screw until the wire hits the bottom of the wire screw. Drag some wire to the opposing post’s leading edge and line it up with where the wire would go. Cut the wire approximately 0.25” shorter than the leading edge of the post. If this is too long/short then you will eventually get a feel for where this cut needs to go. Once you get this down it’ll be cake.
D**.
Very good instructions very easy to install
Excellent cabling system very easy to install. Very good instructions. Highly recommend using this product.
Trustpilot
1 day ago
3 days ago