🏡 Elevate your outdoor space with the ultimate no-fuss, all-weather storage solution!
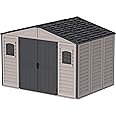
The Duramax WoodBridge II PLUS is a robust 10.5 x 8 ft plastic garden shed featuring a strong metal roof and foundation kit designed to withstand heavy snow loads. With maintenance-free vinyl construction, dual ventilation, two waterproof windows, and a lockable door, it offers secure, weatherproof storage or a versatile hobby space that lasts season after season.
| Product Dimensions | 192 x 108 x 21 cm; 130 kg |
| Part number | 0638801202257 |
| Material type | Plastic, Metal |
| Manufacturer | Duramax |
| Item model number | 0638801202257 |
| ASIN | B08KTFHQHY |
I**I
Good quality shed
First off, some of these reviews about this product talk nonsense and are not really reviews, more like an explanation of how stupid the writer is.Yes the item does come in one big heavy box, which is a bit daft, but once you are prepared for that you can easily plan where to put package. The drivers were extremely accomodating and placed the package in the garden until i got around to building it, after all it is meant to be in the garden once built!All items in the box were in tact, clearly labelled and all present and correct.At 57 pages of A4, the instruction booklet is quite daunting when you unpack it. On closer inspection the instructions are mainly pictorial with a few written notes to clarify the pictures. Take time to read through the instructions and make yourself aware of the components. Remember these drawings are not to scale, so check and recheck you are assembling the pieces the correct way.The quality of the pictures in the booklet are excellent and very clear. if you take your time and follow the instructions you will have a perfectly solid shed that does not move. All the holes line up perfectly and the quality screws hold the pieces together well.When assembling the roof panels i did find the roof panels did not align with the holes in the frame. I realised that whilst assembling the frame I occasionally lent on the frame causing the frame to slightly twist. Once I recognised the problem, some very slight movements of the shed ensured the holes all aligned and the roof was then easily completed.This shed requires one competent DIYer and one helper, yes when you place the walls in place it is very scary and flimsy and you think you have made a mistake but once you start placing the frame in place, you very quickly realise this is one clever construction and it is going to be a really sturdy building.The end of the booklet has a number of suggestions for floor bases, which should be considered before you start.One final tip. Once you have completed the base frame at page 13 I would suggest you go to pages 31-36 and assemble the pieces you require for the roof frame. Once they are complete restart construction from page 14 through to the end.If you do it this way, you will limit the time the shed is in the 'scary flimsy' state that others have complained about. I would not recommend starting from page 14 if there is any wind at all.All in all there is some room for improvement from a packaging point of view, but once complete it is better and easier to erect than any wood or metal shed I have previously constructed. This took my wife and I three half days to erect, not because the instructions are poor or it was complicated or difficult, simply because this is a really big shed.
T**Y
Very good shed!
Duramax WoodSide 10 x 8 (8.02 m2) Plastic Garden ShedI purchased this shed when it was on sale for £600 and I am very pleased with it.It took my partner (who did most of the DIY) and me (helper) 2 days to build with plenty of breaks throughout the process.It comes with a detailed manual for assembly. We followed the manual to the letter and assembled the shed on a flat foundation (we used paving slabs), and the shed came out perfectly aligned. We had no issues with screw holes not aligning but did have to double-check some of the metal struts a few times to make sure we had them the right way around, etc.The metal frame is robust, but not until it is fully assembled. The roof struts are the strongest and heaviest, and very secure.The metal floor base has quite wide gaps between the struts. We used OSB board flooring but filled the gaps with 10mm gravel to prevent the boards from bending.The plastic panels appear flimsy, but when the shed is assembled, they hold together well. Assembling the panels is definitely a 2 man job as they flop around until the roof struts are in situ!We used a drill/screwdriver, set square, rubber mallet, spirit level, tape measure, ladder, and a silicone seal for the roof bunges.One mistake we made was on the shed panels' top corner edges there are plastic angled corner pieces, and we screwed one of the roof struts into the wrong hole in the plastic. It was a nightmare to remove! It took us over 2 hours. We tried every screwdriver we owned, the drill, and even a hacksaw blade as a final ditch attempt. All failed to remove the screw from the plastic. With everything failing, I used spray lubricant, which did the trick. Don't make the same mistake. The screws are indestructible!Overall, I am very happy with this shed. The only thing I will change is the door handles. They are not faulty, however, they don't appear very secure and I prefer metal over plastic. It is surviving the current storm with wind gusts of 52mph with no issues. It's not leaking!
E**N
Sturdy once fully erect
Ok, so I got the 10 x 8 foot shed and it took longer to put up than we expected and there were a couple of issues we had to overcome. We waited till we had some pretty good weather and little to no chance of heavy wind. It took two days with 2 people and the aide of pieces of wood and a spade at one point.Putting the base together was pretty simple and fitted together with no problem. One thing to note about the base though is that its really flimsy metal strips. When we boarded the bottom of the shed you definitely feel like they're bending and going to break. We have built ours up off the floor and I think it may have felt sturdier had we built it on the floor.Sliding the sides in and clicking them together was a bit tricky at times and we had a couple of side edges that were damaged so had to straighten them with some pliers to get the edge straight enough to click into the side panel next to it. There are thin metal strips you screw to the inside of the panels once they're in place, but to be fair, they didn't really make the sides feel sturdier even once they'd been attached. This is the part were we used pieces of wood and the spade to hold the panels up and not wobbling about as we proceeded to put all the sides together.Putting the roof and doors on was pretty straight forward and easy enough without a hitch. And once the roof was on and everything screwed together it shed it pretty sturdy. We had a bit of rain a couple of days after it had been put up and the rain water had got in round the windows a bit, so I would definitely recommend sealing round those.All in all I think its a pretty good shed, but I think they should make the metal base strips like the ones for the roof, the roof ones are much thicker, stronger and sturdier, which would be more appropriate for the floor. I also think having 3 or even 4 willing volunteers would have helped with the erection, especially with the big one.
Trustpilot
3 weeks ago
1 day ago