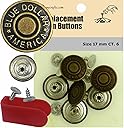

17mm Brass Kit, 6 Set with Tool Jean Tack Buttons-There is a Replacement Button for Levis!
Details
- BrandJBDIYME
- Color17mm BDA
- MaterialMetal
- ShapeRound
- Size17mm
Desertcart purchases this item on your behalf and handles shipping, customs, and support to Cyprus.
Details
- BrandJBDIYME
- Color17mm BDA
- MaterialMetal
Description
👖 Upgrade your denim game with brass that means business!
- EFFORTLESS DIY UPGRADE - No sewing needed—just hammer on and go!
- PRACTICE MAKES PERFECT - Extra buttons included so you nail the installation first try.
- PREMIUM BRASS DURABILITY - Solid 17mm metal buttons built to last through every wash.
- CLEAR INSTRUCTIONS INCLUDED - Step-by-step guide ensures flawless button swaps every time.
- LEVIS COMPATIBLE REPLACEMENT - Perfect fit for your favorite jeans—no compromises.
This 17mm brass jean button kit includes six high-quality metal buttons plus extra practice pieces, designed for quick, no-sew installation using just a hammer. Compatible with Levi’s jeans, it offers durable, stylish replacements with clear instructions to ensure a perfect fit and professional finish.
Specifications
| Asin | B005NOEMJ8 |
| Best Sellers Rank | #278,313 in Arts, Crafts & Sewing (See Top 100 in Arts, Crafts & Sewing) #4,096 in Sewing Buttons |
| Brand Name | JBDIYME |
| Color | 17mm BDA |
| Customer Reviews | 4.4 4.4 out of 5 stars (354) 4.4 out of 5 stars |
| Manufacturer Part Number | DE-QUUPC-019 |
| Material Type | Metal |
| Model Number | DE-QUUPC-019 |
| Number Of Items | 6 |
| Number Of Pieces | 1 |
| Shape | Round |
| Size | 17mm |
| Unit Count | 1 Count |
| Upc | 727260230281 |
Reviews
User
Works for me!
It is becoming quite evident that clothing manufactures are using inferior quality thread to hold buttons on pants. As a result, I have a jar filled with buttons and a closet filled with buttonless pants. The problem is how do I resolve this dilemma. The answer is with this product. I've used it and it does work. It holds my pants waist closed and after a number of cycles through the washer and dryer there are no signs of these buttons coming loose.Some who reviewed this product did not have the same experience as I have. I would like to share my method of attaching these buttons. First, try to work on a flat surface such as a table; it will make it easier.1. To get the button in the right spot, lay the pants on the table with the zipper closed with the waist band button hole over the other side of the waist band where the original button was located. Make certain that the top of the waist band are in alignment.Using the center of the button hole as your guide, push an awl (or a sharp pointed nail) through the waist band where the button was located. A thick magazine placed between the front and rear of the waste band will prevent the tool from penetrating the rear part of the waste band ( or worse, the table).2. Push the button tack through the waist band (from the rear) at the point where the awl penetrated through the waist band. When you do this, the button side of the fabric will show some loose thread ends and possible a roll of fabric around the pointed end of the tack. Using a single edge razor blade or a sharp knife, cut the threads off and remove the roll of fabric. The object is to expose the maximum length of tack available to insert into the replacement button stud.3. Turn the pants over so that the tack head will be in the up position. Align the button and tack. Using a hammer, drive the tack into the button. It is not necessary to drive the tack into the button with a great amount of force. (I use an 8 ounce tack hammer which works fine.) The new button should be snug on the waist band. It sometimes takes two or more hits on the tack to achieve this. I also place a magazine directly under the button to prevent the button from getting damaged and to protect the hard (table) surface from dents or other marks.I have had success using this method. It does take some time to get everything organized - about 10 minutes - but it is worth it.
User
Great product
Went to at least three different cleaners to try to get a few pairs of jeans fixed, none of them could do it with a real jean button. the best they could do was to sew on a button for about the cost of the pack of eight of nice brass buttons. So far they have been holding up great... Easy to use. Saved my jeans and a couple of pairs of shorts....
User
Technique is everything
So far, so good. I read in another review on a different product that the easiest way to attach the button smoothly is to use a C clamp (also sometimes known as a G clamp). I used the included plastic guide to hold the pieces in place, then turned the C clamp crank and the install went perfectly.Pay attention to instructions and online guides about patching if your hole is too large or worn. Also, the plastic guide that comes in this kit is not very durable... it showed stress marks at the hinge almost immediately. I doubt it would last long enough to attach all the buttons in the kit.
User
I did take someone's advice and got some small metal washers that work better than the button alone
Replace sewed buttons when they come lose - no sewing and works really well. None have come lose since put in place. I did take someone's advice and got some small metal washers that work better than the button alone. Will never sew another button back on pants - shirts maybe - but paints never. Can't find any of these same ones at the local stores. They have dinky ones.
User
All about that Brass
New pair of Arizona Jeans that I purchased, wore them a couple of times and discovered that they had a flaw. Yep, the button popped right off. I purchased this kit in hopes of salvaging the jeans. With little expectations and high hopes I mended a new brass button onto the jeans. This kit was magic. Easy to use, easy to apply and now my jeans are like new! I recommend this product to anyone wanting to salvage a buttonless pair of jeans!
User
They do what they were made to do
I bought a pair of Levi jeans online, and the button above the fly was broken. I could’ve sent the jeans back, but it seemed easier to just replace the button, so I did a little research and decided to try these. I was a little nervous because of some bad reviews, but figured I have eight tries to get it right, and the price wouldn’t kill me.The buttons arrived a full week earlier than predicted, by mail, and I set straight to work replacing my button so I could wear my new jeans. The first button was a bust, and I quickly figured out that a hammer is NOT the tool to use; it’s almost impossible to line up the button and keep it straight. For my second (and successful) attempt, I used a pair of pliers - the kind with an adjustable jaw - and adjusted the jaw to where the two sides would come down almost straight, like a tiny vice. I imagine vice grips would work here too, but I think I had more control with the pliers. Also, don’t overdo it; I went back and tried to tighten it up, and almost ruined my work.All in all, the buttons are what they say they are. If you have to have one, these will do the job.
User
Good solution to lost buttons, but not perfect.
The "tack" backing and the button go together easily using a simple pair of pliers or channel locks. I suppose you could also use a hammer (gently). I didn't use the tool that was included because the channel locks worked perfectly. The reason that I gave it only 3 stars is because the "tack" diameter is approximately the same as the original. If your button fell out because the hole elongated (large enough for the tack to slip through -- as mine did), then this is not a good enough solution.....unless you plan to make a new hole. If the "tack" face diameter were the same size as the button -- this would work perfectly!
User
Great Buttons
Use these buttons for several things. Great replacement button for above your fly.Take a lot more force then those sewed on plastic one you blew out anyway. Use mine to add suspender attachment points for logger type suspenders. Works great. And dudes those clip on suspenders are lame. Commit, use button type. The tool that comes with it is a little silly but can work, I just but mine in place , lay on the concrete and one good hammer strike and you built a button.
Common Questions
Trustpilot