


🚀 Upgrade Your Mac, Elevate Your Game!
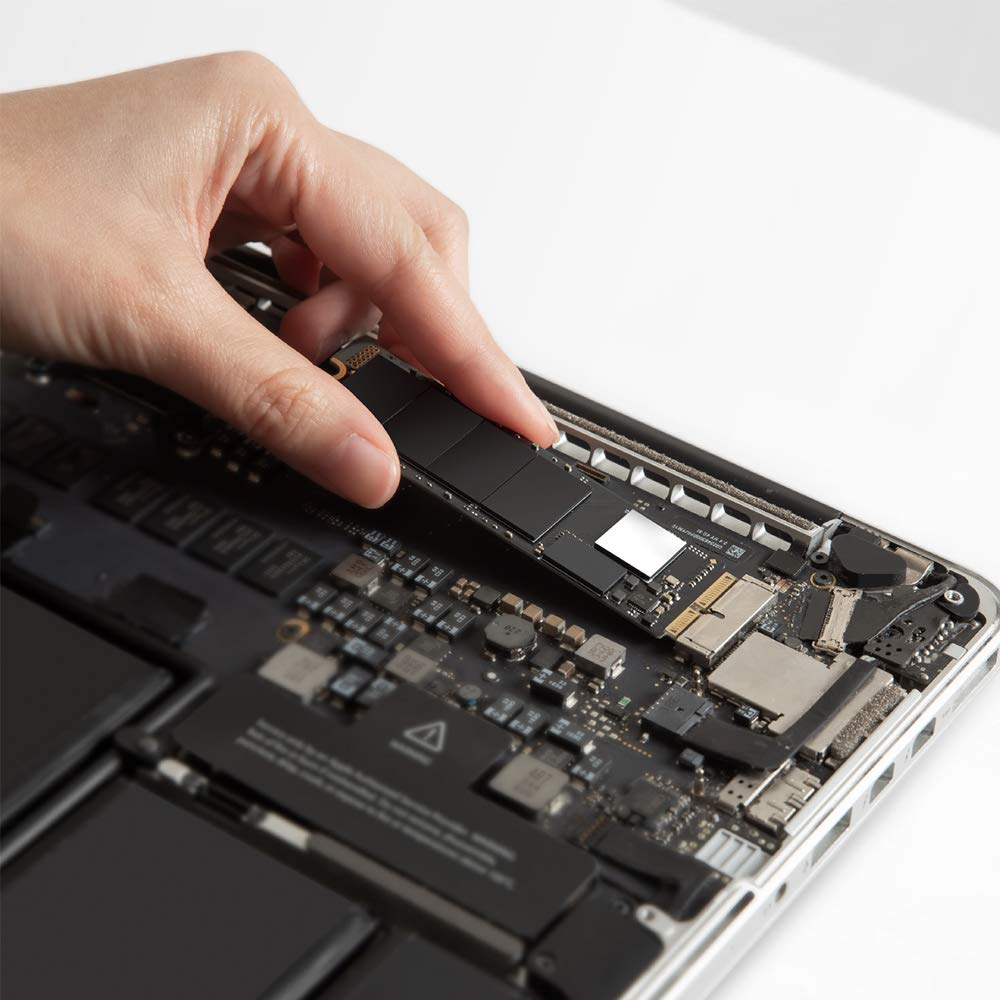
The Transcend 960GB JetDrive 850 SSD is a high-performance solid-state drive designed for select MacBook Air and Pro models, offering lightning-fast read and write speeds, seamless compatibility, and an easy installation process. With a generous 960GB capacity, it’s the perfect upgrade for professionals seeking speed and efficiency in their daily tasks.
| Brand | Transcend |
| Product Dimensions | 8.92 x 2.39 x 0.76 cm; 9.98 g |
| Item model number | TS960GJDM850 |
| Manufacturer | TRANSCEND |
| Series | TS960GJDM850 Jetdrive 850 |
| Colour | Black / Orange |
| Form Factor | Bar |
| Hard Drive Size | 960 GB |
| Hard Disk Description | Solid State Hard Drive |
| Hard Drive Interface | NVMe |
| Number of USB 3.0 Ports | 3 |
| Wattage | 6 |
| Power Source | Hand-operated |
| Hardware Platform | Mac |
| Supported Software | Mac OS X 10.13 High Sierra |
| Are Batteries Included | No |
| Lithium Battery Energy Content | 2 Kilowatt Hours |
| Lithium Battery Packaging | Batteries packed with equipment |
| Lithium Battery Weight | 2 g |
| Number Of Lithium Ion Cells | 5 |
| Number of Lithium Metal Cells | 5 |
| Item Weight | 9.98 g |
| Guaranteed software updates until | unknown |
P**6
Need a bootable Image to install OS onto the SSD without enclosure
I use the 850 240gb drive to replace the 128gb sands drive in my 2015 MacBook air 11 which actually only supports pcie gen 2 x4, throttling this drive's pcie gen3 x4 top performance. The speed of this drive when installed is measured as read 1400mb/s, write 750mb/s, which is very respectable considering the old platform it runs on. The build quality of this drive is actually more solid than the official drive. The pin is shiny gold plated. It also comes with two necessary high quality screw driver. So no need to buy extra tools.I rely on one 16gb and one 256gb external ssd for installing the OS mojave on to the new drive. I create a full time machine backup before everything. Then I create a bootable installation usb drive with the 16gb following the official guide about creating bootable installation media on Apple website (google create bootable installation Mojave). After the Mojave installation USB drive has been completed, I install the new ssd to the MacBook air. Then I boot from the created bootable usb drive, which goes into a recovery interface. Under the recovery interface, I use disk utility to erase the 850 drive to the required format (just leave on the default setting). After this step the I can install macOS on to the new drive. When the newly installed OS first boots, it will prompt you to backup from a time machine backup. Then simply plug in the time machine backup and leave the rest to the system. After restoration completed, I get a clean installed Mojave machine in a state exactly like where I left off. It boots exactly like the original drive with no black screen or abnormality.This method does not require 3rd party software. But it does need copy and paste command in Terminal. The bottom line is you need a bootable image from which you can restore (install) to the new drive.
M**E
Excellent And Massive Benefit in speed boost
well I have to say I got this thinking it wouldn't be as easy as swopping a drive out,but I installed it reinstalled the OS and my god what a speed boost this has made over my current apple Blade driveit works perfectly fineI would highly recommend this drive to anyone
V**.
Better get Jetdrive 855 with the Enclosure. It will be much easier to install the ssd.
The drive was not visible after insertion on my MacBook Air Mid2013. I tried Disk Utility and Terminal According to FAQ in Transcend's support. No disk found! After contacting Transcend support they postet me the solution. Now the disk works just fine.
R**J
Fantastic upgrade
Used this to upgrade my MacBook Air 13” 2017 from 250gb to 1tb and it has worked a dream, comes with the equipment needed, very well packaged and installed very easy
M**N
A painless MacBook upgrade
Messaged the company (Macway) to check compatibility and was promptly given a list of possibilities. Used the instructions on the Transcend website to perform a time machine backup to an external hdd. Installed the new ssd using the supplied screwdrivers. Then restored from the time machine backup. The MacBook then rebooted and the only thing needed was the Apple password. Have lots of experience with PC’s but this was my first attempt at a MacBook. A painless experience, would recommend Macway and Transcend.
G**R
Great piece of kit, not suitable for the Mac I wanted it for
This looks like a great value upgrade for any SSD MacBook. The package contains the SSD in a solid casing with the instructions and two screwdrivers underneath. The plastic case holds the drive firmly and won't open accidentally.The instructions are sparse, the tell you to disconnect the battery but not how to do so for example. Physically installing the drive is extremely simple and quick. Then the fun begins. I followed the instructions for formatting and restoring the drive from the Apple web site but I didn't get the option to use the APFS format. I copied the back-up to the drive but the computer wouldn't recognise it. I started again and used a different back-up but it still wasn't recognised. I tried to reload the OS but it wouldn't load because the drive wasn't APFS. At which point I contacted Apple who suggested contacting a local repair agent.This product is designed specifically for Apple MacBook computers, it really should be delivered correctly formatted.It turns out that for the MacBook in question a 1TB drive costs £600+ and isn't readily available. This wasn't what I wanted to hear but does suggest that this computer, despite what appears on Transcend's web site, is actually not compatible with the JetDrive 850. If you have a Mid 2015 MacBook Pro be aware of this possibility. I deleted the content from the drive and have returned it.
M**O
good quality
All good recommended
G**N
Massive improvement
1tb expansion to Mac Book Pro early 2015 Retina. Easy to fit though pentalobe screwdriver was rubbish and mashed up heads. Get a good one like QNine before fitting if you can. Physical fitting easy. MBP didn't recognise it in Device Manager. Had to boot Mojave off a stick, then could see drive but it wouldn't format. Had to use Terminal to format and then it was perfect and used Time Machine to backup. (None of the 'automated' methods of restoring from Time Machine worked until had manually done the format from Terminal. "diskutil eraseDisk JHFS+ MacHD disk0" is the command). Great product, no evidence of any heat or performance issues as have heard with other products. Thoroughly recommend.
C**N
Buon prodotto
Pro: Buon ProdottoContro: il libretto di installazione semplificato è "troppo" semplificato. Mancano passaggi per l'inizializzazione disco che consenta il trasferimento tramite backup
R**5
Calidad
Justo lo que necesitaba, un buen producto a un buen precio.
C**.
Works
Works well. Was a real bitch to get it to work with Apple Mac. Transcend should document the tricks needed to install. but persevered and got it to work.
W**L
Fast but power hungry. Instructions lacking.
Fast. Amazing upgrade for the mid-2013 Macbook Air. Gives the laptop a new lease on life in 2019.Install is straight forward if you are a versed computer person. Included instructions are missing some key steps. I needed to install Transcend's SSD utility, make a bootable clone via superduper!, install drive, boot from clone, format SSD and enable TRIM, reboot to clone, copy clone to SSD.Be aware this SSD is very power hungry. My Air still had decent battery life until I installed this drive. Approximately cut battery life by 20%. One star off for this.
R**Y
You CAN restore files from Time Machine with this SSD given the right steps
I decided to switch to this brand of SSD after having the same PANIC NVMe issues with the OWC Aura Pro as others have mentioned in their reviews. I would like to add that it's nice the two screwdrivers needed to remove the MacBook Pro cover and T5 screw on the motherboard are included with the drive. I'll do a follow up review in a few weeks after observing performance and general use.I would like to comment on how others have mentioned they can't use this SSD out of the box or do a Time Machine restore and they only method to get this SSD functional is to clone the original volume. While cloning one volume to the other is ONE effective solution. I would like to offer another solution that DOESN'T require cloning and will allow you to restore your macOS Time Machine Backup. First off, it's important to note fresh drives from the manufacturer are not formatted and do not have any sort of partition scheme. Hence, why you can't just place this SSD in your MacBook and boot it up and expect it to work. The macOS recovery partition would need to be installed in order to get any boot options and since this drive out of the box is bare, I will walk you through the steps I took to get it to a functional state and a successful Time Machine restore.Step 1) You'll need to create a flash boot drive with the applicable macOS install files. There are two methods for doing so: A) Download the "Diskmaker X" Application, which is a GUI interface for creating a bootable USB flash drive with the macOS install files.B) If you comfortable using the terminal command line, there's a simple one line command you can copy and paste from the following Apple Support article: https://support.apple.com/en-us/HT201372** It's important to note, you must download the "installer file" from the App Store onto your machine in order for this to work. And once a previous macOS version is no longer supported, you will have a hard time finding it on the App Store since Apple will remove it.Once you have your macOS Bootable USB Flash drive created, you are ready to proceed with the next step.Step 2) Provided you have installed the new SSD in your MacBook, you can now boot up your MacBook with the bootable USB drive also inserted into a USB port. Power on your MacBook and once you hear the Apple boot chime, press and hold the "option" key which will bring up a prompt to allow you to boot from the USB flash drive. You should see an icon with the application macOS version (i.e. Install macOS Mojave). It will take a few moments to load the applicable installation files and then launch the macOS utilities menu. Important!: You will first need to prep your drive with Disk Utility.Step 3) Open Disk Utility app. By default, Disk Utility only lists Volumes. You will want to see all devices by selecting View on the upper menu bar and select "Show all Devices". This will now display the hardware ID for the SSD "TS480GJDM850 Media" in the left column. Highlight this hardware by selecting it and then click the "Erase" button. You will then be prompted to give the SSD a name (i.e. Mac SSD), select the macOS partition type (Mac OS Extended Journaled) and change the Scheme from Boot Record to GUID Partition Map. Click Erase. After a few minutes this should prep the SSD for installation of the macOS. When complete, exit Disk Utility.Step 4) You are now ready to install the macOS Operating System. Select "install macOS", review the licensing agreements and proceed. You should be able to select your newly formatted and prepared SSD drive.After a while, the base operating system files will be installed on the SSD and you will have an option at that point to restore your files from time machine. There is an option to restore from Time Machine from the Utilities Menu at the completion of Step 3 above, but I elected to install fresh new operating system files first. Simply technique.Step 5) Your Time Machine files will be restored from backup after several hours and you should be good to go at that point!Hope this new information helps others.
Trustpilot
2 months ago
3 weeks ago