We remain fully operational. Our teams are working around the clock to ensure your deliveries continue safely.

DOWNLOAD THE APP


Copyright © 2025 Desertcart Holdings Limited
DOWNLOAD THE APP


Buy anything from 5,000+ international stores. One checkout price. No surprise fees. Join 2M+ shoppers on Desertcart.
Desertcart purchases this item on your behalf and handles shipping, customs, and support to Cyprus.
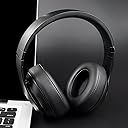
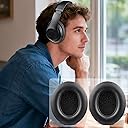
🎧 Upgrade your vibe, not just your gear.
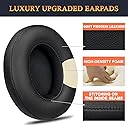
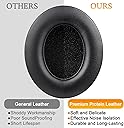
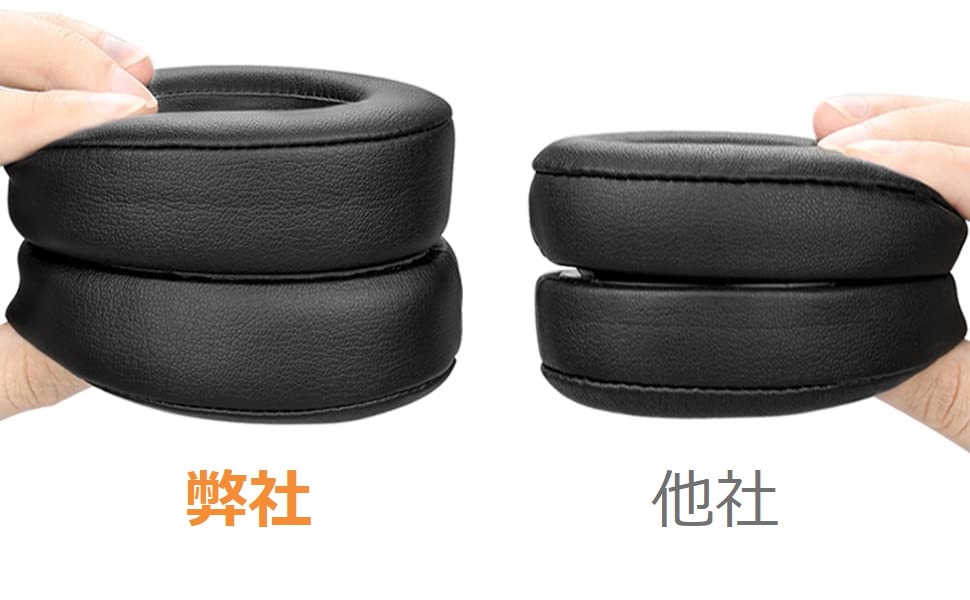
SoloWIT Ear Pads are premium replacement cushions designed specifically for Beats Studio 3 and Studio 2 headphones. Crafted from thick memory foam and soft protein leather, they deliver superior comfort and noise isolation. Easy to install with included tools, these pads restore your headphones to like-new condition while enhancing sound quality and durability.


| ASIN | B07HF18TJ9 |
| Amazon Bestseller | #8,426 in Electronics ( See Top 100 in Electronics ) #32 in Headphone Earpads |
| Brand | SoloWIT |
| Color | Black |
| Compatible Devices | Studio 2.0 Wired (B0500), Studio 2.0 Wireless (B0501), Studio 3.0 Wireless (A1914) |
| Country of Origin | China |
| Customer Reviews | 4.4 4.4 out of 5 stars (20,034) |
| Enclosure Material | Leather |
| Item Dimensions | 9.8 x 8.5 x 2.6 cm |
| Manufacturer | SoloWIT |
| UPC | 630792758119 676422970025 |
| Unit Count | 1 Count |
な**け
かなり驚きだったのでレビューします。 簡単さ:付属のピックで剥がすだけです。新しい方も穴に合わせて設置をするのみです。 色味:ネイビーですが純正と何ら変わらない色味です。互換であれば多少変化がありそうですが純正との違いが本当にわかりません。 質感:上に同様です。レザーも純正同様柔らかめで遜色ありません。 総じて、非常に簡単で新品になったようで最高でした。Beats studioをお持ちでパット交換を検討される方には非常にお勧めです。
M**O
純正品をボロボロになっても使うくらいならすぐにこの製品で新品同様に戻して使ってあげた方がヘッドフォンも自分も幸せになれると思います。 作業も簡単、元どうりに戻ってとても良かったです。
A**A
品質見た目ともにいいと思います。 耐久性に関しては現状何とも…。
高**知
バッチリです。
S**E
Amazing
The best quality
U**ト
この商品は自分で間違って購入したから使ってないので何とも言えませんが商品自体は良いと思います。
や**ん
ボロボロになったので変えました。交換簡単でした。
P**K
格安の商品と比較して、造りがしっかりしている。以前違うストアで購入したものは生地を接着剤で接着していただけで、すぐにスポンジが出て来て使い物になりませんでした。 この商品はしっかり縫い合わせてある為長く使えそうです。 次回も購入したいです。
P**S
Top voor studio 3 beats
P**K
Super nice and easy! Looks fabulous. Very comfy (even more so than the OEM ones. Its just what you need to do with these pleather items, replace them now and then. Mine stil worked fine but I did not like the cracking look. Now I got an accent to match my iPhone 17 Pro Max in orange too! The demo made me a little bit unsure at first, and I ended up using a butter knife because the little plastic tool was just not doing the job (and they tell you you can use a butter knife). Once you get the old ones to pop off then it comes off clean. There are little male knobs that fit perfectly with the female indents in the new muffs. Try to follow that and then they will lay flat. Don't be alarmed, thre are a lot of little holes, but the right ones fit in the right spot, even one that is super small in diameter.
R**N
Easy application and great easy fix to sustain the lifespan of the headphones and refresh them. Yet to notice any imperfections with the product, seem to be flawless so far
A**E
Kurzbewertung und Montagehilfe: SoloWIT Ersatz-Ohrpolster für Beats Studio 2 & Studio 3 Was es ist - Austausch-Polsterpaar für Beats Studio 2.0 und Studio 3 (Over‑Ear), nicht passend für Solo/EP/Pro oder Studio 1. - Meist Kunstleder („Protein Leather“) mit Memory‑Schaum, oft inkl. Staubschutzgewebe über dem Treiber. Klebemontage, teils mit Zusatz‑Fixierlaschen. Stärken - Günstige, passgenaue Alternative zu OEM‑Pads; guter Komfort und Abdichtung, ANC‑Leistung bleibt bei sauberer Montage nahe Original. - Verschiedene Farben/Nahtdesigns verfügbar. - Häufig mit 3M‑Kleberingen vormontiert; Einbau in 10–20 Minuten. Schwächen - Haltbarkeit Kunstleder abhängig von Schweiß/Hitze; kann nach 12–24 Monaten reißen. OEM meist etwas langlebiger. - Kleber fordert saubere Vorbereitung; bei Wärme/Feuchtigkeit kann sich ein schlecht gereinigter Sitz lösen. - Velours‑Varianten (falls angeboten) verändern Klang (weniger Bass durch geringere Abdichtung). Lieferumfang (typisch, setabhängig prüfen) - 2 Ohrpolster, Kleberinge (vormontiert oder separat), evtl. Kunststoffhebel/Alkoholtuch, Anleitung. Einbau – Schritte für festen Sitz 1) Alte Pads entfernen: Polster ringsum abziehen; Kleberreste vollständig vom Kunststoffring am Kopfhörer entfernen. 2) Reinigen: Klebefläche mit 70–90 % Isopropylalkohol säubern, trocknen lassen. Je sauberer, desto besser hält’s. 3) Ausrichten: Links/Rechts prüfen; Naht meist nach unten/hinten. Trocken anlegen, Passung merken. 4) Kleber aktivieren: Schutzfolie abziehen. Optional Klebering und Auflagefläche leicht mit Föhn anwärmen (handwarm), erhöht Anfangshaftung. 5) Aufpressen: Pad sorgfältig ausrichten, umlaufend kräftig 30–60 s andrücken; dann noch 2–3 Minuten mit Druck halten. 6) Aushärten: 12–24 h nicht belasten, damit der Kleber vollständig bindet. Tipps - Achten Sie darauf, dass das feine Lautsprecher‑Gewebe nicht verrutscht/gefaltet wird und keine Öffnungen/Ports verdeckt. - Für schweißintensive Nutzung dünn mit pflegendem Tuch reinigen; keine aggressiven Reiniger/Alkohol auf dem Kunstleder. - Wenn ein Pad sich löst: Fläche erneut gründlich entfetten und einen neuen 3M‑Ring verwenden. Pro - Gute Passform, Komfort und Abdichtung zum fairen Preis - Einfache DIY‑Montage mit vormontierten Kleberingen - Erhält Klang/ANC nahe am Original (bei dichter Montage) Contra - Kunstleder-Abnutzung über Zeit, besonders bei Hitze/Schweiß - Klebemontage verzeiht keine schlecht gereinigten Flächen - Nicht für andere Beats‑Modelle passend Fazit Preiswerte, solide Ersatz‑Ohrpolster für Beats Studio 2/3. Wenn Sie die Klebeflächen gründlich vorbereiten und die Pads sorgfältig ausrichten/andrücken, erhalten Sie Komfort und Klang sehr nahe am Original. Für maximale Langlebigkeit OEM‑Pads erwägen; für gutes Preis‑/Leistungsverhältnis sind SoloWIT‑Pads eine empfehlenswerte Wahl.
K**D
We got these Beats replacement ear pads for our headphones and they worked out great. They came with detailed instructions that showed how to remove the damaged ones. It took a little bit of work but they came off clean. I prepared the area with alcohol and when it was dry I removed the sticker on the new ones. I pressed them in and rather than put them on a book to set, I just wore them. They sound amazing and over all the install was easy. It feels like we have a new set of headphones. I would recommend these if your padding is degrading or if they were damaged. Very glad we got them.
Trustpilot
1 month ago
3 weeks ago