Monoprice Select Mini 3D Printer V2 - Black With Heated (120 x 120 x 120 mm) Build Plate, Fully Assembled + Free Sample PLA Filament And MicroSD Card Preloaded With Printable 3D Models
Product ID: 69240008
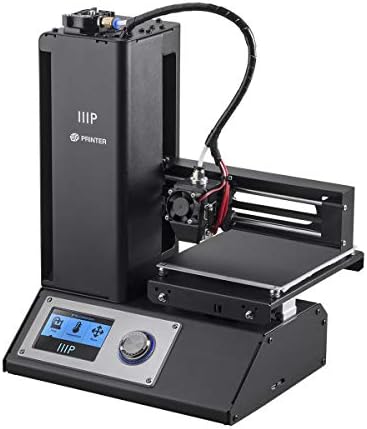
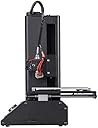
Color:Black MP Select Mini 3D Printer Too often, getting a low-cost 3D printer means getting a box of ill-fitted parts with poorly written and incomplete documentation. You end up spending hours on the internet, searching forums and asking for help to get the printer assembled and operating properly. That isn't how Monoprice operates and this 3D printer is a perfect example! This printer not only comes fully assembled, it has already been calibrated at the factory. All you have to do is perform a quick check to verify that the print bed is still leveled, in case it shifted during shipping, then load the included MicroSDTM card, load some filament, and start printing the preloaded model. Nowhere else will you find a 3D printer ready to print out of the box at such a low price! Affordable 3D printing for everyone All Filament Types: The heated build plate and wide range of extruder temperatures allow this printer to work with any type of filament, from basic filaments, such as ABS and PLA, to more advanced materials, such as conductive PLA, wood and metal composites, or dissolvable PVA. Compact Desktop Design: Featuring a small footprint and basic, open frame design, this 3D printer is compact enough for any desk. Ready to Print: Unlike most other low-cost 3D printers, this printer ships fully assembled and has already been calibrated at the factory. We even include a MicroSDTM card with preinstalled models, so you can start printing right out of the box! Features Factory Calibrated Heated aluminum build plate nozzle cooling fan for printing all filament types Quick-release steel gear filament feeder Easy to use color LCD 0.4mm extruder diameter Complete kit with bed scraper, and MicroSDTM card with preloaded model files Micro USB and MicroSD card connectivity PC and Mac compatible Compatible with Cura, Repetier, and other
A**R
... I just received this printer and so far it's amazing! However I've noticed some people on youtube or ...
Ok I just received this printer and so far it's amazing! However I've noticed some people on youtube or other places that shows them having a bit of trouble setting it up so if you're planning on getting this printer use the following steps to have an awesome experience.0.) Order a spool of Hatchbox 1.75mm Filament to either arrive before or at the same time as the printer. (The sample PLA included isn't enough for anything)1.) The VERY first thing you do is use an X-acto knife to cut away the corners of masking tape covering the bed screws! LIKE I SAID THE VERY VERY FIRST THING!2.) Use the provided Allen Key to lower the bed at each corner TWO full turns!3.) Remove the tape from the hot end (NOT THE YELLOW TAPE AT THE NOZZLE) but the one that holds the hot end in place for shipping4.) Plug in the power supply and turn it on5.) Navigate to "Move>Home" and home the printer and guess what? The nozzle won't dig it's way into the print bed because what? YES we lowered the bed first!6.) TURN THE PRINTER OFF!7.)Now use a strip of regular typing paper and gradually start to raise each corner while checking the tension on the paper until you feel some resistance but not too much. In other words like a guitar we tune up not down!8.) DO NOT UPDATE THE FIRMWARE UNLESS YOU NEED TO TO TROUBLESHOOT LATER ( In spite of what some gurus say on youtube)9.) Take your SD card, load a test Gcode from Thingiverse (Print something you'll actually use like the New Dial for the MP select mini on thingiverse) it takes 26 minutes to print (NOT THE CAT! it takes too long!)10.) After each print leave the filament in the nozzle and never try to pull it out once it cools because you'll break the hotend! To switch filament (Empty spool or different color) Preheat to 210 wait for it to reach that temp, extrude a little bit and then pull it out from up top)I wish this info was put together in one place like this when I was reading reviews, It took me like 4 weeks to gather all the steps.Now stop thinking about it and just order it!, a year ago you'd have to spend $500 to get a printer this good
R**.
A print comparison
Red robot = $2700 3D printerBlack robot = $200 3D printer (this one)I'm stunned that you can now buy a 3D printer for $200 and get this good of a result!
R**H
Can't beat this for the price !EDITTED!
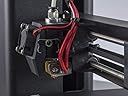
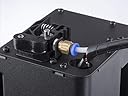
Can't beat this for the price. The quality of the prints are amazing as is the build quality, I can't understand the price being so low...Edit: I have ran into a few issues since I bought it, so I knocked off a couple stars. Listing them below:1. Since the gantry is only supported on one side, and it will eventually begin to sag to the right. Unsupported, the gantry sags so much the right side of the build plate had to be tightened all the way down to become level. This was corrected by buying a 6mm rod and linear bearing and 3d printing a gantry support. There are a few different models on thingiverse to choose from.2. The bed heating is VERY underpowered, and only makes it safely to 70c(60c from the UI). When printing over USB, the print will not appear to start on the LCD until the bed heats up, which is very non-user friendly, and may make people the printer is broken. I don't know any fixes for this other than patience.3. The stock hot end is only good for PLA, and is prone to jamming due to a gap being between the PTFE tubing feeding into the heatsink and the hot end's heat break. This can be reduced by butting the ptfe tubing into the heat break, but never totally eliminated. I ended up replacing the hot end entirely with an E3D V6 hotend with an all metal heat break, and have been very happy with the upgrade. Highly recommended. I also recommend using the 'Zero Offset' mounting kit for the E3d V6 off of thingiverse.4. The metal digs into the wiring where it feeds out of the top of the printer and will eventually cut through a wire. The fix is to use a better cable wrap, like one of those braided cable wraps.5. This printer is too troublesome to disassemble for general maintenance. It makes no sense for there to be so many unnecessary screws to get the panels off.6. The aluminum bed will warp on you, as this is what aluminum does. This will cause things like the edges of the print being too close to the nozzle, while simultaneous the middle of the bed being too far from the nozzle, a piece of glass to sit on the bed will correct this. Which leads to my next point.7. There is no way to offset the z-stop stock(so you can raise the home position of the hot end). You have to 3d print a spacer for the job, which is quite silly.8. The temperature reading is inaccurate, and there is no way to fully calibrate it, meaning you have to figure it out yourself for each filament.9. The stepper driver for the extruder has tendencies of overheating, I assume because the stepper is a bit weak for the job. However, upgrading the extruder body with a MK8 aftermarket body with an adjustable filament grip pressure, and adding a cooling fan to the stepper driver heatsink will fix your problem. This leads to my final point.10. The header on the mainboard meant for a stepper cooling fan is faulty, the mosfet for it was soldered the wrong way around... This means you have to run the fan at 100% all the time instead of it being temp controlled, which can be a little annoying to listen to.
Trustpilot
3 days ago
1 week ago