🪑 Elevate Your Relaxation Game with UNEEDE!
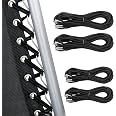
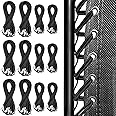
The UNEEDE4 Cords Zero Gravity Chair Replacement Cord Kit offers a reliable and eco-friendly solution for repairing your zero gravity chair. With upgraded lengths of 98.4" and 65", durable materials, and easy installation, this kit ensures your chair remains a staple of comfort and relaxation for years to come.
L**M
Works well and sized right!
First, let me say that restringing this chair is a total pain -- from removing the old lace to installing the new one. I ended up just cutting the old lace in several places since it was already stretched, rotted, and broken in some places. Secondly, it's going to take some time. And lastly, yes, the cords are long enough to complete the project -- both sets (shorter ones for the top half of the chair and longer ones for the bottom half of the chair). Understand that the zero gravity chairs use the tensioning of the laces to keep the webbed laying mat in place. The lacing *has* to be tight to keep the mat in place *and* to support the weight of the person sitting on it. There is some "give" to the string so that it has the ability to flex somewhat when a heavier individual sits on it. That's how they are designed.When I first started restringing my chair, I made the mistake of trying to pull both ends of the cord through the holes at the same time. Not only was this extremely hard to do, but it seriously hurt my hands. Instead, I looped the cord through the first "buckle" and then pulled each half of the lace through the holes one at a time. Doing it this way, I didn't need to use wire ties or binder clips to hold it, although that might really be helpful for some -- especially if you struggle with hand strength (and you will need a good amount of hand strength for this). Thank you to those who suggested these tips because you do need to keep the rope taught as you pull it through the holes. If you're working your way through the project and it comes up short, the most likely reason is because it wasn't pulled tightly enough through the buckles and the holes and not because they are sized wrong. I had to restring two strands due to not pulling it tight enough. The strength of these is pretty remarkable and like some of the others, I found it to be stronger than those that originally came with my chairs. Like all things left outside, I'm sure these will dry rot after time like the originals, but I'd definitely purchase these again as they are a good price and pretty easy to do once you get the hang of it. Just make sure you're pulling the cord tightly as you weave through. If you have an inch or so left after your last hole, it's much easier to end the cord and loosen it a little working backward through the lace than it is to re-weave it because it wasn't tight enough to start with.Remember -- Keep the lace as tight as you can moving up the chair through the buckles and laces. Good luck!!
M**M
A challenge but worth it, handy tips below
I had a set of zero gravity chairs from Costco that I ordered in 2018. They were used outdoors year round in Florida and by 2021 the elastic was failing, particularly in the seat area of the chairs. I did some research and settled on this elastic repair kit. These kits do work and are probably the right size for most chairs, but it is a real chore to actually install the new elastic. I completed the first chair in winter of 2021, started the second chair, and disliked doing it so much I put off finishing it for months. I finally completed the task a few days ago and I’m going to give my tips on how to make the process as easy as possible.First, you absolutely cannot do the job without sturdy zip ties and a good pair of sharp scissors. A second set of hands really helps too. Start with the bottom half of the chair by installing the zip ties tightly on both sides through every other or every third hole. The zip ties have to duplicate the tension of the elastic while you remove and replace the old material. Next cut out the old elastic on just one side of the chair, being careful not to cut the zip ties. If you cut out the elastic without securing the seat with zip ties first, you will never get the seat tight enough to accommodate the new elastic, which won’t be stretched and loose like the old material. Once the old elastic is removed on one side thread the new elastic in by copying the pattern from the opposite side you haven’t removed yet. From the very first hole, you must pull the elastic tightly, and keep the tight tension the entire length of the elastic as you work. If you don’t, you will run out of length and the elastic won’t be long enough to complete the bottom half. The first time I didn’t pull it tight enough so I had to start over. People who say it isn’t long enough probably aren’t pulling it tight enough. And this is where assistance helps tremendously. I found it very difficult to keep the elastic stretched, and thread it over and under the holes and chair on my own. My assistant would grab it from above and pull up while I made sure the strands were lined up and tight, and then they would feed it down to me so I could grab it under the chair. It’s an awkward process. They also helped me make sure I was matching the pattern and not missing any holes or pattern repeats. Also, do not stretch or keep tension on the elastic by pulling the metal ends, they can come off. I did that and had to re-attach an old metal end from the old elastic. My hands also got very tired, so my assistant would hold the cord for me occasionally for a break. Once you get to the end of the section carefully feed the metal end through the last hole and flip the end to hold it in place. Now you can carefully cut out and remove the zip ties on that side, making sure not to knick or cut any of the new elastic, and adjust any tension as necessary. Repeat on the opposite side, then use the same process for the top half of the chair. The top was a little easier than the bottom. For some reason I had a little more slack in the top elastic and the chair itself doesn’t get in the way of what you are doing.You can see my photos for the final results. The cat photo has a slight variation on the very bottom threading on the right. I skipped the first hole to try giving myself a little extra slack in the elastic. That was the first chair I did and was still learning exactly how hard I needed to pull and stretch the elastic, and was questioning whether it was long enough. Skipping that didn’t really make a difference. These chairs and elastic are supposed to be able to hold a certain amount of weight, your maximum hand strength isn’t more than that, so just stretch and pull and it will work fine. I’m just so glad I don’t have to do this again anytime soon!!! Many thanks to my assistant as well, couldn’t have done it without you!!!
F**R
Did the job.
Renewed a zero gravity chair that had it’s elastics breaking and losing elasticity. Has everything yiu need and good instructions. Best to do one side at a time and just duplicate the other side. E careful when ordering to get the right length or count eyelets to make sure you get a long enough set. So glad the replacement cords exist, so we didn’t have to toss the chair, which was otherwise in great shape.
D**A
Easy peasy.
Works as advertised
K**N
Durable
Worked great. Was able to use chair again.
M**E
Gravity chair laces
Easy to install , worked perfect ,
K**N
Easy Peasy
This was very easy to replace the old with the new. Great product. Chair is like new again!
N**E
Giving Up
I have two zero gravity chairs that I love, but because they are out in the sun all summer, the elastic bands holding the chair sling wore out and needed to be replaced. This is the second set of elastic that I purchased...the first was way too short. These were a bit longer and closer to the original length. The original chair had the elastic weaved through twice so that the double bands would be stronger. I tried that with this set, but I had to pull so hard to get it to stretch and it didn't work. Also, if you pull too hard, you lose the separation between the frame and the fabric which should be there. This really is a two person job with one person weaving one side and the other person weaving the opposite side trying to maintain the gap. This set came with pins to help with that but they were really awkward to use. So then I tried to use just a single weave, but that was too loose when you sat in the chair. Ugh. So I gave up. I'm still giving this product three stars because the elastic itself is thick, strong, and with a good stretch. I'm guessing that someone who knows what they're doing might be able to make it work.
Trustpilot
2 months ago
1 month ago