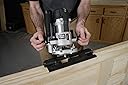
This review is for the Porter-Cable Strike and Latch Template, Porter-Cable #59375. A router template is a pattern that is used with a pilot bearing router bit (or with a special insert for the router) to keep the routed area within bounds. The template, in conjunction with the router setting, also keeps the depth of the routed area to the desired amount. This kit uses a pilot-bearing bit (Porter-Cable #43671PC) that is supplied. The bit is 1/2" diameter with a 5/8" guide bearing mounted above the cutter. Using the supplied bit results in a mortise with a 1/4" radius at the corners. This exactly matched the Kwikset lockset hardware I was using. If your hardware requires square corners, you will need to chisel them out. According to P-C (Porter-Cable), this template will allow you to rout mortises for strike plates and latch plates that are 1" x 2-1/4" and 1-1/8" x 2-1/4". The larger size uses a T-shaped strike plate and this shape is supported. I tested only the smaller size. The instructions assume you have already drilled the holes in the door for the lockset and the hole in the jamb for the bolt. I had already drilled my doors, but I can see that you could also easily use this template to rout the mortises before drilling the holes. I bought this to rout the strike and latch mortises for about 18 doors in a new house. After using it for that entire job here are my observations and opinions: First, it is not a professional-quality tool. This template is made from plastic, or something that is very much like plastic. If you need to use this for a houseful of doors every so often, it probably will not stand up. I don't think it will get broken in the toolbox (although it might), but if you touch the template with a spinning router bit, it's the template, not the router bit that is ruined. There are seven very small parts that are part of the kit. These are the bit, the two nails to attach the template to the door or jamb, and the four locking pins that are used to position the template on the door properly. They are easily lost, and P-C did not provide any means to store them securely with the template. P-C did at least provide a small, about 2"x2", Zip-Lock-type plastic bag. Unless you are an obsessively organized person, you will probably lose these items before you hang your next door. I will tape my small bag to the template and hope I can find everything when I need it again. P-C supplies four locating pins but only two are required, so you have two extras. They do not, however, supply additional double-headed nails, and these look like they could be more easily lost. You can substitute for the nails with any number of other hardware items however. The instructions are clear enough, but I found that if I followed them the mortises were incorrect. I was using Kwikset interior door locksets. This is a very popular brand. The latch plates were 1" x 2-1/4", which is a size that is supported by the template. Following the instructions, I set up the template and routed the latch mortise on the door. The mortise was not only in the wrong position, but it was also too small. I adjusted the position of the template and re-routed the mortise. After some trial and error, I finally got the lock bolt to install, but the edge of the door looked like I did the routing freehand. The strike plate mortise on the first door was also in the wrong place, although this was more easily fixed. With the template fully against the doorstop, the strike plate location was too far out (away from the doorstop), resulting in a door that would close, but would have so much free play that it would rattle. There are two removable spacers that allow adjustment for the two sizes that this template supports, and if I removed one of them I could rout the strike plate mortise close enough to the doorstop to get a proper fit. After trying to follow the instructions on a second door, I quit using them. Here's my method: For the latch plate mortise: 1. Secure the door so it will not move. I did this by using a pair of wedges under the door. 2. Slide the lockset bolt assembly into the hole and position it correctly. 3. Do not use any locating pins on the template. Place the template over the lock plate on the edge of the door and position it so there is an equal clearance all around the lock plate. 4. Attach the template to the door in this position with the supplied nails. 5. Remove the lockset bolt assembly from the door. 6. Adjust the depth of the router bit. The Kwikset lock plate requires a deeper mortise than the strike plate, so I had to adjust the depth whenever I switched from one to the other. 7. Using the supplied bit, rout the lock plate mortise. 8. Remove the template by pulling the nails. 9. Install the lockset into the door according to lockset instructions. Aside: The best method I have found for setting the location of the strike plate and its hole in the jamb: 1. Drill both holes in the door with a 1/8" bit. 2. Drill the large (2-1/8") hole for the doorknob. 3. Insert a cut-off nail into the hole for the bolt and close the door. 4. Press the point of the nail into the jamb by striking it through the hole in the door. You will probably need a bar of some kind to reach the nail. 5. This will mark the location of the bolt on the jamb. For the strike plate mortise: 1. Hold the strike plate in its proper position on the jamb. For some strike plates, like the Kwikset brand that I was using, you must drill the hole first. The strike plate has a part that extends into the hole. 2. Mark the top and bottom of the strike plate on the jamb. Remove the strike plate. 3. Remove both spacers from the 1" x 2-1/4" part of the template. 4. Do not use any locating pins. Position the template against the doorstop. Slide it up and down until the clearance from the marks is equal, top and bottom. 5. Attach the template to the jamb using the nails provided. 6. Adjust the depth of the router bit. The Kwikset strike plate requires a shallower mortise than the lock plate, so I had to adjust the depth whenever I switched from one to the other. 7. Rout the strike plate mortise. 8. Remove the template from the jamb. As you may have guessed, this template will leave two small nail holes in both the jamb and the edge of the door. Short of an elaborate clamping method, there really doesn't seem to be any way around that problem. I used my Porter-Cable 690 router with a D-handle. It's a nice router, but not particularly lightweight. A lighter router will be easier to handle. The bit requires a 1/4" chuck, so I don't think you can use anything as lightweight as a Roto-Zip. All in all, this tool did the job I needed it for, but if I were a professional finish carpenter, I'd look for a metal template that was easier to set up and adjust. Except for removing the spacers (mentioned previously) there are no adjustments possible with this template.