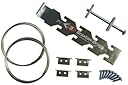
Hercules Universal Sink Harness Kit
Product ID: 4783882
🔧Universal fit for all sink types
⚙️No drilling or adhesives needed
🏗️Transfers weight to cabinet, not countertop
Desertcart purchases this item on your behalf and handles shipping, customs, and support to Cyprus.
🔩 Secure your sink like a pro—no compromises, just Hercules strength!
The Hercules Universal Sink Harness Kit by Braxton-Bragg is a versatile, no-drill support system designed for undermount sinks of all materials. It eliminates the need for costly brackets or adhesives by transferring sink weight directly to the cabinet, protecting countertops from damage. Ideal for double bowl, bar, and vanity sinks, this fast, economical kit is a top-rated solution trusted by professionals and DIYers alike.
| ASIN | B00ILFKWUY |
| Best Sellers Rank | #73,453 in Tools & Home Improvement ( See Top 100 in Tools & Home Improvement ) #127 in Kitchen Sink Installation Parts |
| Customer Reviews | 4.5 4.5 out of 5 stars (663) |
| Date First Available | February 1, 2014 |
| Item Package Quantity | 1 |
| Item Weight | 6.7 ounces |
| Item model number | 17310 |
| Manufacturer | Braxton-Bragg |
| Part Number | 17310 |
| Product Dimensions | 8.62 x 5.35 x 1.14 inches |
A**G
Great solution to a difficult problem
Best way to secure an undermount sink to granite. Thought I needed 2 kits (one on each side of the single centered drain in my ss sink longways), but after watching a YouTube video, looped 1 wire from the backside of the sink onto the metal piece. Then looped 1 short wire right in the center of the cabinet and hooked it to the bolt assembly. Worked great!
Z**H
Incredible
I’m a handyman and I’ve repaired a surprising number of undermounted sinks that have become detached from the counter and fallen into the cabinet below. These are the only things that realistically work, because the hooks that come with the sink are always trash and don’t work, especially if the guys installing it didn’t cut the countertop (usually granite) perfectly. Sorry I don’t have a video or pictures. Next time I do it I’ll upload some, but I’ll try to explain how I use it Tips: 1. Remove old sink and scrape the old silicone off the sink and counter. Take your time and make it CLEAN clean! 2. Get board (2x4) and put it across the huge hole in the counter where the sink goes 3.Put a solid, unbroken bead of 100% silicone around the edge of the sink 4. Take a bar clamp apart (search “quick clamp”) and feed the non-handle end up through the hole in the sink (that would connect to the drain/garbage disposal) and reconnect it to the handle side of the clamp. (As if you wanted to clamp pieces of paper to the inside and outside of the bottom of the sink) 5. Lift the sink and put the handle side of the clamp on the 2x4, with the other side of the clamp on the bottom of the sink. Now, as you squeeze the clamp it will suck the sink up to the bottom of the countertop. (Imagine you’re ice fishing and you cut a hole in the ice(the hole in the counter,) lay a board across it, and then dropped the hook(bottom part of the clamp) in through the hole. If you’re standing on the board and a fish(the sink) bites, you(the handle of the clamp) can lift up the fish(the sink).) 6. Take this Hercules hangar and install it. Follow the instructions. They aren’t the best, but you’ll figure it out. You screw two of the little brackets into the cabinet on either side of the sink and feed one wire through each side so there is a triangle of wire coming from each side of the sink. Loop those over the other hardware and crank it tight so that most of the weight of the sink is on this instead of on the silicone and clamp. 7. All done! Take off the clamp and all the weight should be on this hangar thing and not on the silicone.
N**F
Great gadget for supporting metal sink
I moved to a house with a kitchen sink insufficiently jury-rigged to stay in place so that it sagged and the caulk was separated. A handyman said be could build a cradle for the sink for about $400. Hah! I ran across a YouTube video demonstrating a sink install using this harness and it looked like the perfect solution for my situation. The sink is stainless, so I wasn't concerned about the weight pulling the screws out of the sides of the cabinet where the sling must be attached. If I was installing a heavy undermount sink, I'd be concerned about the short screws and would likely install this using longer screws that extend past the cabinet walls into wood strips for reinforcement. The directions were very easy to follow and I believe DIY beginners wouldn't have any problems setting this up. A second pair of hands could come in handy but with the help of some 2x4s cut larger than your sink opening and some cleverly positioned straps, it's easy enough to do on your own. A gave this 4 stars because my particular install was pretty difficult, so that may not be fair. The previous homeowners put a sink meant for a 36" cabinet into a 33" cabinet. Doh. (Face palm.) That size of sink measures exactly 33". Folks, I do not recommend you try doing the same in your own home! Since I'd like to eventually replace the countertops, sink and base cabinet, I just went with what I already had. The protruding screw heads for the sling made the cabinet width ever so slightly narrower, but the sink was already snug so I had the wrestle it into place for longer than should have been necessary. I had the sink suspended just below the counter and applied caulk; this is where a second pair of hands would have been a huge help. It took quite a while to get the sink seated against the counter because of its size. I took turns cranking the screw for the underside of the sling and hammering the edges into position. By the time it was correctly placed and the sling was tightened, the silicone caulk had started to set up and there is no way to get a clean application with a finger swipe. A second person would have been able to do this for me while I worked underneath. I used a sharp utility knife to cut out extra caulk, but it looks junky to me. All that being said, I would recommend this sling if you are replacing or reinstalling a sink with a countertop that is already in place. It's unobtrusive and won't take up any cabinet storage space. It has a strong hold, but I'd be careful not to overtighten your main screw so that you don't risk pulling the screws out of the cabinet walls. The value for the money is very good as this does the job very well for the low price.
J**G
Saved us thousands of dollars
Insane that nothing like this is sold at hardware stores!! Very affordable and the only effective solution to our kitchen sink, which completely fell through not too long ago! The stuff at the hardware store was very expensive and would not have worked without some pretty big remodeling. This really is an amazing product and we are very thankful for it!
A**A
Works as described
Works as described
M**K
Good stuff to keep your sick strong hold
It made my day when my bathroon sick just fell off. The metal strings are so strong and hard to bend too. But it serves the purpose. Good stuff
B**B
I'm glad this product exists.
The under mount sink in our kitchen needed to be reattached. It's a large sink in a tight corner cabinet. Worst combination for working on it. After watching various videos I decided to go with the Hercules system. Regarding the items that come with the kit: the screws provided are junk. I used coated self-tapping screws that had a much better bite to the threads. The clips seem flimsy but so far they are doing a fine job. The printed instructions are useless, and the video instructions, while better, hardly even attempt to address different install situations. Based on our sink design, a large, deep, rectangular single bowl sink with the drain in the middle, I bought two kits, one for each "side" of the sink, so the drain would not interfere. Because our sink is not mounted in the middle of the cabinet, and the cabinet walls are not parallel (it's a corner cabinet), knowing exactly where to attach the clips was the hardest part. I made my best guess but still ended up having to move 2 of the 4 clips. I wish there was a better way to determine that before drilling holes in the cabinet. The wire is stiff and can be difficult to work with. Remember to twist the wire to make it secure BEFORE putting caulk on the sink. The harness must be really close to the sink bottom for the system to have enough movement to tighten. The wire is stiff and can be bent out of shape easily while fitting things. This will put kinks in the wire which will add slack as they straighten out during tightening. Best of luck with your install
L**N
Fix for sagging sink
This worked great and solved a sagging sink
Y**G
Easy install
Still holding up after 5 years. I just looked at it today and it has been solid.
A**R
Awesome sink holder
This Hercules sink holder is amazing... It is very easy to install and its worth every penny.... Cheers
T**K
Good for supporting a sink without drilling into your counter
I watched reviews of this and it sounded very easy to install. It's not as easy as it sounds but the process is straightforward. Screw in the brackets to your cabinet walls on either side of the sink and set up the harness. The harness can loosely support the sink while you apply caulk. Then have a helper to hold the sink in the final installed position or use scrap 2x4 underneath the sink to wedge it in place. The final step is tightening the harness to support the sink. No need to tighten that hard, just so that you get the squeeze out from the caulk. The installation is challenging because of how stiff the wire is. The reviews didn't really mention how stiff it would be but pliers are necessary to manipulate and tie off the ends. This is probably the hardest part to move the wire to get it to the right length for the install. Ensure it's not too loose for the sink before tightening. There's only a few inches of slack on the tightening bolt so it can be hard to get the sink in place and still have enough bolt to tighten the harness. Definitely check the sink's placement while tightening the harness as it could shift position. Ideally, you want the tightening bolt to be placed in the middle of the sink to apply pressure evenly on the sink. It also leaves more space for tightening the bolt. Instructions are included but are terrible. The pictures are black and white and blurry. They don't really show how to install it. It's better to find the manufacturer's video on installing it. The wires are quite long and could probably support a 36" sink. I had to trim the wire and use the smallest notch on the harness for a single sink. It's plenty strong to support a heavy sink but those that want extra support could install two sets for larger sinks (might need to rotate the install orientation 90 degrees to have space for both harnesses). The harness has a notched metal plate that can be used to adjust the harness size. The edges aren't filed so be careful during installation as it can cut you. The included screws are an adequate length for installation. Pre-drill your holes so that it is easier to install and you will have no problem with the screws stripping. The price could have been better for what this is (metal brackets, wires, screws, and a metal plate). But pricing out epoxy with support brackets or drilling holes on the counter's underside isn't that much cheaper of an option and requires more time (if waiting for the epoxy to cure). This would be an easier install for someone that is comfortable screwing in brackets and doesn't want to risk cracking their counter with drilling or waiting for epoxy to cure. This design allows plenty of space to tighten the harness.
L**S
worked exactly as advertised
I installed it as per the directions and it worked very well.
A**R
Quick fix!
Easy to install, strong!
Trustpilot
3 weeks ago
2 weeks ago