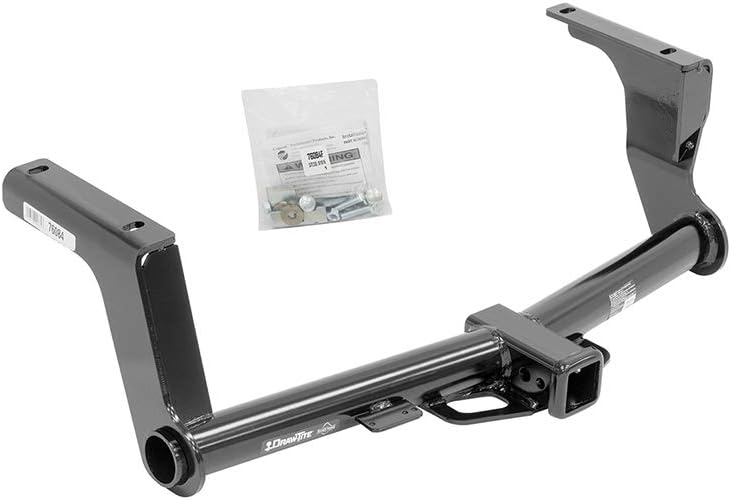
Went on smoothly. I installed this on a 2016 Ford Transit 350 HR. The only thing extra I did was add some washers in-between the frame rails and front-most carriage bolts to fill the frame gap. Total installation time was around 60 minutes. Steps: 1. Spray the four bolt holes you are to tap with a spray gel lubricant. Spray gel because you don't want it dripping all over. 2. With a round, steel-toothed brush, clean out all four holes you are to tap. 3. Mark each bolt you will use so that you know which bolt will marry with each hole you are about to tap. 4. Lube your bolt (yeh I know). 5. With a large ratchet and 15mm socket, firmly press and rotate the bolt until it bites into the frame hole. 6. Check to make sure you are driving the bolt straight. 7. Continue to thread the bolt by hand until you are all the way tight with the frame rail. 8. Use an impact driver to remove the bolt. 9. Repeat steps 4-8 for each of the four bolt holes in your frame. 10. Use the fishing wire to run the two carriage bolts and plates through the frame rail and down. LEAVE THE WIRE ON THE BOLT FOR NOW. You are now ready to lift the hitch into position and bolt it onto your vehicle. 11. Grab some large, brass washers from the hardware store and with mashing tape, tape them to the front-most bolt holes. These will set in-between the hitch and the frame rail, taking up the space and keeping your hitch level. 12. While the hitch is on the ground, run the carriage bolt fishing wires through the matching holes. This will allow you to keep align the carriage bolts while lifting the hitch into place. 13. Once the hitch is lifted into place, use a small ratchet to bolt it into the pre-tapped holes you created on Steps 4-8. 14. Leave all of your bolts semi-loose so that you can align the hitch. 15. Remove the fishing wire from the carriage bolts. 16. Use the washers and nuts included and assemble the front most carriage bolts. 17. Pull the mashing tape off of your hitch that held the washers in place between your frame rail and hitch. 18. To the best of your ability, align the hitch. 19. With a torque wrench, torque down all fasteners. You are done.