We remain fully operational. Our teams are working around the clock to ensure your deliveries continue safely.

DOWNLOAD THE APP


Copyright © 2025 Desertcart Holdings Limited
DOWNLOAD THE APP


Buy anything from 5,000+ international stores. One checkout price. No surprise fees. Join 2M+ shoppers on Desertcart.
Desertcart purchases this item on your behalf and handles shipping, customs, and support to Cyprus.
💧 Elevate your home water game—soft, smart, and sleek hydration awaits!
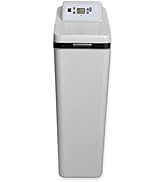
The Kenmore 350 Water Softener is a high-capacity, whole-home system designed to reduce hardness minerals by up to 90 grains per gallon and clear iron up to 8 PPM. Featuring IntelliSoft adaptive technology, it optimizes salt, water, and energy use while its compact design fits easily in tight spaces. The advanced display and sediment screen ensure easy monitoring and protect your plumbing and appliances, making it an efficient, space-conscious solution for cleaner, softer water.


| ASIN | B016DXLMCM |
| Brand | Kenmore |
| Capacity | 0.83 Cubic Feet |
| Color | Black |
| Customer Reviews | 4.3 4.3 out of 5 stars (361) |
| Date First Available | 18 September 2021 |
| Item Weight | 36.3 Kilograms |
| Material | Iron |
| Model Number | 383500E |
| Product Dimensions | 50.17 x 41.91 x 121.29 cm; 36.29 kg |
S**N
Came with a damaged part
J**N
We got this model as a direct fit plug and play unit to replace a nearly 20 year old similar model. This units plumbing fittings at the rear were about 3/16ths inch lower that the model we had installed. It was hard copper pipe and I did not want to redo the pipe. Luckily I had a spare piece of ceramic floor tile in the shop. I placed the tile on top the softeners previous platform and put the new softener in place. A perfect fit. The softener with its basic settings lowered our hard water from 125ppm to about 20ppm. Works and looks great
S**O
Nice, compact, easy to program. The instructions were TERRIBLE. The QR code right in the box sends you to a video which isn't even specific to this model. It has segments to connect things which this model doesn't have and excludes CRITICAL steps needs for this specific model. Recommendations for a good experience: 1) Expect that you will need two 1" x 1" flexes. They're at Lowe's in the WATER SOFTENER SECTION. You won't find them in the regular plumbing sections. 2) The video neglects to show that the hood can be detached and moved slightly (but not removed entirely as there are wires attached), which gives better access to the parts you need to attach. 3) FIRST, attach the bypass valve to the back of the unit The video doesn't show that, and doing it later sucks. THEN attach the flexes to the bypass valve and LAST attach the flexes to your plumbing. 4) The video omits entirely that apparently you need to cut the drain hose into two pieces and manually attach it to the drain fixture under the hood. I didn't know that and the drain sprayed everywhere when I ran it. Only when looking for the source of that leak did I find the drain fixture and realize you have to attach a hose to it. Read these instructions before the video, then watch the whole video several times before you start, see where these instructions fill in the gaps, and you'll enjoy this product.
S**N
Should you previously have had a craftsman 350 such as I did? You will find it very easy to connect for the installation. At this point, it seems to be doing the job very well and I’m looking forward to many years of its service.
J**K
Bypass valve nipples are plastic. Careful with sweating in copper fittings. Otherwise very satisfied
Trustpilot
1 month ago
3 weeks ago