🚀 Elevate Your Adventure with Thule!
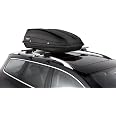
The Thule SideKick Rooftop Cargo Box is a compact and versatile solution for transporting small loads like camping gear or golf clubs. With a sturdy design, water resistance, and a user-friendly passenger side opening, it combines functionality with ease of use. Its lightweight construction and ample storage capacity make it an essential accessory for any adventure enthusiast.


| Water Resistance Level | Water Resistant |
| Mounting Type | Rack |
| Item Volume | 8 Cubic Feet |
| Closure Type | Buckle |
| Shell Type | Hard |
| UPC | 091021702578 |
| Manufacturer | Thule |
| Item Package Dimensions L x W x H | 54.5 x 25.5 x 12 inches |
| Package Weight | 9.93 Kilograms |
| Item Dimensions LxWxH | 54 x 25 x 15.5 inches |
| Brand Name | Thule |
| Warranty Description | Limited Lifetime |
| Model Name | Sidekick |
| Suggested Users | unisex-adult |
| Part Number | 682100 |
| Included Components | Rooftop cargo carrier |
| Size | One Size |
D**E
Secure and waterproof rooftop carrier
We bought the Thule sidekick carrier because I was tired of not being able to see out my back windshield since our family way overpacks for vacation! This did the trick. We were able to fit 4 bags, beach towels, and two camp chairs in the carrier. The carrier remained secure on two separate 650 mile+ trips. The lock stayed locked and everything inside remained dry despite driving through a couple of strong rainstorms. It’s sturdy, but light enough that one person can lift it and secure it to the car rooftop. We’re very pleased with this purchase and plan to use it for a long time.
T**S
Perfect Storage Accessory
I'm going to start off by saying: some of the reviews I read on this are quite misleading. One in particular mentioned it's construction being really crappy. Let me set the record straight on this thing, you put it together yourself. If you follow the directions (which are pretty dang clear and the assembly diagram is pretty dang easy to understand) then you won't have any issues with how the lid sits or the locks working or not. I did require an extra set of hands to hold the lid while I attached it to the bottom (shoutout to my daughter), but other than that, it's a piece of cake.I am using it on my 2010 Toyota RAV4. Mounted it by myself, no issues there. Worked fine with the factory crossover bars, no additional drilling required - I had seen previous mentions about additional holes needing to be drilled for other peoples' RAV4's, but I didn't have to do any of that (maybe I just got lucky).Anyway, it works great. Fits a large suitcase, bag of shoes for myself and 3 kids, backpacks with nick-nacks for the kids, and dog supplies for the trip. I honestly don't have a bad thing to say about it, but we will see how it lasts in the long-term. By the way, be sure to heed the instructions where it says "when not in use, store away from the elements." Makes sense, as the plastic seems a little thin and will likely wear prematurely if left in the sunlight for the duration of it's life. Hope this helps someone. God bless.
B**L
Works well, kind of small, does not feel worth the price
Let me start by saying that the car top carrier does it's job. It's watertight (if properly assembled), it's light weight, and it locks closed. But for the price I paid I had thought it would be bigger, or feel more durable. It's light weight because the plastic shell is very thin, not sure how that will hold up over the years. The assembly was not terrible, but it's large and bouncy and not the easiest to wrangle while you put the pieces together. I suggest having someone help. Mounting it to the car roof rack was easy but with the 8 screw down knobs it takes some wrist strength standing on a step stool, feels like it could be made easier. It would be a great deal at half it's price, I just wish there were competitors making other choices, I don't feel this was worth what I paid for as little as we are likely to use it.
C**S
Assembly made me wish for a quick death
This is an absolute NIGHTMARE to assemble. I had to put this together by myself, and the only way I was able to put the screws through the two hinges in order to secure the top of the box to the bottom of the box, was to actually crawl inside and seal the top of the box over myself like I was sealing myself into a coffin.I tried every other way I could think of, but the only way I could put the nut and washer on the other side of the screw to prevent the screw from sliding out of the hinge slot, was to crawl into the bottom of the box, and put the top of the box over me, like I was sealing myself into a coffin. The two screws slide through holes on the top of the box are supposed to line up in the hinge slots on the bottom of the box, and the screws need to be secured with a nut and a washer from the inside in order to keep the screw from slipping out of the hinge slot and out through the holes on the top of the box.I honestly would've rather suffocated and died while trying to secure the top of the box to the bottom. That, at least, would've made it so I never would have to continue with the assembly of this god-forsaken thing.Whoever came up with the assembly process: Not everyone can use two people! And even WITH more than one person, it's still a complete nightmare!To whoever came up with the assembly process of this: I hope that you and your family are cursed for 1000 generations. Even the most complex piece of IKEA furniture I've ever had to put together by myself, was easier than getting TWO screws, through TWO hinges, and securing the top of the box to the bottom.I honestly would've preferred to die whilst I was sealed up in this thing trying to secure the screws through the hinge slots. At least then I wouldn't need to continue the assembly of this wretched thing, and I also wouldn't have needed a coffin, because I would've already been in this cargo box!!! :~)
R**
Quality and ease.
It’s a Thule, so it will be a good product, that much is known.Let’s address assembly. Took about 20 by myself. First thing you should remember is to lay out all hardware and conduct an inventory and put together all nuts, bolts, washers and covers before assembly begins.THEN apply supplied weatherstripping. It will save you disassembly and reassembly.Next, put the LOCKS on, paying attention to the instructions as they are clear to the direction the hooks face.Now here’s the BIG HINT.Stand the carrier and end, insert the bolt through the pre-drilled hole and finger tighten.Flip the box onto the ends and repeat the process.Then assemble the hydraulicsNo need to build jobs, or stack books or anything weird.Then slap that bad boy onto the roof racks enjoy.
Trustpilot
4 days ago
3 days ago