🎯 Measure with precision, lead with confidence.
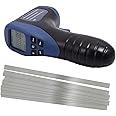
The NEIKO20713A Digital Tachometer is a professional-grade, noncontact laser RPM meter designed for precise rotational speed measurement from 2.5 to 99,999 RPM. Featuring ±0.05% accuracy, a large LCD display, and a compact, lightweight design, it offers instant readings from 2 to 20 inches away. Powered by a 9V battery (included), this tachometer is ideal for automotive diagnostics and industrial applications, delivering reliable performance in a sleek, portable package.


| Brand | NEIKO |
| Material | Crystal |
| Item dimensions L x W x H | 6.25 x 4.25 x 1.75 inches |
| Item Weight | 6.4 ounces |
| UPC | 837013207139 |
| Global Trade Identification Number | 00837013207139 |
| Manufacturer | Ridgerock Tools Inc. |
| Part Number | 20713A |
| Product Dimensions | 6.25 x 4.25 x 1.75 inches |
| Item model number | 20713A |
| Batteries | 1 9V batteries required. |
| Color | Black |
| Style | Tachometer |
| Power Source | Battery Powered |
| Item Package Quantity | 1 |
| Number Of Pieces | 1 |
| Measurement Accuracy | +/- 0.05 |
| Special Features | Lightweight |
| Included Components | Digital Tachometer |
| Batteries Included? | No |
| Batteries Required? | No |
| Battery Cell Type | Alkaline |
D**E
Works great.
Purchased this to verify the fan speed on a AC condenser. Shiny 3 blade fan.....read the RPM.....divide by 3. Had my answer in less time than it took to put the battery in. BTW.....the fan is rated for 850 rpm.....this fan is running 860 rpm. All good.
F**.
Works well
Works well, best to use reflector tape.
J**.
Works fine, but will drain battery
It works well and is easy to use. If the disc is speckled though it can give an erroneous high reading. It drains battery when turned off so if you are not going to use it for a while remove the battery.
D**K
Accurate and reliable
I bought this particular tachometer, because I own several tools made by Neiko, and they're quality tools. I used it to test my new 1.5kw spindle motor and vfd.It's important to use a small piece of the reflective tape on whatever you're testing. The tape wasn't sticking well to the spindle motor, because of the packing grease. Even after cleaning the collet chuck, it came off. So, I put a piece of non reflective tape on the chuck, and a small piece of the included reflective tape on top of it, and it's still holding.It was with the Neiko tachometer that I discovered that my new vfd display wasn't defaulted to rpms. That sounds like something that would be obvious, but my vfd reads out "r" before frequency, not rpms, so I thought r240 was 24000 rpms; it was a frequency of 240 (go figure). When I realized what was going on, I was able to correct the vfd programming so that it defaulted to rpm readout. I found that the vfd was correct to minus 35-50 rpms. The Neiko reading was rock solid, and consistent through 6 different spindle speeds. I didn't find a difference in reading based on distance from the source; the reading was the same whether taken 4" away, or 4' away.It came with a battery, which worked. But, I prefer a good alkaline battery over a mercury battery, so I'm storing it with a 9v alkaline. I do not store my battery operated tools with batteries inserted; I store the batteries with them, but not inserted.The storage pouch is nice. I'm storing the tachometer in the cnc table drawer. The neiko tachometer came with a zippered pouch, quite a bit of reflective tape (I'm only using about 3/16"), a 9v battery, and instructions.
H**O
great tool to have
easy to use, seems to be accurate. used it to set speed controller for a generator and the frequency was almost spot on.
M**T
That the money I spent is likely lost due to carelessness on the part of this manufacturer.
Why did you pick this product vs others?:It was affordable and I’ve had success with Neiko’s other products. Instructions were to insert 9v battery into the device and the + and - terminals were marked inside case. Then battery would not fit according to polarity. So squeezing the pos terminal made it fit then I discovered the terminal marks were backwards! That means I the battery got warm and could have damage.
M**S
Would be higher rating if I didn't have to fix it first.
Was not in a condition to work right out of the box. The device was still in shrink wrap so it was not a return, but it could not provide a reading first time I tried to use it. I work in optics and could tell right away the problem was with the lens assembly because it was loose and out of position. I was able to fix it quickly and then it worked like a charm. If the initial quality was high I would give it four stars. In case you take the plunge and also get a lemon, here is what to do:Remove the battery cover. There are two small black screws recessed in holes that need to be removed; use a skinny Phillips head screwdriver to remove them. At the opposite end there are two more screws also recessed. When those are out remove the top cover. The two push buttons may fall off their switches but don't worry, just set them aside. On the top of the circuit board near the lens you will see a clear photodiode; mine was bent at a severe angle. If necessary use your fingers to bend it so it is pointing straight forward toward the lens- make sure the photodiode does not bend down toward the circuit board because the light emitter is mounted on the underside of the board and you don't want to block the light. The lens is biconvex so it doesn't matter which side is which; it sits loosely inside a plastic ring. There is a larger plastic spacer that holds the lens firmly within its plastic ring- they don't snap together tightly but when you have them positioned correctly they will stay together well enough to place them together as a unit in the tachometer. The lens end of the assembly goes toward the photodiode. There is a rim on the spacer that fits in a groove at the very front of the tachometer and the rim has an oval shape so the assembly needs to be rotated so that it nestles down in the groove. Once the assembly is in place you can close the tachometer, but make sure the switch buttons are seated on top of the two switches (the Test and Memory switches) and angled at a 45 degree angle so they'll match up to the holes in the tachometer cover. Then you can press the cover in place over the switches and put the four screws back.It sounds awfully complicated but it really only took five minutes to fix and then it worked perfectly. I also can verify its accuracy because I was using a synchronous motor controlled by a pulse generator that outputs exactly 2500 rpm and that is what I got from the tachometer. My only quibble is that the device displayed 0 rpm when it actually wasn't getting a signal; I would prefer that it have an indicator of no signal.
M**.
Great tool
Works awesome Used it to set the idle on our Mitsu
Trustpilot
1 day ago
3 weeks ago