⚡ Elevate Your Experiments with ITO Magic!
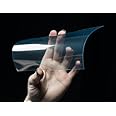
The ITO Coated PET Plastic sheet measures 100mm x 200mm and features a clear, conductive film ideal for scientific research and LCD/OLED manufacturing. Its flexible design allows for easy customization, enabling users to create conductive traces with various materials.
B**9
ITO Coated Plastic - This stuff could have a lot of uses!
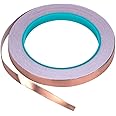
This material is really cool! I stumbled across this stuff after searching the internet about heated snowmobile visors. We were on a trip and a guy I was with had all kinds of fogging problems. I started looking at his shield and the material. Ended up being the power connector but it made me look into the actual material. I only bought this to play with at home and so far have added copper tape with electrically conductive adhesive to the top and bottom. I soldered wires to them and applied 12VDC. Looking at it through a thermal camera, you can see it gets hot (you can feel it too). I only wish I knew about this stuff 10 years ago when my paintball mask was always fogging on me! Amazon's price is a rip off if you compare it to Adafruit's site but Adafruit was going to charge $9 to ship it. No matter what, I was going to pay $20 for this.
D**R
Think this was used and showed no conductivity at all was fake.
The media could not be loaded.
N**7
Really Interesting For Exotic Applications
Ok so first off, you should know that this is not lab grade material. It's not what NASA is going to grab off the shelf for a lot of reasons, amongst them that it isn't what you'd call "low" resistance. It's also not going to be perfectly uniform. You also should probably expect some dings and a fair bit of warp. It's also not crystal clear - it has a light blue tint to it even with the protective film removed. Don't forget to remove that film when you go to use it, btw!What it does do is what you'd expect it to do; it conducts electricity at something around 30 ohms per inch or a bit more. You might get lucky and get a lower resistance sheet, but I did not. I don't care, it works for what I wanted it for. In fact, it works so well (as a Faraday cage window for a high gain photosensor) that I have twice now run into failures due to water getting in past my crappy weatherproofing and electroplating the film via a closed circuit between the photosensor Vcc source and the grounded film. Result was an almost beautiful copper film electroplated onto the PET ITO window. Obviously my weatherproofing needs work. As for its function as a Faraday window - I could not ask for better. My previous method used a metal mesh, which worked great but blocked too much light for my taste. This does not, and it manages to do a great job of blocking RFI from getting into the high gain amplifier system. Result is I can run that beast on the order of several million times gain while rejecting hum from the nearby powerlines. Works! I'll be favoring this over a glass variant for the foreseeable future mainly for cost reasons.Now, on to some nitpicky things you probably need to know: I'm using MG Chemicals 841AR shielding paint to shield the inside of the device enclosure, and also to contact the PET ITO window to close up the Faraday box. Problem is, it does NOT like to stay stuck. So, if your PET window has a bit of warp to it, which this of course does, then it's going to peel free. That's how I got my leaks twice now. I'm moving on to using epoxy to glue down the topside edge and keep it from doing that again. First time, I used enamel paint - failed. Second time I used silicone caulk - failed. I'm thinking regular 5 min epoxy just might work but we will see. This thing sits on my porch rooftop and has to endure blasting sun, high heat, and occasional torrential rains, so it needs some truly hardcore weatherproofing while still maintaining ground contact at all times.My method tonight will be thus: Heat flattening of the PET ITO window to remove the warp. Then placed down onto the 841AR coated window area with some alcohol laid down to temporarily liquify the grounding paint. Let it dry, then overcoat the entire window edge area with epoxy. Let cure, flip it over, and apply a bead on the inside all along the window edges with more 841AR with a glass dropper. Let THAT cure, give it a conductivity test, and then back into service it goes. Hopefully this time, Lady Starlight will give me a full season before another failure. Hopefully more than that.Anyway, I'm rambling out loud. Point is, as long as you're being realistic about what this is and what it can do, you're good to go with this stuff. It's FAR cheaper than ITO coated glass, easy as sin to cut, easy to work with, and good enough to not only act as a Faraday shield but also as an electroplating target if that's what gets you fired up. Copper plating looks quite pretty on it, so I could see some uses for that.Oh and I only gave it 4/5 stars because of the warps and dings mine had. It's not a deal breaker, just could have been a little prettier. I got several windows out of the one piece so it's fine.
A**E
Five Stars
Resistance isn't as good as ITO on glass but works okay for novelty experiments.
A**V
Don't buy
Defects bad areas
C**N
At time
Good material
E**N
Good for science project.
Good for science project.
J**S
many applications..
Very special type of material. I am using this material to make Capacitive Touch switch. If you use this material, you can use copper tape which has conductive adhesive on back, then you can solder to the copper tape.
Trustpilot
2 weeks ago
1 week ago