📸 Elevate Your Shots with Vintage Flair!
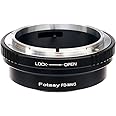
The FotasyFD Mount Lens to M4/3 Adapter is a high-quality converter that allows Canon FD lenses to be used on Micro Four Thirds mirrorless cameras. It features a manual focus system, a lock open aperture controller, and guarantees infinity focus, making it an essential tool for photographers looking to blend classic lens characteristics with modern camera technology.
| Maximum Aperture | 1 Millimeters |
| Minimum Aperture | 1 Millimeters |
| Image stabilization | Digital |
| Compatible Camera Models | [Olympus, Panasonic] |
| Lens Mount | Canon FD |
| Minimum Focal Length | 1 Millimeters |
| Lens Design | Prime |
| Focus Type | Manual Focus |
| Lens | Standard |
| Compatible Camera Mount | Canon FD, Micro Four Thirds |
| Maximum Focal Length | 1 Millimeters |
G**Y
Must have for mu-4/3 users!
I'm using the adapter with my Panasonic Lumix G10 and Canon FD 50mm f/1.8. I HIGHLY suggest this combo if you own a micro 4/3 camera! It fits snug, feels sturdy, and looks good. The price is right & now I want to run to every thrift store in the area to see what other FD lenses I can find!At first, I had an issue figuring out how to control the aperture on the lens, so I have copied the instructions that I used (originally an Amazon review, copied to mu-43 forum). Hope this helps! If you do this, the lock-open ring on the ADAPTER will control aperture, so just leave the lens itself alone. If you leave the lens on f/22 permanently, you can adjust to whatever you want with the lock-close (on adapter).--------------------------------1. Install adapter ring onto camera: align the red dot on the adapter and red dot on the camera, twist to close.2. Install lens on adapter:2a. Stop the lens down to its smallest aperture.2b. On the adapter, there is a ring that controls the position of a pin that allows for aperture control. Facing the front of the camera, turn the ring to its most counterclockwise position.2c. Seat the lens on the adapter (align the red dots). Now turn the adapter ring to its most clockwise position. This aligns the pin with the lens pin.2d. Twist the lens clockwise until it clicks shut. Now you should be able to rotate the aperture ring and see the aperture adjust. (The ring on the adapter can also be manually rotated, which will adjust the aperture, but fortunately it clicks to a shut position so you won't do it accidentally while shooting).3. Set the camera settings to "Shoot without lens." Otherwise, you'll get an error message about the lens when you press the shutter button.3a. Turn on the GF1, and press the MENU/SET button.3b. Scroll down on the left menu icons to CUSTOM MENU. In the CUSTOM MENU, scroll to the last item, and select SHOOT WITHOUT LENS -> ON.3c. Set the GF1 dial to M-manual or A-aperture priority.
R**.
Does Exactly What It Is Supposed To Do
This little mechanical ring, which has no glass in it, is very useful and well worth the money, if you own a mirrorless Micro 4/3rds camera but also own lenses for Nikon. I have a large number of older Nikon lenses left over from professional use years ago, and this little ring allows me to use almost all of them on my Olympus mirrorless camera. The IBIS (in-body image stabilization) of the Olympus actually makes these older lenses more functional on mirrorless than they are on the original Nikon cameras they were designed to work on.I love to use my older Nikon manual focus lenses on one of my Olympus cameras. My auto-exposure in Aperture Priority mode still works fine using the adapter,, and you get some interesting telephoto effects. For example, my old Nikon 200mm F/4 lens, which is quite small and cost me $35 used, becomes essentially a 400mm f/4 with image stabilization. This is a lot of fun for birds and other distant objects. Or you can take that 50mm f/1.8 lens that came as standard with your old film camera, and turn it into a very nice 100mm equivalent portrait lens.If you have newer Nikon G lenses that don't have aperture rings, this adapter won't work, because your lens will default to its smallest aperture and you won't be able to change it. There is another adapter that has an aperture ring built in for those lenses which only costs a few dollars more. I've been using the Nikon to Micro 4/3rds adapter as an example, but you can get these for virtually all brands of older lenses that will work with APS-c and Full Frame mirrorless cameras.
L**R
Valuable Accessory for G1 m4/3
I received the PK adapter from Rainbow Imaging directly via Amazon purchase. 4 days from order to delivery, quite satisfactory via USPS. In fact, one day earlier than promised.The adapter itself is very well made and nicely finished and detailed. Fit and finish couldn't be any better. The Pentax 50mm f2 fit perfectly and installed on the G1 as if OEM. The longer 80-200 Sears PK wasn't as precise in fit, but I blame that on the lense itself, since the Pentax fit so well.Just switching to the "No Lense" setting in-camera and turning to Aperture or Manual and I was operational in seconds. With the all manual lens, the Aperture mode works very much like Program mode normally would. Scroll the EV for exposure and manually focus. A much easier method than I had expected. I was pleasantly surprised to find that many of the dial modes also are funtional with the necessary exposure adjustment and manual focus. Using the Extended Zoom increases the focal length from 100mm to 150mm to 200mm and retains the f2 aperture throughout. Lots of possibilities there, thanks to the Panasonic feature set.The potential of the lense combinations is rather irrelevant to the review of the adapter, but if not for the quality and price of the adapter I couldn't use the lenses.I wouldn't hesitate to purchase another from Rainbow Imaging for a different mount or just convenience. I did some research prior to purchase and found the Rainbow Imaging adapters are far more popular than the Amazon site suggests.(Though listed, no rear lens cap was included, nor any "Fotasy" logo). Otherwise it appears identical to the current photo.
Trustpilot
2 months ago
4 days ago