


Desertcart purchases this item on your behalf and handles shipping, customs, and support to Cyprus.
โ๏ธ Upgrade your staircase game with Zipbolt โ where innovation meets effortless style!
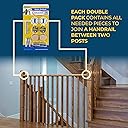
The Zipbolt Slipfix Railbolt 2-pack is a professional-grade stair handrail connector featuring a patented universal technology gear-driven mechanism. Designed for quick, tool-friendly installation without nuts or washers, it includes all necessary components for a durable, hidden fastening solution. Made from high-quality steel and alloy, it ensures a stable, long-lasting connection between handrails and newel posts, perfect for modern residential and commercial staircases.





| ASIN | B00NC9HYKU |
| Best Sellers Rank | #34,526 in Tools & Home Improvement ( See Top 100 in Tools & Home Improvement ) #29 in Staircase Handrails |
| Brand | Zipbolt |
| Compatible Groove Diameter | 0.5 inches |
| Customer Reviews | 4.4 out of 5 stars 790 Reviews |
| Fastener Type | Bolt |
| Global Trade Identification Number | 00702706420440 |
| Head Style | Hex |
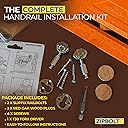
| Included Components | 1" Wooden Plugs (2) (2), Hex drill bit, Slipfix Rail Bolts (2) |
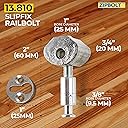
| Item Diameter | 13.8 millimeters |
| Item Dimensions | 5 x 3 x 1 inches |
| Item Highlight | Handrail between newels connector kit, Hidden rail fastener, Wood staircase railing hardware, Gear-driven tightening system |
| Item Shape | Drop |
| Item Type Name | Slipfix Rail Bolt 13.810 |
| Item Weight | 4.8 ounces |
| Item dimensions L x W x H | 5 x 3 x 1 inches |
| Manufacturer | Zipbolt |
| Material | Steel, Zinc, Alloy, Wood |
| Material Type | Steel, Zinc, Alloy, Wood |
| Model | 13.81 |
| Number Of Items | 2 |
| Number of Packs | 1 |
| Number of Pieces | 2 |
| Outside Diameter | 13.81 inches |
| Part Number | 13.81 |
| Screw Head Style | Hex |
| Set Name | Slipfix Rail Bolt 13.810 2-Pack |
| Size | 1 Pack |
| Size Name | 1 Pack |
| Thread Size | 13.81 |
| UPC | 702706420440 |
| Unit Count | 1 Count |
W**E
Works for slender hand rails too
Works great. Easy install. Was able to adapt for low profile railing. Tips: 1) when installing your rail, loosely tighten the starting end right away to help hold rail in place as you slant install the railing. 2) keep your first spindle from the post far enough away to allow working room to tighten the rail bolt. 3) use an excel spreadsheet to map out your spindle layout. They donโt have to be exactly the same distance apartโฆ nobody is going to notice an 1/8 of an inch if you need to burn up some gap between posts.
1**R
Tight, tight fit between 2 immovable newels
This was the only solution I could find for putting a new handrail between 2 extremely solid newels. I was worried because the demos always seems to show only 1 newel or 2 wobbly ones. It took some doing but it worked. I tightened by hand and it wouldn't wobble or spin without muscle. In fact, I accidentally popped one side off when dry fitting my iron balusters. Should consider adding a screw to the handrail into the newel for extra security. I did not but I used Epoxy to set the balusters and it is rock solid. The balusters prevent any chance for popping that rail off. Won't come off by "natural means" anyway. Make sure your drill holes are straight with this though. I don't know how those guys do it on youtube without a drill guide. I used my drill press for the 1" Forstner holes and a drill guide for the 3/8" and one of my 3/8 holes was slightly off and the thing would not work. Hope that helps! Good luck!
J**G
Don't know how we would have done it without them.
We were successful using these, but it was tricky and stressful. We were using it to attach guard rail instead of tall bread-loaf style handrails so the margins were much narrower than the described process. It did latch tightly except the one that stripped before it was fully tightened. It still got pretty tight. Thank goodness it's a star bit not a Phillips! Some details are missing from the instructions or if they are there, they are not clear. But we read it over and over and think we got it right!
D**N
Great Hidden Fastener!
These work as advertized. I recommend ordering the ZipBolt Railbolt Drill Guide which helps mark the 1" hole on bottom of the rail. It also is a life saver when drilling the 3/8" hole in the end of the rail. I opted to clamp the drill guide to the bottom of the rail so it wouldn't move when drilling. I found that there is a little bit of wiggle room if all the drilled holes and the parts aren't perfectly square. When installing the gear in the 1" hole, hold it in place with the hex bit against the the side of the hole where the bolt comes in, then slide the bolt into the 3/8" hole and screw the bolt counter clockwise into the gear so it sticks out of the end about a 1/4". Then slide the gear so the bolt is flush with the end of the rail. Then put all of the balusters in the holes in the rail, stand it up in place, line up and extend both bolts into the key hole plate in the post and push everything down. Tighten the bolts with the hex bolt bit turning clockwise. I have big strong hands so I tightened all the connections by hand. I am an experienced carpenter and it still took a fair amount of time, but the finished product was worth it.
R**P
Perfect installation
This made my installation so much easier that it would have been otherwise. I was installing a handrail between two immovable objects. So, there was zero wiggle room to work with. This product allowed me to install the handrail with minimum fuss and the result is rock solid. I strongly recommend doing a dry run first (3rd photo) so you can get the feel of things before the actual installation and get familiar with how everything works together. Based on some videos I watched, I took my handrail and cut off two small wafers of handrail and a third chunk of handrail that was about 3 inches long. One wafer was a template for marking the location of the center of the 1 inch forstner bit on your newel (middle photo right wafer). One wafer was a template for marking the location of the 3/8 inch hole one the end of your hand rail (middle photo left wafer) And I used the drill press on the 3 inch chunk to make a perfectly plumb 3/8 inch hole to guide my hand drill when I was making the 3/8 inch hole in the ends of the hand rail (left photo, top of middle photo). The key for me was making the templates and practicing (3rd photo) before doing it for real.
A**R
Perfect!
The rail fastening hardware worked just fine.
M**N
Works
If u take ur time. Figure out how it works to tighten begore installing. Must turn with screw gun alot to tighten.
K**L
Donโt know how I wouldโve finished my railing without these
I had never used these or anything like them before, but was able to make a very nice stair railing with them. I honestly donโt know what I wouldโve done without these. They are fairly easy to use and make for a very sturdy railing. I would definitely use these again if I ever needed to do another railing.
S**N
Perfect Solution!
Quick, simple and easy to use. Be careful not to over tighten the catchbolt though, easily done! I know from previous experience!
O**H
Time,cost and simplicity
Great and works well. Easy to follow instructions and makes install a breeze
K**R
Does not appear to be up to the job.
The idea seems sound enough, but the product was not up to the job. It all seemed very straight forward, however, when it came to tightening the screw thread up to ensure a snugg tight fit, it didn't. Therefore, having waited for the product to do the best job I thought I could, I'm afraid it was back to good old screws. Disappointing.
M**D
Great product
Great product
K**.
Happy with product
Clear instructions and easy to install with common tools available at the hardware store if you don't have them already. Rail looks great and is solid. Also used Zip Bolt product to anchor newel post to floor, same experience with that too.
Trustpilot
3 weeks ago
1 week ago