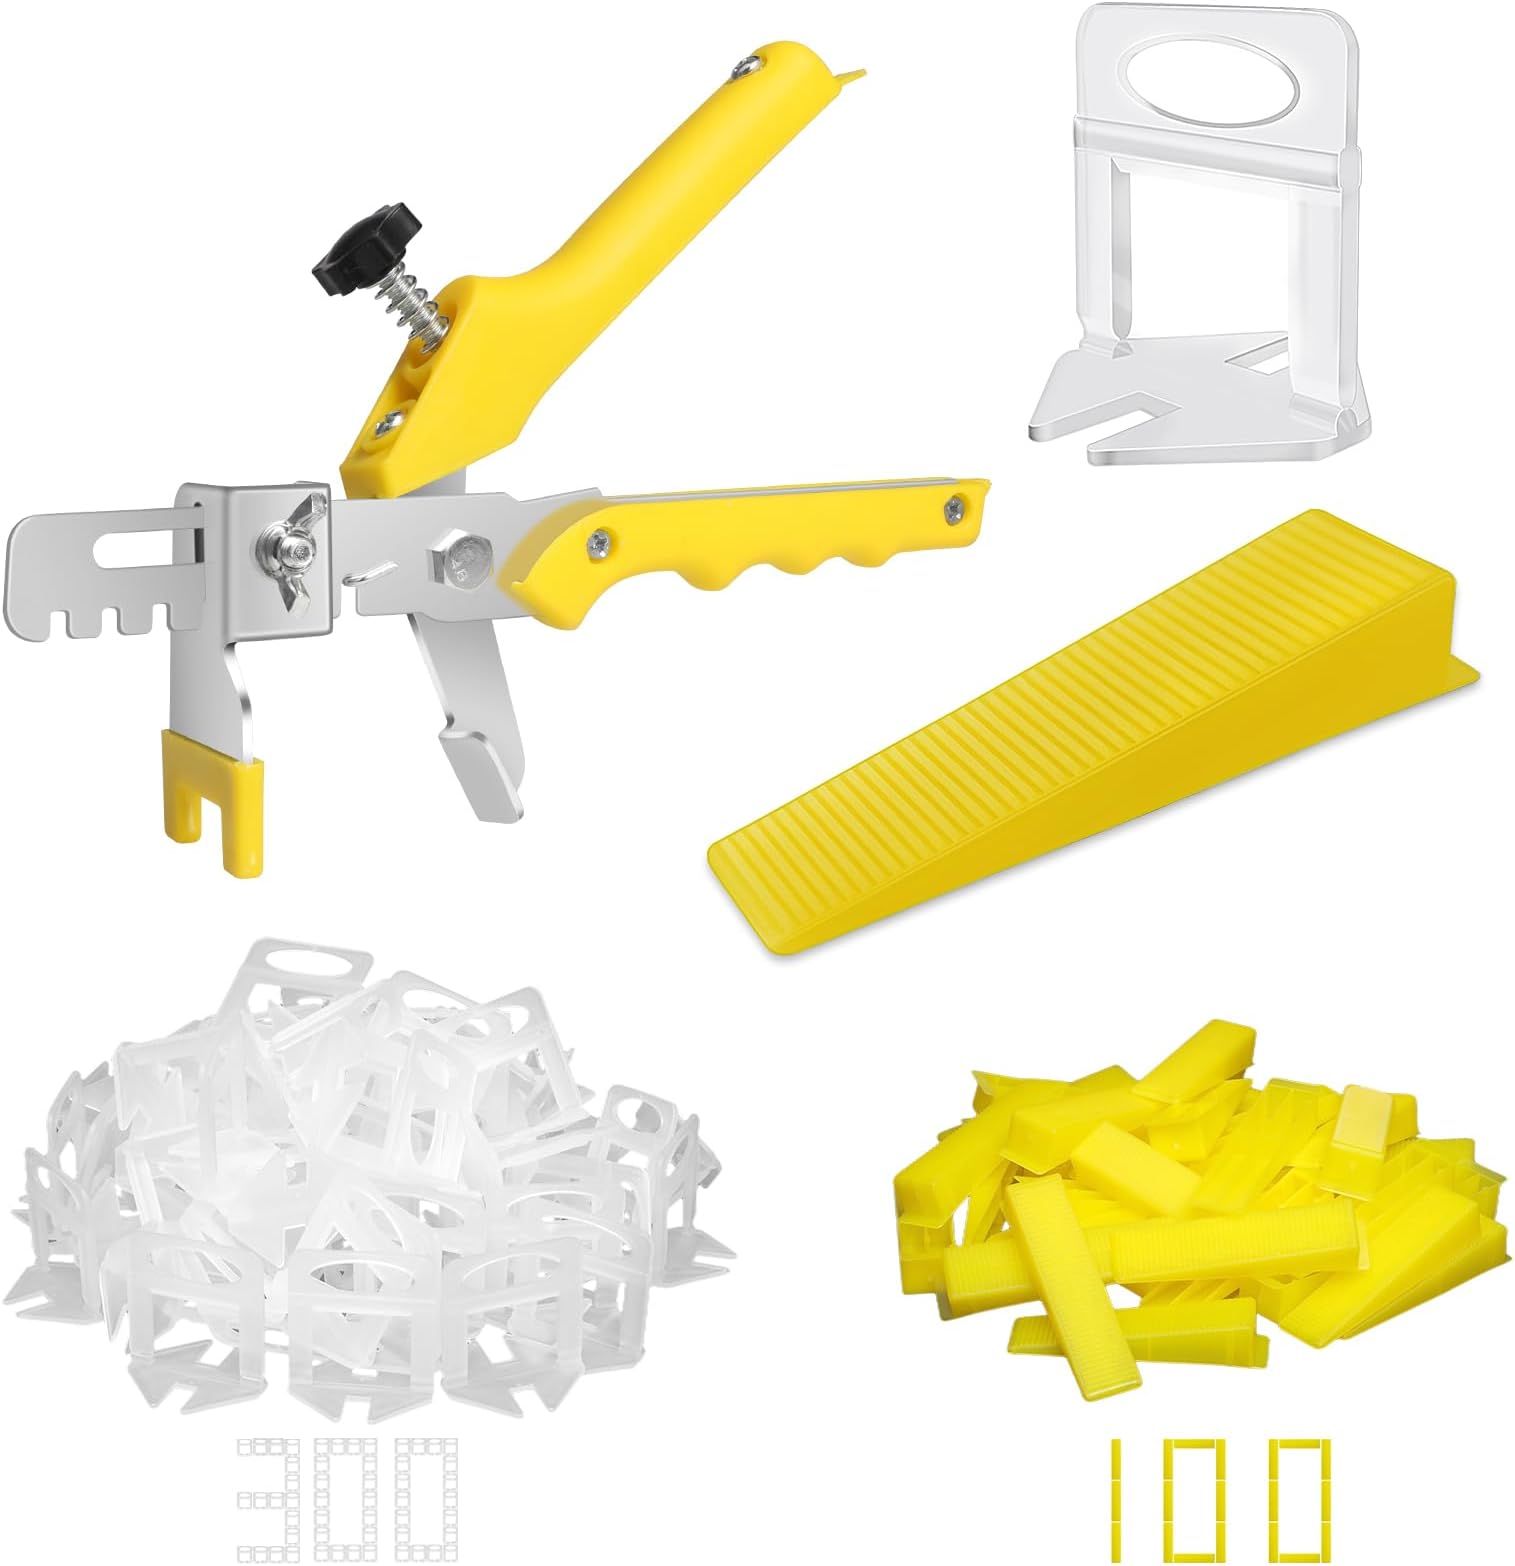

Buy anything from 5,000+ international stores. One checkout price. No surprise fees. Join 2M+ shoppers on Desertcart.
Desertcart purchases this item on your behalf and handles shipping, customs, and support to Cyprus.
🛠️ Level up your tile game — flawless floors, zero fuss!
The DGSL Tile Leveling System is a comprehensive 400-piece kit featuring 300 precision plastic spacers and 100 reusable wedges designed for 1/8" tile gaps. It includes an ergonomic iron-handled tile plier that accelerates installation and ensures perfectly flat, lippage-free tile surfaces on floors and walls. Compatible with tile thicknesses from 3mm to 12mm, this system is trusted by professionals and DIYers alike for its efficiency, durability, and cost-effectiveness.


| ASIN | B07XYS9JLW |
| Best Sellers Rank | #4,116 in Tools & Home Improvement ( See Top 100 in Tools & Home Improvement ) #1 in Floor Leveling Compounds |
| Brand Name | DGSL |
| Color | Yellow |
| Customer Reviews | 4.4 4.4 out of 5 stars (5,273) |
| Grip Type | Ergonomic |
| Handle Material | Iron |
| Included Components | No Components |
| Manufacturer | DGSL |
| Manufacturer Part Number | TLS01 |
| Material Type | Plastic |
| Model Number | TSL002 |
| Set Name | Tile Leveling System with Tile Spacers Clips and Reusable Wedges |
| Specific Uses For Product | Gripping |
| UPC | 649758675414 |
| Unit Count | 1.0 Count |
C**K
Great system at a great price, with a caveat or two (Updated)
First the good. This system is the equivalent of the QEP and other high cost, name brand tile leveling systems. It is easy to use, works well, and best of all, about 1/4 the price of the HD and LOWES ones. The bad. Yes... sometimes the spacers do not break off cleanly. However, the one star reviews are as much user error as a fault with the leveling system. (See more on that below) I used this to put some 4x12" subway tiles on a shower surround, and against manufacturers recommendation, I did a 50% overlap. The reason the tile manufacturer recommends against a 50% overlap is to avoid lippage. (Where the edge of one tile is not even with the adjacent tiles.) The larger the tile, the bigger a problem it becomes. It worked extremely well. I compared the results against a 3x6 subway tile job I did a few years ago, and I saw less unevenness across the board. I was rather impressed. Now, I did have a few spaces that did not break off evenly on the first wall I did. It was frustrating, and I needed to diagnose the issue before I did the remaining walls. Here is what I found out. 1. When breaking off the spacers/wedges you have to hit hard and quick. Swing as if you were kicking (or hammering) something about three inches on the other side of the spacer. A wimpy hit will guarantee a bad break. 2. Do not allow mortar to harden around the spacers. After I got the best method to hit the spacers down, the only time, and I mean the ONLY time I did not get a clean break was where the spacer was embedded in hardened mortar. 3. Adjust the pliers before using. There is a limit set screw to ensure you do not over tighten (and potentially snap off the spacer while snugging it in place.) It is easy to do a few tests before you start setting tile. The spacers and wedges work just fine on loose tiles for this purpose. Lay the tile out, spacers between them and try to set a wedge. If it does not set securely, back off the set screw, if you can squeeze the wedge to the point the spacer deforms, screw the set screws in a bit more. Final caveat. The spacers will sometimes be unusable. I found one or two spacers per 100 to have their feet bent. If you insist on using that, expect your tile to not line up. The wedges are not enough to overcome a seriously bent spacer foot. Recommendation: Buy more than you think you need. This is cheap insurance. I purchased this kit, a bag of 300 spacers plus 100 additional wedges, and another 500 spacers (because it was only slightly costlier than the 300 bag). And, I am glad I did. With the extra spacers and wedges, I am sure I will be able to finish the shower and floor without needing to order more. UPDATE! After using the leveling system to install the floor tiles, I discovered a rather frustrating item. Not enough to adjust the star rating, but it is an ongoing problem. What, exactly is the problem? The levelers are clear/translucent plastic. Because you have to hit them hard and quick, they fly everywhere. And, because of their color (or lack of color) they are impossible to find. Seriously, manufacturer, put a color into it. Any bright color, except yellow, would do. It has been about two months since I tiled, and I am still finding these things. They are showing up everywhere, but you cannot see them until the vacuum sucks them up, you step on them, or whatever. Color! Color people. Make it easier to clean up, and you get a win!
L**I
So easy to use, and results are fantastic!
These are amazing!! I'm 5' tall and usually struggle with installing shower tiles, especially vertically towards the top. (I'm a home owner and tile hobbyist) By using these clips I didn't have to continually check level, squareness, or whether the tiles were flush with the wall. Just snap them in place and you're on your way! Removal was super easy as well. All but maybe 4 of them didn't snap off because I put them too close to the corners and couldn't use the hammer to break them, but all I needed to do was use a small wrench and twist them and they broke off easily. I can't wait to use them on my next floor project!! I'll never tile without them. (I didn't use the pliers that it came with. They slide and snap in place easily enough :) Removing them was easy too, and the slide-ins are reusable. Mahalo!
M**3
Great product!
This set works great for lying stone tile in our kitchen! Levels great. The only reason I didn’t give a five star rating is because the little pieces that hold the levelers do not break off as advertised. We have asked several other people who use these and this is the same problem they’ve incurred.
R**H
Works good but pliers broke
Works good pliers broke
C**A
Good idea
My first time using tile levers, it certainly does solves the problem of keeping the tiles aligned and is easy to use, but removing the wedges after the thinset has cured by hitting the them with a mallet is a bit of hit and miss, sometimes one side of the spacer refuses to break off but using a pair of pliers to twist them free solves that.
M**Y
Better improvement
Not a bad product for the price but wedges are too frigle
C**W
Great system
Works great and so easy perfect tile work just got easier
B**A
A must have for floor tile
These make laying tile so much easier. It came with enough to do my bathroom, laundry room, and still have some left over. The wedges are reusable, but the spacers are one time use.
R**E
Description was accurate, delivery is remarkable. Highly recommended seller!
C**R
Made tiling my bath so much easier.. Clips seems sturdy enough. Only issue I had is that a few of the clips were slightly bigger than suggested and didn't notice until I started to grout. Will purchase again
A**R
Easy to use. Very convenient.
D**C
Fonctionne comme prévu. Aucun soucis. Ajuster la pince adéquatement et tout le travail a été bien fait!! Essayer de ne pas faire de bavure au niveau des croissillons en plastique! Plus facile à casser ainsi! Le nivelage dépend de la dextérité de l'opérateur. Ne pas serrer trop fort l'un ou l'autre, serrer au même niveau, en même temps et progressivement pour une même section. C'était ma première fois que je posais de la céramique!
A**A
Considering the alternative is ~$80 here in Canada at the homedepot, I highly recommend these for novice use. I’m not a professional and this was my first tile job, where I tiled my entire shower from floor to ceiling using this system. The tool works well and is sturdy. The yellow wedges are good too. The spacers themselves seem to be a crapshoot in terms of their strength. They are either normal strength (what they should be) and break-off easily, or they are sometimes stronger than they should be and more difficult to break-off. My suggestion is: 1. Most definitely use a rubber mallet when breaking these off, I don’t want to get too technical but believe me it will save you a lot of headache from having the clips break at the tip and having to chisel the rest of it out and potentially chipping the tile/stone. 2. Try your best not to get any thin-set on or between the clips when placing your tile and if you do, spend the extra 20 seconds to clean it off completely. If the thin-set dries around the clips, it is a nightmare to break-off the clips (i.e., they will break at the tip) 3. If you are finishing a row of tile and coming back later to continue the row above it, and placing the spacers in advance (which you should be doing), MAKE SURE (and I emphasize!!!) that the buttom of the clips is touching the back of the placed tile and not all the way against the wall. The reason for this is two-fold. One because if you push the spacers against the wall and they dry that way, it will not allow the spacer to push against the tile to level your next row to the now dried row and it will not do what it’s supposed to. Lastly, it will be very difficult to get the yellow wedges underneath the clip as you have not left enough space between the surface of the tile and the clip for the wedges to slide in. Hope me learning from my mistakes make your installation easier some. Good luck.
Trustpilot
1 month ago
4 days ago