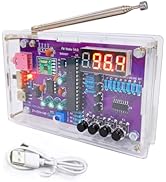
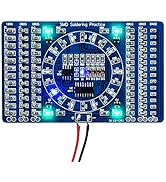
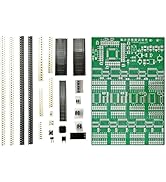

Buy anything from 5,000+ international stores. One checkout price. No surprise fees. Join 2M+ shoppers on Desertcart.
Desertcart purchases this item on your behalf and handles shipping, customs, and support to Cyprus.
🔥 Master micro-soldering with every spark – your gateway to pro-level skills!
The Gikfun DIY SMD SMT Welding Practice Board Ek7028 is a compact, high-quality training tool designed for beginners to develop precise surface-mount soldering skills. Featuring a built-in ruler for accurate measurements and a visually rewarding water lamp circuit that lights up when powered (3-12V), it offers hands-on experience with clearly marked components on a durable PCB. Ideal for professionals and hobbyists aiming to sharpen their electronics assembly expertise.


| ASIN | B00VWB8F8K |
| Additional Features | Manual |
| Aspect Ratio | 16:9 |
| Best Sellers Rank | #16,606 in Industrial & Scientific ( See Top 100 in Industrial & Scientific ) #27 in Prototyping Boards & Accessories |
| Brand | Gikfun |
| Built-In Media | Electronic Components |
| CPU Model Number | LYSB00VWB8F8K |
| Color | Blue |
| Compatible Devices | Computer, Smartphone, Projector [with LAN and keyboard compatibility] |
| Connectivity Technology | LAN |
| Cooling Method | Water |
| Customer Reviews | 4.2 4.2 out of 5 stars (788) |
| Display Resolution Maximum | 3840x2160 |
| Display Type | LED |
| Graphics Card Interface | PCI Express |
| Graphics Description | Dedicated |
| Graphics Ram Type | Unknown |
| Hard Disk Description | 1TB HDD |
| Hard Disk Interface | Serial ATA |
| Hardware Interface | USB Docking Station |
| Human-Interface Input | Keyboard |
| Item Dimensions | 5 x 3.2 x 0.1 inches |
| Item Weight | 0.02 Pounds |
| Keyboard Description | QWERTY |
| Keyboard Layout | QWERTY |
| Manufacturer | Esooho |
| Memory Slots Available | 1 |
| Memory Storage Capacity | 1 TB |
| Model Name | Ek7028 |
| Model Number | LYSB00VWB8F8K-ELECTRNCS |
| Model Year | 2022 |
| Native Resolution | 3840 x 2160 |
| Power Plug Type | Type A - 2 pin (North American) |
| Processor Brand | Intel or AMD |
| Processor Count | 4 |
| RAM Memory Technology | DDR4 |
| RAM Type | DDR4 SDRAM |
| Resolution | 3840 x 2160 |
| Specific Uses For Product | Education |
| Style Name | DIY |
| Total Usb Ports | 1 |
| UPC | 634894431406 |
| Video Output | HDMI |
| Video Output Interface | HDMI |
| Video Processor | Intel |
B**C
Great Starter Board for SMD Practice
This little board is laid out in a way that makes surface‑mount practice feel approachable, even if you’re just getting comfortable with smaller components. The instructions are easy to follow, the pads take solder well, and the mix of part sizes gives you a nice progression as you work through it. It’s a quick, low‑stress project that helps build confidence with SMD techniques and offers a satisfying result when finished. A solid choice for sharpening fine‑detail soldering skills
Z**R
Instructions are a bit confusing, but I'm glad I bought this
The education value that you can get from this product for soldering and electronics is amazing, especially for such a cheap price. It really helped me understand how to micro-solder and how to get used to using a rework station. I got the whole thing to work perfectly and I'm very pleased with this product. My biggest criticism is that the instructions are a bit unclear and not really geared for beginners. Somebody who is buying this product is likely not just practicing how to solder these micro components, but also learning how to identify each one. I eventually figured everything out with very careful reading, but I do wish the included instructions clarified a lot of those things for beginners.
R**K
READ THIS FIRST!
I would have rated 5 stars but there are a few things the seller did a poor job of explaining. 1. The first thing they didn't spell out very well is the fact that the 6 vertical columns of components (1206, 0805, 0805, 0603, 0603, 0402) on the left and right side of the board ARE FOR PRACTICE ONLY AND ARE NOT ACTUALLY FUNCTIONAL. If you screw them up or skip them entirely the device will still function so long as you get the rest of the components correct. 2. The second thing is that the user manual is inadequate by itself for identifying the components in the kit much less figuring out where they go. The manufacturer's website says they uploaded the user guide to the Amazon listing but that's misleading. THE NECESSARY KEY TO MAKING SENSE OF THE ENTIRE KIT IS THE 4TH IMAGE AT THE TOP OF THE AMAZON LISTING! (I also included it here in my review) All in all it's a good little practice kit for SMD soldering but probably not for beginners. If you read it carefully, the two page manual is easy enough to understand for having been written by someone who didn't speak English. One thing I particularly liked is that they start you out soldering the 6 columns of non-functional components first. And they start with the larger components first and move gradually to the tiny stuff. Then, only after you've had all that practice will they direct you to completing the functional parts. For under $9 it's a pretty good deal - as long as you recognize you will need the image from the Amazon listing.
M**I
Brilliant
I've been soldering through hole parts for many years, thinking that SMD was best left to factories with specialized equipment. Working through this kit made me realize that soldering SMD by hand is not only feasible, but actually faster and easier than through hole in my newly-formed opinion. Completing this project was fun and meditative and now I have confidence in this skill and am eager to apply it to a project. The kit has a smart design. Your first 78 parts have no real penalty for mistakes because they are not part of the final "light show" circuit. Yet there are still some basic test points for these areas so you can check your connections with a multimeter. You start with 1206 size components (0.12 x 0.06 inches), then move to 0805, then 0603 and finally 0402. As you would expect, it gets progressively more challenging. After all of that practice, comes the LED blinking circuit. These are all 0805 components which should feel pretty manageable after finishing 0402. A schematic is provided but I never needed it - the board is already marked with what goes where, including the polarity of the LEDs and diodes. I did use the parts table to determine which part values to use. It's also useful to know how to read a SMD resistor code (e.g. 473 = 47,000 ohms). I experimented with a number of different techniques and tools and suggest you do the same, below is a small account of my experiences: Soldering Iron vs Paste + Heat Gun. Between these, I preferred a soldering iron with a small chisel tip. For the paste I was putting it on with a syringe and trying to fix it up with a toothpick - it looked a bit sloppy. For the larger components, it all worked reliably and components "magically" flowed into place. At 0603, about a third of the parts didn't settle correctly and needed corrections with the tweezers and heat gun. At 0402, about half of the parts needed corrections. I think that a solder mask and reflow oven would be quite a different (better) experience here but I don't have either of those. For the soldering iron, I prepped the area with rosin fluid (Kester 951) and held the component in place with some high-quality tweezers. I put a very small amount of solder on the tip and touched the pad, then the corner of the component for less than a second each. I never needed to use the solder wire directly on the board, which is great because I was already using both hands. After doing one side, I put down the tweezers, rotated the board and did the other side in the same way (touch the pad, touch the component side, done). I then went back to the first side and touched it with the soldering iron for another second or so for a finishing step. It takes longer to type this than to actually do it. You can also batch the work by doing one side of a bunch of components, then doing the other side in a followup pass. USB microscope vs headband magnifier (Donegan DA-4). They both worked but I preferred the headband magnifier for several reasons. In short, the headband magnifier was more comfortable to use, the "real" 3D image was nicer than the 2D LCD image and it was nice to easily see where my tools were as I worked. I found the 2x magnification on the magnifier was plenty enough for every case except the 0402, where a little more would be nicer. Silicone work pad. I recommend using one because these pads are heat resistant, and make it easy to see the tiny SMD parts. I placed the board right on the work pad while soldering. This allowed me to use the table to support my hands and keep them more steady during the work. Multimeter. My multimeters will light up an LED in the continuity testing mode. I used this to spot check the LEDs as I installed them, placing the negative probe on the "-" pad at the bottom center of the board and the positive probe on the resistor that is associated with the LED. The correct resistor can be discovered using the multimeter or by looking at the traces under the soldering mask.
M**L
Although I think this could be cheaper I think it gets the job done for learning new skills or brushing up on old ones. I bought this to brush up on some soldering after some time leaving university doing electronics. I thought it was a good quality board. Easy enough to do with some patience. I used 0.6mm diameter solder with a thin tip iron and a pair of helping hands. I say easy enough to do I have bought 3 of these since the first two I messed up. Put the polarity of some components the wrong way round and second one put the battery the wrong way round... Best to check to be sure to save yourself money. Instructions arent as easy to follow as they could be but all works one you finished.
M**O
È buono ma potevano essere 5 stelle ma no si capisce gli smd da montare non sono spigati i valori e come montarli
A**.
I was very positively surprised by the quality of the included PCB. It's relatively thick, feels very solid, and has very good quality solder mask applied to it. The components themselves came in the usual stripes cut from reels. For most component types, few more were provided then needed, making things easier if one of the SMD components gets lost. The kit comes with a small printed manual, written in English language, which provides basic information on how to do surface-mount soldering, and has several illustrations explaining the steps needed to solder the components, how to identify the correct orientation of the included integrated circuits and diodes, and includes the schematic of the LED Blinker located in the middle of the PCB. The back side of the PCB has several rulers, in centimeters and in 1/10ths and 1/100ths of an inch, as well as examples of several popular PCB trace widths, and popular component footprints. As for the bad sides, there are few small points: The manual seems to be translated from Chinese. In general, grammar of the translation is very good, and manual is easy to understand, however few technical terms have been incorrectly translated: The manual always refers to the procedure as welding, instead of soldering, and it refers to the transistors as triodes. The direction of the SMD LEDs is not shown on the silkscreen, so it needs to be manually determined by following the traces on the board and using the included circuit schematic. Additionally, the measurement unit of 1/1000 of an inch is misspelled as mli instead of mil on the back side of the PCB. All in all, this is a great kit, but it does require some very basic knowledge of electronics.
H**C
I solder for over 50 years by now - now way less these days, but I felt for small repairs you need to work with SMD's, and so far I guess I was lucky. As the saying goes, practice makes perfect, and I can see my solder joints improve with every new component, and I can work out what works for me in placing and holding, etc. One issue with THIS kit I received, the 402 components are missing, annoying but I am not sure if I could freehand solder them anyway - but it would have been good to try. Had the kit for a few months before I spent time with it, so I did not complain to the vendor, who knows, they may have rectified it if I had. Update: when building the rest of the kit i found the 402 components in the other sealed bag.
A**R
Te dan un montón de cositas para soldar pero no te dicen que son ni están marcadas para que las coloques donde van
Trustpilot
2 weeks ago
1 month ago