


Buy anything from 5,000+ international stores. One checkout price. No surprise fees. Join 2M+ shoppers on Desertcart.
Desertcart purchases this item on your behalf and handles shipping, customs, and support to Cyprus.
🚀 Build Your Legacy with the AT-AT!
The Fascinations Metal Earth Star Wars: AT-AT Model is a 3D laser-cut hobby model kit made from steel, featuring 45 precision-engineered pieces. Designed for ages 14 and up, it requires no glue or solder, making it an ideal project for both novice and experienced builders. With easy-to-follow instructions, this highly detailed model is perfect for display and a must-have for Star Wars enthusiasts.


| ASIN | B00GY9133O |
| Additional Features | 3D Laser Cut Model Kit |
| Age Range (Description) | Adult |
| Age Range Description | Adult |
| Art Craft Kit Type | Model Kit |
| Brand | Fascinations |
| Brand Name | Fascinations |
| Color | silver |
| Customer Reviews | 4.3 out of 5 stars 1,068 Reviews |
| Included Components | Instruction Figure |
| Item Dimensions | 8 x 1 x 6 inches |
| Item Part Number | MMS252 |
| Item Weight | 9.07 g |
| Item dimensions L x W x H | 8 x 1 x 6 inches |
| Manufacturer | Fascinations |
| Manufacturer Part Number | MMS252 |
| Material | Steel |
| Material Type | Steel |
| Model Number | MMS252 |
| Number of Pieces | 45 |
| Seasons | All Seasons |
| Size | 2.44"L x 2.28"W x 2.05"H(6.2 x 5.8 x 5.2 cm) |
| Subject Character | Star Wars |
| Theme | Star Wars |
| UPC | 032309012521 490870903035 |
| Unit Count | 1.0 Count |
B**N
Not easy, but not too difficult!
Difficulty Rating: 7/10 Tools Recommended: Clippers, Flat Nose Pliers, Needle Nose Pliers, Tweezers This was the second or third Metal Earth model I completed. I have a handful now and this is one that I appreciate the most. I say that because it wasn't exceptionally difficult to complete (as a beginner I would have rated it a 9/10, but after getting the hang of these I'd knock it down to a 7/10), and it looks the coolest! (Can you tell I'm a Star Wars fan?) As with many other models from Fascinations, this one has many parts and a lot of them are small and flimsy. You'll need to have some patience working with this one, but it won't require as much time as others. Be sure to make your folds right and flatten/twist tabs correctly or the whole model might be a bit misshapen. With a bit of work you'll get the hang of it! At the very top of this review I mention some recommended tools. You likely won't get very far without any. You'll need clippers or a sharp knife (think X-Acto) to separate the pieces from the metal sheets they come bound to. Afterwards you'll need tweezers or pliers to bend the metal tabs into place properly. Fascinations has a kit for sale that includes a few essential tools, but most people will have the ones they need around the house. This model might not be the best for your first model or children without supervision, but it's seriously cool to look at once complete!
B**T
Really Detailed and Fun
SO COOL!!! I enjoy putting these together and have done about twenty of them, I am far from an expert and my first three ended up a wad of twisted metal, rage and profanity with a one star rating. There is a special way to assemble because these are not typical models. TIPS AND TRICKS: Don’t waste your time with the special tool sets or needle nose pliers (they didn’t work for me). I recommend getting tweezers with different tips. There are many times where you will be holding a piece with one set of tweezers and twisting/bending/inserting tabs with another and many times you have to reach tabs inside a small piece you have already made. Attempting to assemble this all by hand became impossible for me. Tweezer were needed. Buy some really small, fine point wire cutters. The package says just pop out the pieces for assembly but when they are very small they do not “pop out”. They bend and just make a mess, so snip the points where they are connected and now they will easily pop out. Get yourself some nails of various sizes to help transform flat metal pieces into cylinder shapes. I use different sized nails, cables, pens and markers of all different sizes to round some parts of these models. Whatever you use just make sure you can slide the model part off one end. Trying to round using tweezers is possible but doesn’t look as professional. Don’t get mad if you break some pieces, just keep a small bottle of quick drying, clear super glue. I’ve broken many tabs and pieces. It just happens sometimes, if you fold pieces to many times it will break, read the instructions wrong and have to undo folding and bending they can break. Use small amounts of super glue and apply with a needle and you can hardly notice you used it once it has dried. Some of the instructions are a bit unclear so look at the pictures closely and even the pictures of the next few steps. The directions are not very specific and won’t tell you exactly which way a part is meant to be bent, or engraved side in or out. Putting together a 3D model from 2D parts and directions can be confusing. Green triangle means twist tab and blue circle means to bend tab down. If you get lost using their included flow chart, just know that the parts go on in numerical order. You can see from my video that these are far from perfect but being able to complete them is a satisfying feeling. The rotating display is by Facinations and is solar powered. It works well indoors and works fine with just the lights in the room but do not work well in shady areas but it does take a battery if you want. Take your time, take breaks, have fun!
A**R
... put together more than 50 metal earth models and love every one of them
I've put together more than 50 metal earth models and love every one of them. Many times you can find a set of multiple models for a much lower individual price. Some are just harder than others. A few considered "easy" on metal earths web site have been harder than ones considered "challenging" or "expert". I like the harder ones. Spending $7 to $10 on a model that I put together in less than 20 minutes sucks. Having the proper tools is a must. A pair of small wire cutters (I purchased the Hakko CHP-170 for less than $5), a small pair of pliers or two (I purchased at Hobby Lobby in the jewelry section), a set of small electronic/watch repair screwdrivers (to bend the tabs or to take apart when I mess up), and since my eyes are not what they used to be, a head magnifier or cheap reading glasses you can get at any dollar store. I search around the house for things that may help. Round pencils, small wood dowel, markers of different sizes, anything that fits the shape I need. Many of the pieces in the models are very small, and the tabs to be bent or twisted are hard to get to or manipulate. But isn't that the idea of a model? With all Metal Earth models, take your time and if something doesn't seem to fit then stop, backtrack, and look and see if you missed something or have a wrong piece in the wrong place. The instructions are easy to read, but on the more than 50 models I have put together only 2 or 3 have had an error in the instructions. I have learned that if you come to a spot in the instructions that is hard to understand then slightly twist the tabs. This allows for a much easier time taking apart. You can then bend or twist the tabs when you know it is correct. The tabs can be bent several times before they break (I can't seem to put together any of them without messing up and having to take a piece or two off to correct).
M**.
Great Kit With Impressive End Product But You Will Probably Need A Couple Extras...+TIPS!
First off this is truly an impressive end product. This is the second model I've purchased from fascinations, the first being R2D2 and I loved putting it together so much that I decided to go for the AT-AT. I honestly didn't think it was possible to put together something like this without any solder whatsoever but the level of intricacy of the pieces is so high that they are able to come together and form a really solid piece that, although delicate, will be around for a while to come with proper care. Also, the photos on amazon don't really do the metal justice. It is less plain metal looking and more chrome-like, again, very eye catching with a high quality look once they're assembled and on display. The only real downside to this project comes as a result of one of the biggest pros (not having to solder), because in order to piece it together into a solid end product, the pieces require very intricate and incredibly tiny bends and folds. This is why it loses the star, it would have been nice to have a suggested miniature plier kit or at least a heads up that regular tools might not cut it with this sort of scale. So, heads up! That aside, it may seem a little pricy for a miniature but it really is worth it when you see it all put together and how nice it looks. Hope you guys enjoy yours as much as I have! PROS: No Soldering Required, Chrome Finish Looks Upscale, Impressive and Professional Looking End Product CONS: They Really Should Recommend a Miniature Plier Kit to go Along With The Model Because it Really Does Seem Necessary To Make The Appropriate Bends and Curves. TIPS: Some pieces need to be slightly bent in a curved fashion, I've found an eyeglass repair kit very helpful in this regard. The small screwdriver handles make really great templates for the curves and are a great at adding stability while you shape the pieces. Also, if you don't want to go the miniature plier kit route, a slant tip Tweezerman type tweezer may be enough to get you through to the end! ***Did you find my review helpful? I hope so! Let me know if you have questions by using the comments section below ***
B**E
Easier than most small scale model, fun, very cool looking finished product.
I’ve built several of the Star Wars Metal earth sets and this one has been the easiest in my opinion. It is much smaller in scale compared to the Tie Fighter for example. On my review of the tie fighter I suggested watching some videos that show tips etc how to achieve the best fit and I agree with most of said videos that tools used has everything to do with the precision of the build. My tool list includes a ruler, sockets from a socket wrench set of several sizes, ultra fine point jewelers needlenose pliers (used to set gems into a setting so they won’t scratch, same is true here, you don’t want to scratch the metal) a cutting mat (used for cutting fabric but helps to roll circular parts with none or little slippage) center punches (If theyre tapered) of all sizes (helps achieve cone shapes) A large needle (that is used to sew denim or leather) the needle helps pull tabs into place gently if they don’t line up exactly. Lastly I would suggest to pay very close attention to the way these instructions are set up. They’re basically a flow chart however if one doesn’t pay close attention it’s easy to close an assembly before a part that attaches to it is put in place and clamped on. So again, pay close attention to that.
L**A
Made out of aluminum NOT stainless steel
The pieces broke on the head without us even trying... We tried to fix it by saudering and the steel wouldnt stick, but with aluminum it did. It was cheaply made and is clearly made out of aluminum and not steel. They failed to mention that you need to have wire cutters to get the parts out, until we read the instructions. Dont buy this its a complete waste of money! Buy a bigger model.
G**E
Not for Children
These are very cool and not impossible to put together. However, it was definitely too advanced for our 9year old. The main difficulty is just popping the pieces off of the sheet. They are connected by a sliver of metal that just won't separate, even with needle nose pliers. The pieces get damaged. I would try tin-snips next time. My son was very frustrated that his parents had to be involved. So, I guess it's a great project for teenagers or adults.
S**A
Tricky to build, but awesome result.
I snapped up all of the Metal Earth Star Wars models last week because it seemed like they were becoming scarce. This one was not the first model I built, but it was very tricky. I'm pretty meticulous, but I made a few mistakes which resulted in a broken AT-AT head. Luckily, I was able to finagle it back into place and no one will notice but me. I also broke some tabs off one of the leg pieces just removing it from the metal sheet. Again, I just kept going because I figured no one else would ever notice. They really ought to warn you better about "do this before that" type situations... if you seal up the body before attaching the head, there is no way to get the head attached! Sounds obvious, but it isn't clear in the instructions. TL;DR: other reviewers are right, the pieces are fragile and the instructions are unclear, but man I love seeing this AT-AT on my shelf.
7**3
Mein drittes "Werk". Hier Empfehlungen und Tipps für viel Spaß am Schaffen. Anleitung mit Nano-Geheimnissen...
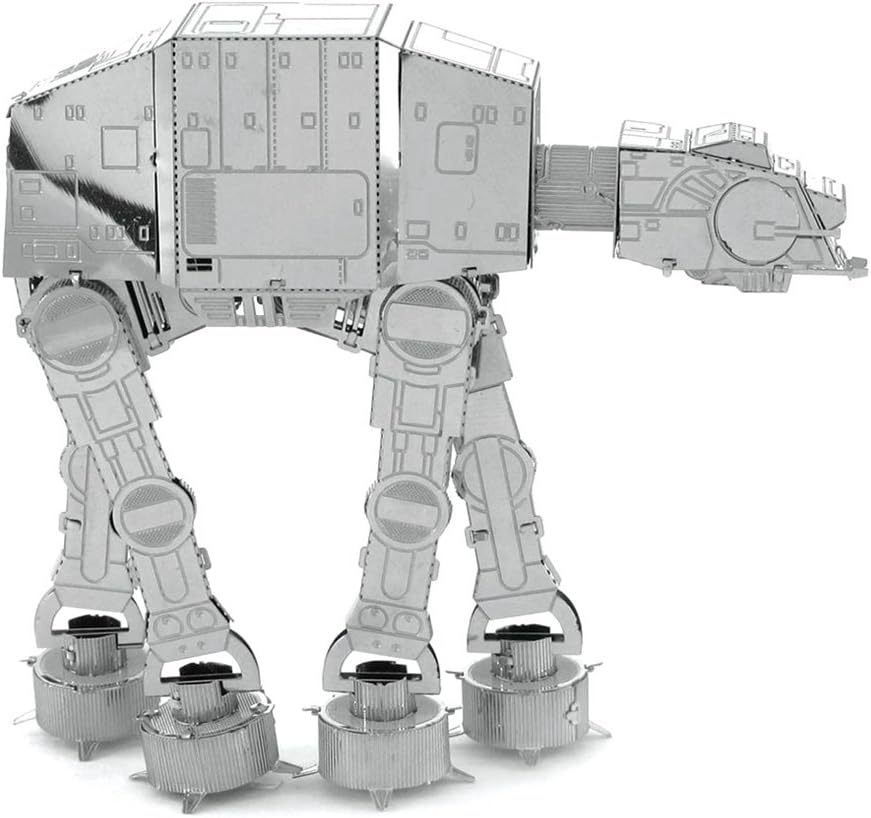
So. Nach dem Sternenzerstörer (schön flächige Teile) und dem Darth Vader Tie-Fighter (Achtung bei der Kugel) habe ich mich nun an diese ikonische Kampfmaschine gewagt. Was habe ich bisher gelernt: Große Teile kann ich schön herausbiegen, wenn idealerweise die Befestigungspunkte nur zwei an der Zahl sind und ich dann durch sanftes Hin- und Herdrehen den Erfolg erzielen kann. Bei drei Befestigungspunkten (diese kleinen Dreiecke, an denen die Teile gehalten werden) muss ich aufpassen: erst ein Dreieck lösen durch Bewegungen mit weniger Weg, dafür aber viel öfter. Resultat bei großen Teilen: manchmal etwas verbogen. Bei kleinen, dünnen Teilen besteht zudem die Gefahr, dass diese brechen. Also musste Spezial-Seitenschneider her. Damit knipse ich bis auf zwei Dreiecke alle Dreiecke ab und drehe dann die letzten beiden Dreiecke ab. Das Abkneifen führt stets zu einem kleinen, spitzen Pikser, der absteht- das ist weniger gut als die abgedrehten Dreiecke, die glatte Kanten bewahren. Aber allemal besser als ein kaputtes Bauteil. Mit einer Mini-Spitzzange verdrehe ich die Verbindungslaschen oder biege diese um. Die runden Außenkanten der Spitzzangenwangen helfen beim Formen von Rundungen (alternativ zum Bleistift). Mit einem Mini-Schlitz-Schraubendrehen korrigiere ich die Laschen, bis sie passen. Diese drei Werkzeuge sind wirklich wichtig für mich. Die Anleitung ist "etwas schwierig": im ersten Schritt wird der Kopf gebaut. Dabei wird gleich anfangs gezeigt, dass das Gehäuse des Kopfs (Teil Nr. 3) zu einem Kubus geformt wird und anschließend werden die an den Außenseiten sitzenden Aufbauten (Sehschlitz vorne, Laserkanonen an den Seiten etc.) angebracht. Ein Vorgehen, dass ich beim Tie-Fighter gelernt habe, ist hier ganz hilfreich: erst die Aufbauten anbringen an das flache Bauteil, aus dem das Gehäuse geformt wird. Also: Teil 3 flach lassen, alle Aufbauten anbringen und erst dann Teil 3 zum Kubus/ Gehäuse formen. Wenn ich das nicht mache, habe ich die Schwierigkeit, im Inneren des Gehäuses die Laschen verdrehen zu müssen- das bekommt noch nicht einmal ein professioneller Gnynä... äh, das bekommt sicher niemand so leicht hin. Resultat: wenn ich alles zurückbiege, kann es passieren, dass die Perforation beim endgültigen Biegen bricht. Folgenlose Fehlversuche gibt es kaum. Also: besser nicht stoisch an die Anleitung halten, sondern selber überlegen oder wie ich durch Schaden klug werden... Die Beine: ein Rätsel. Auf den Beinteilen mit Winkel oben dran (z.B. Teil 10) ist dick und fett ein Buchstabe eingeprägt. Der ist zum Glück beim fertigen Modell nicht mehr zu sehen (im Gegensatz zum klassischen Tie-Fighter, da sind die leider sichtbaren Nummern am Flügel aber zumindest sehr klein). Aber in der Anleitung konnte ich keinen Hinweis auf diese Buchstaben erkennen. Ach ja, nächster Tipp: die Teile erst aus dem Bogen lösen, wenn sie gebraucht werden. Einige Teile sind sehr ähnlich und der Unterschied fiel mir häufig erst auf, als ich merkte, dass etwas nicht passt (Löcher und Laschen. Wie beim Aufbauen von Ikeamöbeln: zum Ende merke ich, dass ich anfangs ein Teil falsch herum eingebaut habe und alles muss wieder zurückgebaut und nochmals von vorne zusammengesetzt werden...). Fehler werden bei diesen Modellen in der Regel bestraft, wie gesagt. Die Beine haben verschiedene Winkel und müssen an die richtige Stelle gesetzt werden. Die Beinteile müssen entsprechend mit dem einzig passenden Gegenstück zusammengesetzt werden. Das ist nicht leicht: die ähneln sich sehr. Aber die Buchstaben sollten ja helfen. Taten sie aber erst einmal nicht, da ich nicht das Gegenstück erkennen konnte. Dann aber die Erleuchtung: die Gegenstücke haben eine winzig-winzig-winzigkleine Buchstabenmarkierung auf eine umzubiegenden Lasche. Diese Nano-Markierung ist auch in der Anleitung zu suchen: der Buchstabe ist aber in der Farbe rot und in einer Schriftgröße eingedruckt, die als nur irrwitzig-winzig korrekt zu bezeichnen ist. Ich habe zum Größenvergleich mal ein Streichholz dazugelegt. Mit dieser Information klappt's aber ganz gut mit den Beinen. Begonnen wird übrigens mit dem Bein "C" (nicht "A"). Am übelsten herumgefummelt habe ich jedoch ausgerechnet am letzten Teil, von dem ich dachte: "Hey, das ist ja ein riesiges, flächiges Teil. Das geht schnell und ist nach der ganzen Konzentrationsfummelei bestimmt geradezu orgiastisch flugs und effektvoll montiert...'. Fehlanzeige. Teil 30 (das Gehäuse des Körpers) war sehr langwierig in Passform zu bringen, da die Schrägen von mir unterschätzt wurden. Insgesamt: mein bisher tollstes Modell. Ich empfehle aber, mit einem anderen Modell (Sternzerstörer) erst einmal zu starten und zu üben. Dicke Empfehlung, weil es viel Spaß macht und richtig klasse aussieht.
N**E
Cool looking.
Boys enjoyed putting it together... lots of small parts better for older kids & adults.
E**S
Excelente Producto
El producto es como la reseña en la página, y me dejó muy satisfecho. Tiene una calidad excelente y lo recomiendo ampliamente.
J**A
MUY SATISFECHO AUNQUE MUY PEQUEÑO
Más pequeño de lo que imaginaba para lo que cuesta, leí muchas críticas y me convencio para pedirlo y al ver el tamaño me desilusione un poco ya que es pequeño, pero la calidad del producto y la satisfacción que levante en la persona que lo recibió, hizo que mereciera la pena el esfuerzo.
R**M
Pourquoi pas !!
Il faut être patient, c'est très fragile. J'ai mis 2 heures pour le monter avec précaution. Sinon le rendu est parfait !!
Trustpilot
3 days ago
5 days ago