We remain fully operational. Our teams are working around the clock to ensure your deliveries continue safely.

DOWNLOAD THE APP


Customer Services
Copyright © 2025 Desertcart Holdings Limited
DOWNLOAD THE APP


Buy anything from 5,000+ international stores. One checkout price. No surprise fees. Join 2M+ shoppers on Desertcart.
Desertcart purchases this item on your behalf and handles shipping, customs, and support to Cyprus.
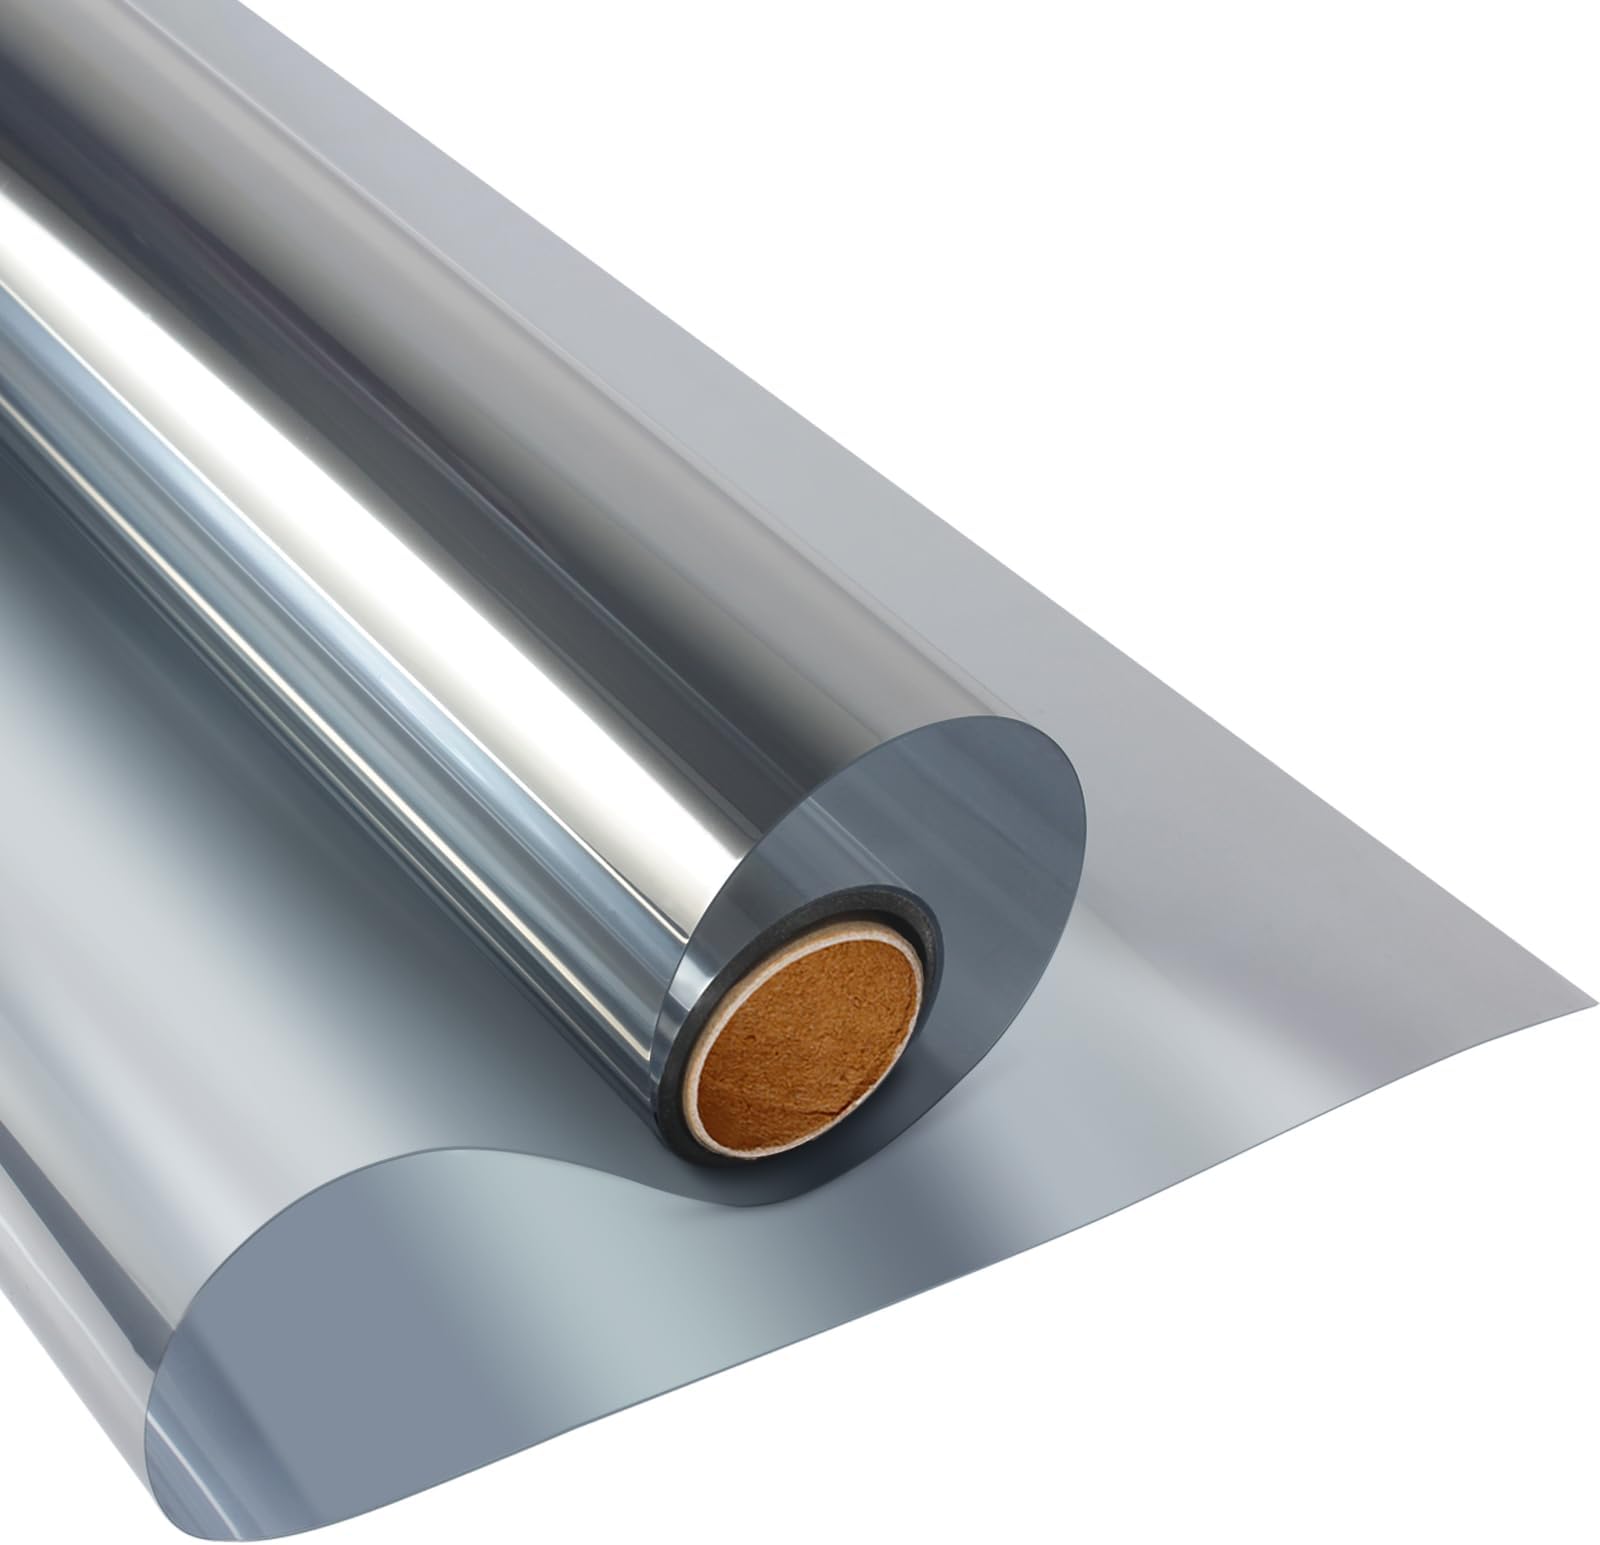
🪟 Reflect your style, block the rest — privacy and comfort in one sleek film!
KESPEN One Way Reflective Window Film offers daytime privacy with a mirror finish that blocks 80% of UV rays and 79% of infrared heat. Its static cling, glue-free design ensures easy installation and residue-free removal. Ideal for home and office windows, it reduces glare, protects interiors from fading, and helps lower energy costs by improving heat control.


| ASIN | B07F32LX45 |
| Best Sellers Rank | #937 in Home & Kitchen ( See Top 100 in Home & Kitchen ) #5 in Window Films |
| Brand | KESPEN WINDOW FILMS |
| Brand Name | KESPEN WINDOW FILMS |
| Color | Silver |
| Customer Reviews | 4.1 out of 5 stars 29,303 Reviews |
| Installation Type | Peel and Stick, Static Cling |
| Item Dimensions L x W | 78"L x 35.4"W |
| Manufacturer | KESPEN |
| Material | Glass, metal |
| Material Type | Glass, metal |
| Product Dimensions | 78"L x 35.4"W |
| Size | 35.4 Inch X 6.5 Feet |
| UPC | 682141268329 |
| Ultraviolet Light Protection | Block 80% UV Rays |
| Unit Count | 1 Count |
B**M
Could be more in a roll.
I love this film. I've ordered this 3 different times now. The first one was for the windows to my office. I pump so I needed privacy but wasn't going to buy blinds so I got this instead. In my opinion it worked better than the tint film because this is actually harder to see through. It also worked great for the little door pane windows on the front door. Easy to install just clean the surface first so it'll stick correctly. It comes with the squeegee for the bubbles thay might pop out and a gripper for the protective film to come off. Very good value for the money. Just get a couple of rolls if its for a big project.
D**D
Work very well for not being a professional install
These were not that hard to install, if you follow instructions and take your time they can look very good. My pictures show during daytime you cannot see inside, and you can see outside with minimal visual distortion. I did not take night pictures, but at night you can see inside. The only downside to these is that looking from inside to the outside at night seemed very poor. This is what I found to work best for install. If you have plenty of material left over after cutting out what you need, use some of the excess to practice with. 1. Get a good squeegee - I got this one EHDIS Small Squeegee 5 inch Rubber Window Tint Squeegee for Car, Glass, Mirror, Shower, Auto,Windows 2. Thoroughly clean your windows. Don't just wipe them down, clean them. Clean them a few times. 3. Measure the glass you want to cover, then add at least a half inch to each edge. So if your window is 20" wide, you want at least 21" of material or more. 4. Cut your material to the amount you just figured out. 5. Make a spray bottle of soapy water. Don't go crazy with the soap, just a drop or two is plenty. 6. Spray your window so that every inch is wet and the water is dripping down - you cannot get it too wet. 7. Peel the plastic protective sheet off the film. 8. Spray the cling side of the film (the same side that had the protective plastic) with your soapy water. 9. Give another couple sprays to the window, especially the top edge if your water has dripped down. 10. Place the film onto the window so that the edges overlap the window. The film will automatically cling to the window and some of the soapy water will go away. You can adjust the position of the film as necessary to get the edges overlapping. 11. Use the squeegee ONLY in a small section of the center of the window - DO NOT wipe to the edges. This will help the film stay in place while you cut it to fit. You do not want to squeegee to the edges because you still need the soapy water to help the edges stick after you get the film trimmed to size. 12. Use a sharp hobby/exacto knife to cut the film. Push the film down so that it gets as far into the corner of the glass and the frame as possible. I found it easier to start from the middle and work my way into the corners. Go VERY SLOW! A nice slow cut will help you cut straight. I also found it helpfull to cut an entire sliver off, and not just to the corner of the window. 13. Once you have it completely trimmed, use the squeegee starting from the center of the window and work your way to the outside edges. Do it multiple times, even if it looks like the soapy water is gone. 14. If you have any edges that are not sticking, gently pull the edge back far enough that you can spray more soapy water in there, then use the squeegee again.
L**A
effective! highly recommend for privacy
overall, i really like this product & would recommend it/buy it again. i got it for the privacy aspect as we live on the ground floor of an apartment building, our windows overlook the sidewalk, & people would always look into the windows to see our cats on their perch. totally understand, i love cats too, but it was weird to have people looking into our home at 8 in morning. an added bonus is that it also blocks some of the sunlight, thus reducing the temperature! (great because our bedroom gets no direct sunlight after sunrise, & that's of course where the AC unit is, so our living room gets ALLLL the sun & turns into an oven) detailed breakdown: 1) light level & appearance i got the lightest tint available (silver-black) as our apartment is quite small, & most of our light is from the sun coming in through the windows. we have legit two rooms that have windows, living room & bedroom, so our apartment can get quite dark & dreary. i didn't want to turn this place into a depression chamber by blocking out even more light. unfortunately, the tint does still reduce the amount of light received (to be expected, i'm not naive), but it's not bad at all. it essentially allows the same amount of light to enter as an overcast day would, so i can't complain. i also only put the tint on the lower portion of our windows (the part that slides up when you open the window) since it's eye-level with the sidewalk, & i left the top portion bare. this really helps retain some of the light while still providing privacy & the cooling effect. it also looks nice! from the inside at least, you can tell that it's definitely a DIY job, but it doesn't look trashy. the little mistakes also aren't noticeable from the outside. side note: i originally bought this same color but had gotten the wrong size (i neglected to measure my windows for some reason), & also not enough. i put it up anyway as practice though, & i'm not sure if they sent me the wrong color or what, but the "lack of nighttime privacy" was not entirely true. it definitely still provided the one-way mirror effect & the resulting privacy - for anyone outside. we could NOT see out of the windows at night. even when we turned off all of the lights & turned on the porch light, we could NOT see out. it was weird. once i got the new roll with the correct size & amount, the problem went away. visibility is still obstructed at night, but not nearly as bad. especially with the lights off. 2) application i meticulously read through the reviews & tried my best to take peoples advice. one guy gave a very detailed breakdown on how to apply it easier without a spray bottle, but i used a spray bottle anyway & it went fine. my only complaint is that it can be tricky to trim the tint in a straight line once it's on the window I used a sharp exacto-knife & went slowly, but the tint is a little thick & it kept catching my blade & making it jerk. to be fair, i only had a plastic protractor to guide my blade, so take what i say with a grain of salt. i wish i had one of those big ol' guillotine paper trimmers that art teachers have, it would've made this so much easier. overall though, it wasn't that bad. bit of a pain, but with some patience anyone could do it. since it's static clean, it's very forgiving if you make a mistake. just readjust & add more soapy water. it doesn't take long to put these up at all. make sure that your window is CLEAN though!! every speck of dirt, every smudge, every little hair WILL become a bubble. i scrubbed my windows with glass cleaner & a sponge, wiped them down with glass cleaner & a paper towel, then sprayed them with soapy water & squeegeed it off & i STILL had dirt trapped under the tint. once your windows will look clean & spotless, clean them two more times & maybe you'll be good. luckily, because the static cling is forgiving, you can peel it up & remove any leftover dirt easily. 4 stars because i spent like three days squeegeeing out the bubbles & still couldn't get them all, but whatever. they're not very noticeable - super hard to see them actually. the tint is almost perfect, i'm just anal. 3) resilience i've had no peeling so far & these have been up for a few weeks now. they even withstand my cats pawing at it when they see a critter outside, which is incredible. if applied properly, these things aren't moving. they are super easy to remove though, which is important for me as a renter. my original test ones also withstood the cats (i was skeptical if they would), & peeled off super easily after being up for a week without leaving any residue. just lift up a corner & it breaks the clinging effect.
R**N
BEST BANG FOR YOUR BUCK WINDOW TINT
Well, I just want to say this stuff is fantastic. It's super thick vinyl, not like the cheap crap you get for your car. It also reflects light pretty dang good. If you look at my pictures, there is one where you can see the blinds on the left. That is the only window I couldn't complete on my whole house (in pictures) with the 35.4" x 32.8' roll. However, if you look closely, it is also the only one that you can see the blinds through. That alone should tell you this crap works. I live in an area that gets to about 200*F on a cool winter afternoon, and the front of my house heats up like a smelting furnace. My power bill, is, well, astronimcal. And that is just so I can wake up in the morning without wet sweaty sheets. My kitchen, in the afternoon, is like he*l's inferno, and Satan himself would be asking to go back home if he had to stand in front of one of the windows. LUCKILY, after installing these on the first window in my kitchen, it instantly felt about 10 degrees cooler. I couldn't feel the sun beating through anymore. By the way, I have 2" thick vinyl blinds on every window, and they only help so much. Anyway, after finishing the front of the house, I came home the next afternoon and my house felt MUCH cooler, so I did the back of the house. My bedroom no longer gets sunlight in the morning to wake me up through the blinds, and I love it. I totally recommend. Now, to the good stuff. I have never used tint before, so know this: 1. Buy a window tint kit. Make sure you get one with a straight edge razor, a squeegee with the cloth wrapping, and a regular window squeegee. I purchased this one for 10 buckaroos: https://www.amazon.com/dp/B01J3QVS2K?psc=1&ref=ppx_yo2ov_dt_b_product_details 2. Buy a metal meter stick from harbor freight or walmart, because you will need it to measure your cuts as well as to use as a guide for cutting. Also, buy a medium sharpee to mark the areas as well. When I made my cuts, I set it down on a flat hard substrate that I didn't mind gouging, and I set the meter stick to the marks I made and sliced down the meter stick, using it as a guide. 3. It is better to cut your squares a little big than a little small. You can always use a ruler or a squeegee to mash the tint to the edge of the window, and run a razor down the crease. If you are cutting excess out in the window frame, which you will most likely do, I used a metal ruler to guide my razor, because it is virtually impossible to keep a straight line if you do not use a straight object as a guide to run your razor down. 4. The directions show a bottle for soapy water. Throw the directions out. I found that a big a$$ mixing bowl with a 50/50 dawn dish soap and water solution works just great after screwing around with my first two windows. I used a micro fiber cloth, wet the window generously with my dawn solution, and then stuck my tint to it. Then if the tint doesn't slide easy, as in no effort used, then take it off, and reapply a generous amount of solution. That will do the trick, as now the tint is already soapy, and now the window is now soapy. **** Did I mention you need your glass spotless? Cuz' you do. If you don't, your little cat or dog hairs or boogers will show up under the tint. Use the soapy solution you make, and scrub with a micro fiber, and then use the squeegee you buy to swipe the window clean!!! 6. Once you tint is in place, ALWAYS WET THE BACK OF IT GENEROUSLY, because this stuff will stretch and contort and malform itself. If you keep the back of it slippery, your squegee will move easily without scratching it or stretching it. 7. Do not press hard. Use light pressure, as you will scratch it or stretch it. 5. DO NOT USE A HEAT GUN YOU DO NOT NEED IT DO NOT USE A HEAT GUN YOU WILL DESTROY YOUR VINYL. ASK ME HOW I KNOW. 6. Once you have it squeegeed into place, you can start cutting the excess millimeters off to make it fit correctly. USE YOUR RULER AS A GUIDE!!!! 7. You need some small gaps in order for the soapy water and air to escape, so even a small amount of gap between the window frame and tint doesn't matter. It still blocks light just as good. 8. Once you are down, you can wipe 'er down. Come back in a few hours, and you will be able to see where all bubbles are that you missed. In my case, it was the next day, and they don't look like bubbles as much as baby swirls, which is water trapped under. I just made another batch of dawn solution, wiped down the back of tint with it, and squeegeed the rest of the bubbles out! 9. Enjoy your nice dark and cool area! That's my review of this, as I reallly appreciate how well it seems to be working. I'm excited to see how much my power bill drops, because even if it's only 10 bucks a month, this stuff pays for itself in less than a year. I'll be back to update. UPDATE: My first power bill was down $60. 2 months of that in the summer pays for all of the materials. The house has been noticeably cooler as well.
N**X
Un-usable towards the end of the roll because its wrapped on a tiny diameter cardboard roll.
FOR THE SELLER/MANUFACTURER: If you read this please consider shipping this on a larger diameter cardboard tube so that the actual product can be usable till the end of the roll. The film is great and I give it a good 4.5 stars, but the way it's rolled up so tight renders it nearly useless once you reach the last 5 feet or so of the roll and that's where the problem is. Since It's rolled so tightly on a tiny diameter cardboard tube, it's very challenging to work with at the end of the roll due to the curling. This material is much thicker than regular window tint so it's important that it is NOT tight-rolled. On regular window tint, this isn't such a big issue, but this stuff is thick and stiff so it matters. (Note: I was installing this on a rather hot day at 95F or 35C so it should have been more flexible even after laying it flat on a table outside in the sun, yet it was still very curly and refused to lay flat.) The film itself is quite good. I have no complaints there as what I was able to use performed as advertised and even exceeded my expectations on the heat reduction in my 5th wheel camper. For example, we had a few days of 95F with a heat index of 103 yet my camper stayed at a cool 74F all day in direct sun and no shade. This was unheard of before installing this stuff. Before installing this on all windows, my camper would barely maintain a 10-degree temperature differential and temps would climb to the upper 80s or low 90s on a day like this in full sun. So yes, it works very well and I'm very pleased with the actual product once it's installed. However, it's packaged and rolled tight on a tiny cardboard tube a little larger than the diameter of a quarter. This means that by the time you reach the end of the roll, it curls up so badly that working with it is a nightmare. This material is quite thick and stiff in comparison to any other window tint that I've ever installed. It measures 0.2mm thick with the protective backing which is equal to two sheets of paper. When I first started installing it I was happy at how easy it was to install and with the results. However, by the time I was reaching the end of the roll, I was cursing the person who signed off on the decision to tight roll this and ship it on a small-diameter cardboard roll. It was curling up so badly towards the end of the roll that it was very challenging to work with. I don't consider myself to be an expert installer by any means, but I've installed my share of tint and this stuff had me cussing at the end of the roll. A word of advice is to make sure you measure and cut your pieces square with precision and don't leave too much extra as trimming this stuff is not like regular tint. It is more difficult to cut as compared to regular window tint. Curved edges can be a challenge to trim and make pretty, but square windows aren't much of an issue as long as you use a straight edge while trimming. If you have silicone-sealed windows, don't try to go all of the way to the edges as it will just want to peel up. Leave a small gap of 1/16" to 1/8" to the very edge and it should work fine. Again, this stuff works great for heat reduction and privacy during daylight hours but it can be tricky to install depending on your application.
M**V
Easy to apply, use very sharp tool to cut.
Works well, but trim to size before applying. Keep in mind it will squirm while cutting dry. Very easy to apply, and really cuts down heat. Clean windows well first, and really use the soapy water. One of my rolls had a small square missing and didn't come with tools but I didn't complain as I didn't need that piece. A plastic dough cutter worked better than the supplied squeegee.
D**1
Cooler Rooms Sleek Look
Why did I wait so long? This film is FANTASTIC! Easy to use and apply. Definitely blocks out the sun but we can still see out of the windows. The rooms that this film is in is a lot cooler. Going back for more!
T**J
Good product for keeping UV rays out
Pros: * Easy to install once you get the hang of it. (Water is your friend and spraying the window AND the back of the film will help you slide the film around on the window to adjust the film’s placement. * Blocks out UV rays and reduces power usage especially during the FL summer months. With a similar product in AZ we were seeing a 30% reduction on our power bill with a two story home. We are seeing similar results with this product but still early to rule out other contributing factors. * Product was easy to cut using a utility knife and straight edge * The reflective coating makes it harder for people to see into your house during the DAY. Cons: * People walking by can still see inside the house if interior lights are on at NIGHT. We knew this when we bought the product so not really a con, but some folks may be under the impression that the reflective coating plus tint may eliminate visibility at night. * The film had defects especially towards the end of the roll. There was about 2-2.5 feet that couldn’t be used. This was present on both rolls we bought. * The supplied install tools were lacking. We installed the film on 30 windows and the supplied water bottle was good for maybe two windows. The squeegee was flimsy. We opted to use a larger spray bottle we had lying around and a padded paddle squeegee we had left over from some vinyl projects. It was easier to handle making the job quicker without marring the film.
Trustpilot
4 days ago
1 day ago